Zwift runs equally well on Apple OS X Mac machines as well as Windows, if you configure it properly.
Zwift can be a very graphically intensive experience especially when there are a lot of simultaneous riders on the screen at the same time.
This is most apparent during a "ZTR" style racing event, or one of the public events such as the "World Bicycle Relief" event in early December 2015.
On OS X there are fewer settings to tweak than their Windows counterpart but there are ways to improve and in some cases double your FPS, or "frames per second" while playing, er "riding" Zwfit.
This HOWTO will help provide some solutions that can help you get the most out of your Apple Mac OS X machine running Zwift. #ReadOn!
- Checking your current FPS
- Configuring your Zwift Settings
- Configuring your GPU settings
- Checking your Zwift Performance
- Tweaking your Zwift Environment Settings
Checking your current FPS
There are three primary graphics manufacturers supported by Zwift: Intel, AMD/Radeon and NVIDIA. If you have one of these cards in your Zwift PC or laptop, make sure you're on Zwift's supported list of platforms before you begin. Some cards are just too old or under-powered to display Zwift in any usable way.
If you have one of these older, unsupported graphics cards, you're going to need to upgrade the card itself (in the case of a PC that has a replaceable graphics card), or replace the entire machine (in the case of a laptop where the video card is integrated into the motherboard).
Before we do anything, let's check your baseline FPS. Grab any of your recent Zwift logs (found in your Zwift log directory) and drop it onto the top of the "Zwift Log Parser" web application. This should give you a very nice, graphical overview of your most-recent FPS values in-game.
There's another KB article dedicated to FPS in Zwift, which you can find here:
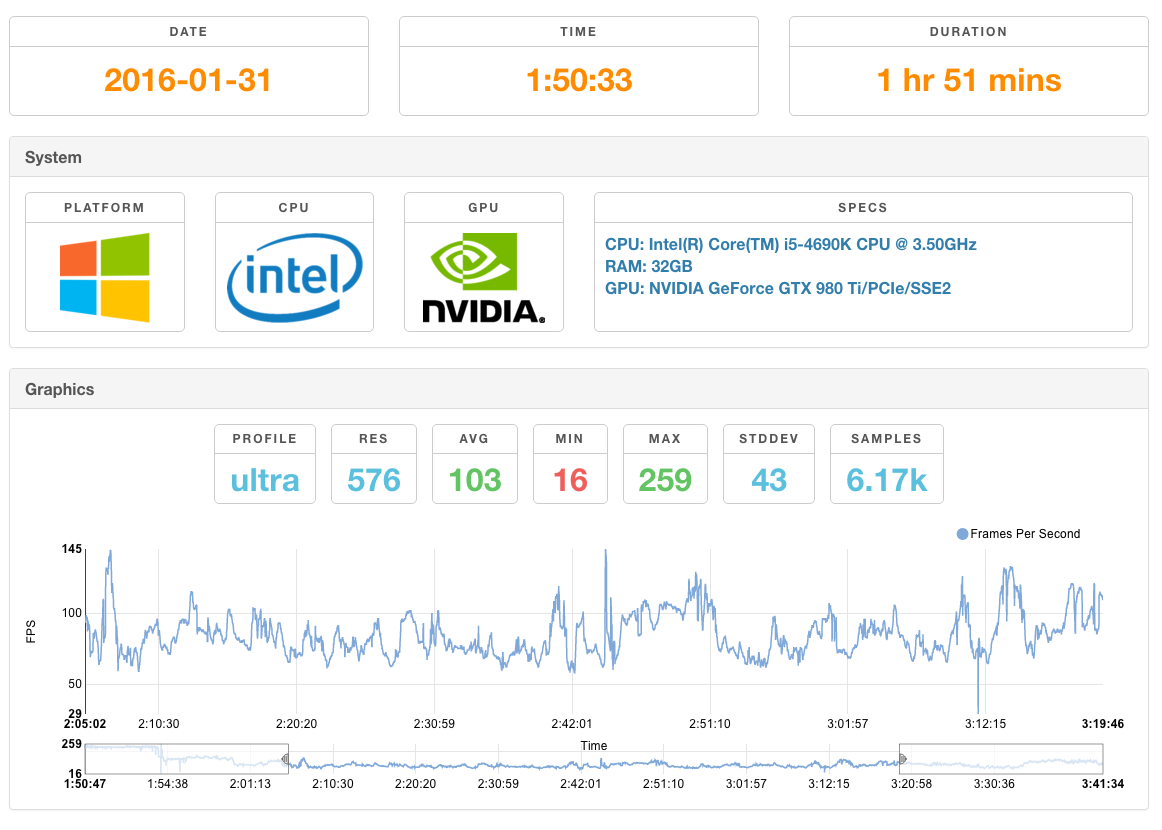
The "Zwift Log Parser" will analyze your log, extracting a number of key pieces of data and produce output that tells you what your min, max and average FPS were for that session. It is a very valuable debugging tool if you're not sure what kind of performance you're getting.
Configuring your Zwift Settings
There are some additional in-game settings you can modify that will help give you some performance gains.
Each Zwift client has a configuration profile that is used when you change your "Game Resolution" in the Settings. If you use "Low", you're using low.txt to customize your experience. If you use "Ultra", you're using ultra.txt and so on. If you're not sure where to find your Zwift data directories, the following KB article should help:
Edit the respective file that matches your game resolution, and add the following line to the end of the file, and save the file in the same location:
set gShowFPS=1
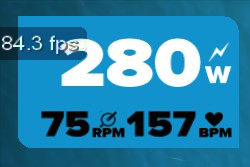
This setting will then allow Zwift to represent your current FPS in-game, at the top-left of the screen, where you normally see your own ride data (watts, cadence, heart rate). You'll see something like this:
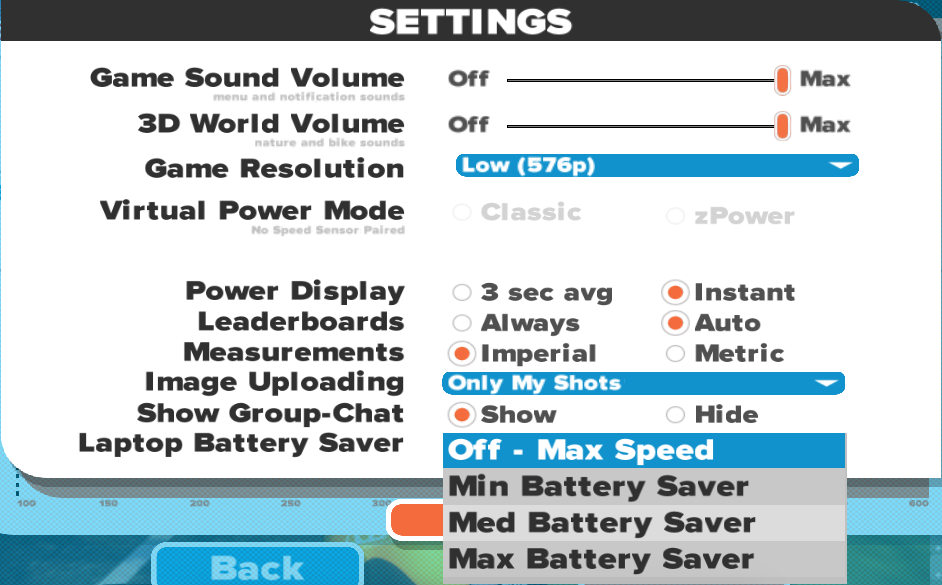
Launch Zwift and go into "Settings", so we can check your performance at this point. While you do that, you should see the new FPS showing up in the upper- left corner, as other riders ride by you while you have the Settings window open.
You may notice the latest Zwift has some "Battery Saver" settings you can use to reduce the FPS, thus saving battery for a longer ride if you're on a laptop, if you're not directly plugged into the mains (AC) power using your wall adapter.
If you are plugged into the wall, you can and should disable the Battery Saver option. If you're on a dedicated, wired PC, these settings will not help you and could negatively hurt your Zwift performance.
On my 11" 2015 MacBook Air, setting the Battery Saver option to Maximum gives me ~15FPS. Moving to Medium gives me ~20FPS, up to Minimum, I get ~25FPS and disabling it entirely gives me ~30FPS using the "Low" profile in Zwift. You'll see these changes reflected almost immediately when you change the options in the Battery Saver dropdown.
Play around with these settings first, before making any adjustments to your graphics card, so you know what your baseline FPS is to start with. Knowing what your baseline FPS is, will help you determine if any of the changes we make later are helping or hurting your performance.
Close down and exit Zwift, we won't need to keep it running while we make these next changes...
Configuring your GPU Settings
Let's go into the video card settings itself and make sure it's being set in the most optimal way for Zwift and any other games you might play on the same machine.
NVIDIA (discrete) Graphics Cards
(add detail here for BeamOff)
Intel (integrated) HD Graphics Cards
There are a few specific tweaks you need to do on your Apple machine to enhance the performance of Zwift and will improve video platback and performance in general on that platform. These changes are permanent, but can be reversed if you find that they're not working for you.
- First, go to the Apple symbol in the upper-left corner of your desktop and choose "About This Mac"
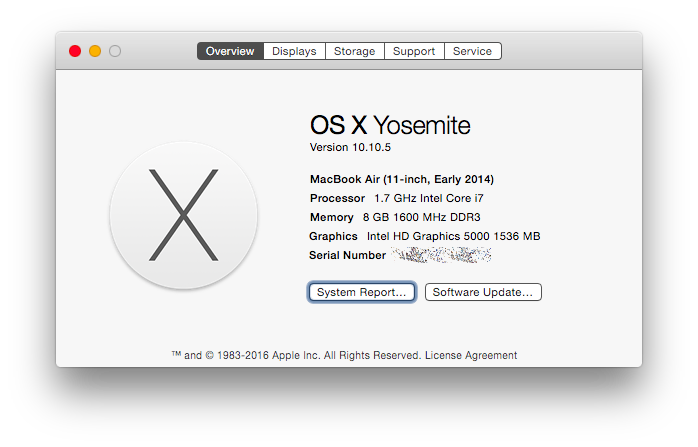
- From there, go to "System Report", which will bring up a window with a great deal of details about your Mac and its current configuration.
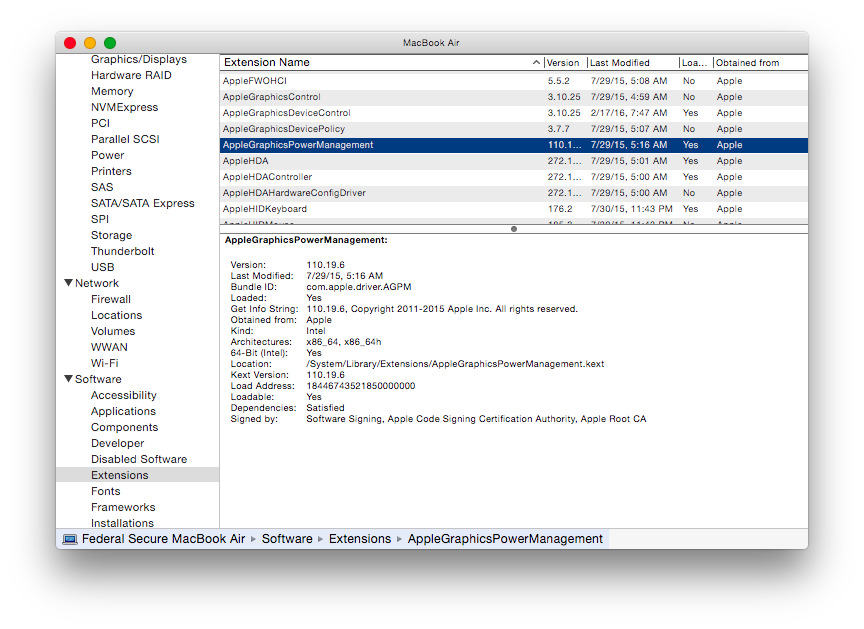
- Scroll down on on the left side until you see "Extensions", and select that. It will take your Mac a few moments to query and build the list of extensions on the right side. Give it time to build that list.
- Once the list is populated, scroll down until you see "AppleGraphicsPowerManagement.kext" in the list and select that. This is the Kernel Extension (kext) that we will be disabling on your Mac.
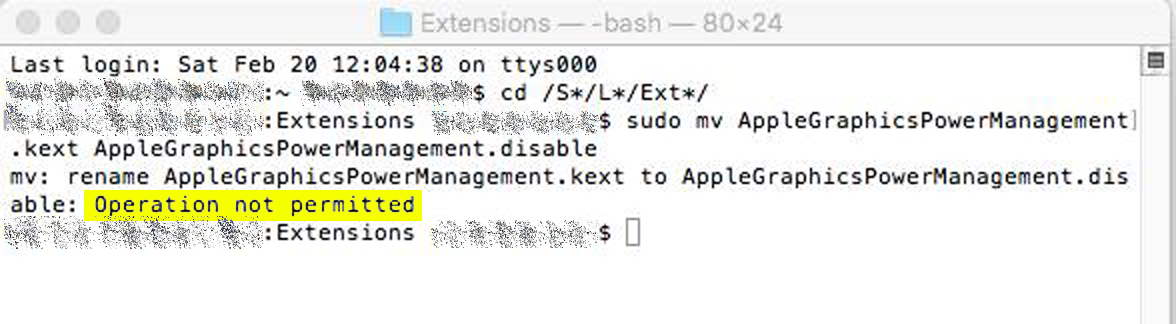
- Open Terminal (type ⌘ (Cmd) + [Spacebar], type "Terminal" into Spotlight) and then type the following into the Terminal window:
cd /S*/L*/Ext*/
sudo mv AppleGraphicsPowerManagement.kext AppleGraphicsPowerManagement.disable
OS X El Capitan Users - Temporarily Disable SIP
If you get the following "Operation not permitted" error running the above command, you're probably running OS X El Capitan or later with the new "System Integrity Protection" layer implemented by Apple.
This SIP layer was implemented to prevent malware and other malicious code from making changes to your machine. Here's how to temporarily disable that layer so you can run this command. Don't worry, we'll re-enable SIP right after we're done.
- Reboot your Mac and while it's rebooting, press and hold ⌘ (Cmd) + r to enter OS X "Recovery Mode"
- Continue to hold these keys until the Apple logo appears on the screen. After your computer finishes starting up, you should see a desktop with an OS X menu bar and an OS X Utilities window listing several options.
- Open the "Utilities" menu at the top of the screen and open "Terminal"
- While in Terminal, type the following:
csrutil disable; reboot
This will disable SIP (rootless) on your Mac and reboot to implement those changes. Once your Mac comes back up, log in as normal and then run the following commands to disable the Apple Graphics Power Management:
cd /S*/L*/Ext*/
sudo mv AppleGraphicsPowerManagement.kext AppleGraphicsPowerManagement.disable
Now reboot your Mac again and enter Recovery Mode as you did before, except this time we'll re-enable SIP, so your system remains secure and protected from any malware or malicious software by running the following command inside Terminal under Recovery Mode:
csrutil enable; reboot
sudo kextcache -system-prelinked-kernel
sudo kextcache -system-caches
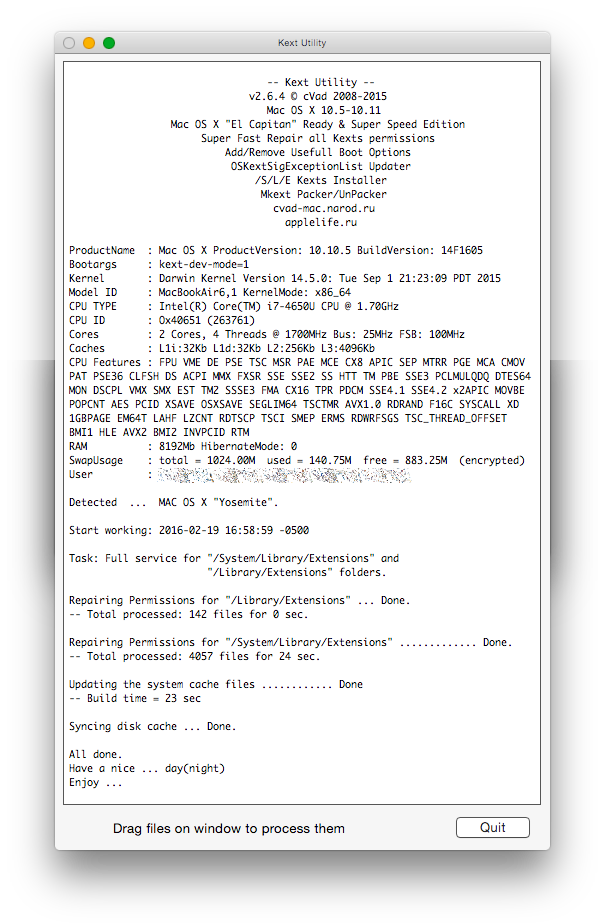 This will detect, repair and rebuild your Extension Permissions and Extension Cache. You don't need to do anything within this window when Kext Utility runs. Just let it run, wait a few minutes until it completes, and then exit it when it has done its work.
That's the first change, and will have an immediate, global positive impact on your Mac's video performance. It also means that any USB, Bluetooth or WiFi devices that typically go into low-power mode, will not cause your video display or playback to 'stutter' again.
If you want to reverse/revert these changes, follow these steps
- Open a Terminal and type the following commands:
cd /S*/L*/Ext*/
sudo mv AppleGraphicsPowerManagement.disable AppleGraphicsPowerManagement.kext
- Go back to "Kext Utility" and run it to correct and rebuild the Extension Cache as we did earlier.
- Reboot your Mac and verify that "AppleGraphicsPowerManagement" shows up under "Extensions" again in "System Report"
To tweak your Zwift-specific settings, follow these small configuration file changes. If you're not sure where to find your specific configuration file, there is another KB article that describes that in better detail:
Here are the changes you need to add to your specific profile's configuration file (basic.txt, medium.txt or high.txt depending on your Mac version. If your profile is already using ultra.txt, you probably don't need to use these tweaks at all)
UPDATE: ALL of the configuration options below have been deprecated and removed from Zwift as of the 2016-02-24 release. They no longer work to tune your client experience.
set gFXAA=1set gHeadlight=0set gFoliagePercent=0.1set gSimpleReflections=1set gSimpleShadows=1set gLODBias=0set gShowInstances=0set gShowGrass=1set gShowGround=1set gShowBikes=1set gShowMountains=1set gShowRiders=1set gShowRoad=1set gShowRocks=1set gShowSky=1set gShowTrees=1set gShowWater=0set gShowBugs=0set gSunRays=0set BloomStrength=0.5set gBloom=0set gFoliagePercent=0.1set gColorCorrection=1set gDoReflectionMap=0set gShowShadowBufs=0set gVignette=0
Play with these values and see which ones impact you the most, balancing the environment quality and game performance for you. I've found these three lines to have the largest impact:
set gSimpleReflections=1set gSimpleShadows=1set gDoReflectionMap=0
That's it! Good luck, and please let us know if these worked for you, or failed in some way.
Checking your Zwift Performance
Now go back into Zwift and see if your FPS up in the upper-left corner has made any improvements from earlier. You should see an almost doubling of the FPS, if these settings had a positive impact.
Tweaking your Zwift Environment Settings
There's still more to tweak, if you're still not seeing the kind of performance you want out of Zwift. If you look at your Zwift log, it will tell you which "Game Resolution" it is using, and it is that resolution's name that determines which configuration file to modify. If you open up your Zwift log in an editor, you'll see a line that looks like this, near the top:
[22:06:01] Using high graphics profile
Using the above example, I'm using the 'high' profile. Open up "high.txt" from your Zwift configuration directory in an editor and insert the following settings, right below the gShowFPS line we added earlier:
set gShowFPS=1set gDoReflectionMap=0set gSimpleReflections=1set gSimpleShadows=1
These settings will tell Zwift to reduce the quality of the reflection on the water surfaces, as well as use a much simpler, less real-time algorithm for drawing shadows that appear from trees, buildings, rocks and the ambient occlusion of sun rays shining down.
Turning those to their opposite values will increase the complexity needed to display the environment (consuming more FPS), and could impact your performance. If you have a high-end GPU, by all means, set them all the way up! I have 3 high-end GPUs in my Zwift machine, so I can turn all the dials, knobs and switches. You may not have that flexibility.
Here are some more settings to play with. If you decide to turn these off, you can tune the environment way back, so it basically turns Watopia into Dubai
set gShowGrass=1set gShowGround=1set gShowBikes=1set gShowMountains=1set gShowRiders=1set gShowRoad=1set gShowRocks=1set gShowSky=1set gShowTrees=1set gShowWater=1set gShowBugs=1set gSunRays=1
There are dozens of other settings, but they're not really going to improve your graphics performance, so I won't go into each of them here,
I've worked with several people on the Zwift Riders Facebook group who have gone through these exact setting changes and have had significant gains in performance. They do work!
- Log in to post comments
- 133993 views