Uncategorized
Uncategorized setuid Sat, 11/21/2015 - 16:20Any questions, topics, help or solutions which don't seem to fit in the other categories, should go here until they're sorted elsewhere.
- 1497 views
Can I continue riding after a scheduled event without losing my miles?
Can I continue riding after a scheduled event without losing my miles? setuid Sat, 11/21/2015 - 17:41
The good news is, Yes! But there's a small catch... you have to start riding in the scheduled event first, and continue riding afterwards, to have those miles included in that second activity.
Adding Miles Before the Event
However, if you start riding on the course, any segment, adding up miles prior to your subscribed ride event, your pre-event miles will be considered one activity, and the scheduled ride itself will be considered another, separate activity.
In other words, if you log into Zwift 30 minutes early and ride 10 miles as a warm-up, and then your event starts and you ride an additional 35 miles, you will not have an activity that includes 45 miles. You will have 2 separate activities; one with 10 miles and another with 35 miles.
Adding Miles After the Event
If you begin queued up in the pen with 0 miles, and you ride those 35 miles within the scheduled event, and then keep riding for an additional 10 miles, your activity as uploaded to Zwift/Strava/etc. will reflect 45 miles. That's probably what you want.
Combining Your .fit Files into a Single Activity
There's another option, if you want to do your pre-event ride miles, and have them included. You can use the tools at "FitFileTools" to stitch the two .fit files together into a single .fit file using their "File Combiner" applet, and upload that manually to Strava.
"Banditing" the Event
The last option is to not actually register with the event "officially", but monitor the start time closely, and position yourself near the starting pen. When the riders fire off, just hook on (this is called "banditing", aka riding in a registered event without actually registering), ride the same race route, miles, effort... and then add your miles onto the end, or onto the beginning of that event.
Those miles will be included, because they're all within a single activity, and since you didn't register for the event you bandited, Zwift won't truncate your activity into two separate files.
Hopefully that gives you a few ideas you can use to keep your intended mileage within the same activity so you can sync or upload that to other services for integration.
- 8174 views
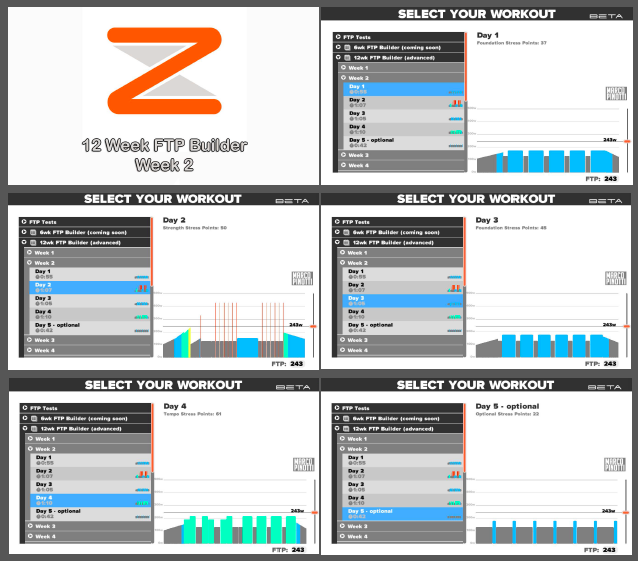
Can I see the Zwift training plans without loading the Zwift application?
Can I see the Zwift training plans without loading the Zwift application? setuid Sun, 11/22/2015 - 10:49There are two ways to search, locate and find Zwift Workouts:
- What's On Zwift? and
- Titanium Geek website maintained by James Gill.
What's on Zwift
The What's on Zwift website has done an amazing job of creating a way to search across built-in workouts, custom workouts and more.
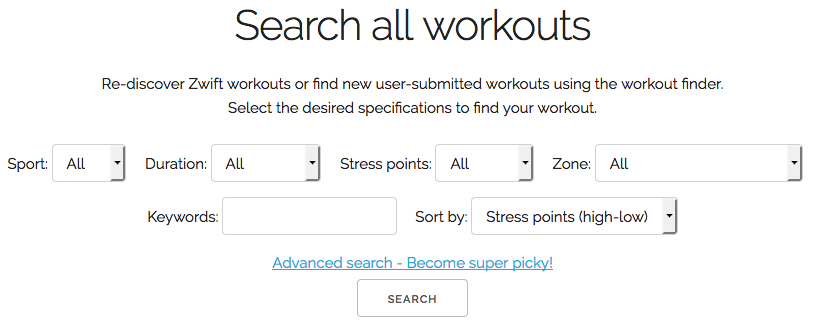
For example, you can search for workouts based on Sport, Duration, Stress Points, Zone or Keyword:
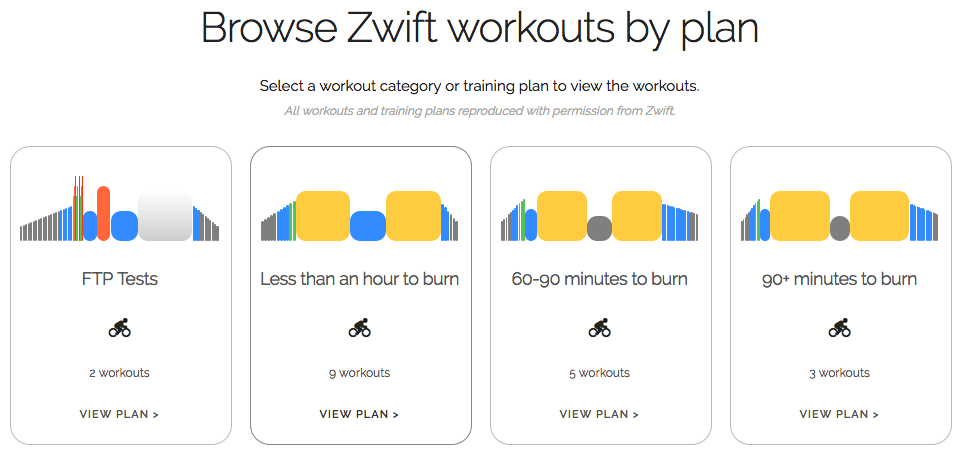
You can also browse workouts by Plan type:
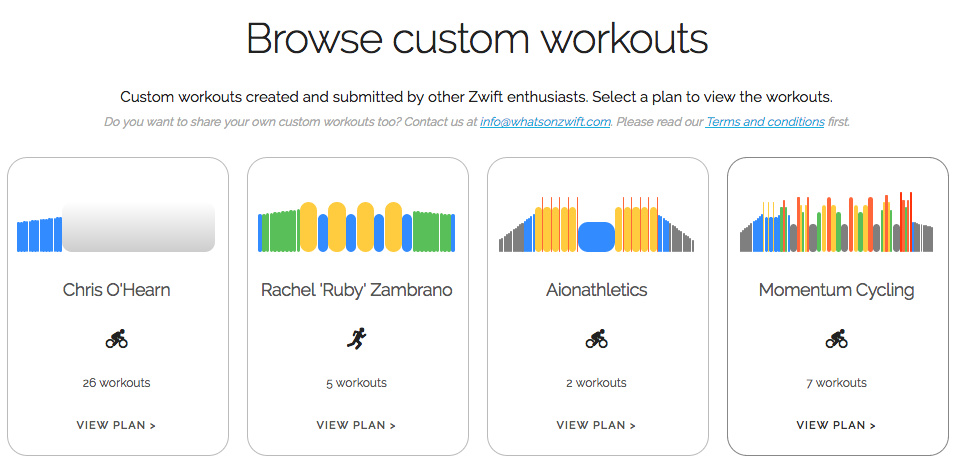
And you can also browse for custom workouts submitted by various coaches and the community:
They are now the community hub for anything Zwift Workout related. Definitely give them a visit and see if they've got what you want!
Titanium Geek
There's a page there specifically around Zwift Workouts and it includes the 205-page PDF breakdown of every single included workout so you can see what training plans apply to you before you even launch Zwift to run them.
There's also a Facebook group dedicated to Zwift Workouts, where you can share (post/upload) and download your own workouts as well as discuss your own experience with the Zwift Workout side of the application.
Lastly, don't forget to visit the Zwift Workouts website, where dozens of others have share their own custom workouts and have converted other workouts from other tool such as the GCN Workout Videos and Trainer Road into Zwift Workout format, ready to load into Zwift so you can train and ride them there as well!
- 42928 views
Do I really need to use a fan with Zwift?
Do I really need to use a fan with Zwift? setuid Sun, 01/15/2017 - 14:55

Each winter season across the hemispheres, we see this topic come up again and again, in various online cycling forums and the Zwift Riders Facebook group.
“Do I need a fan while cycling indoors, even when it’s cold inside my workout space?”
We often see people showcasing their “Pain Caves” with beautiful photos, but one thing that is missing from time to time, is the fan, or some other active active cooling system. But do they really need a cooling fan?
The answer is, unequivocally, YES!
The justification on one side of the table is that it’s “cool enough” in their workout space not to need a fan, or that they’re “only working out for 30 minutes at a time”, so why use a fan?
A cooler room just isn’t enough, you have to move the hot air away from your body, off of your skin. Your heart will thank you for reducing the stress it has to bear. Cycling isn’t Bikram Yoga, after all!
The Myths
- Myth: As long as the room is cooler, you’re fine. You don’t need any fans.
Fact: Not entirely true. You need to evaporate the perspiration from your skin to lower the body’s temperature as heat increases from riding or working out. If you don’t evaporate the perspiration produced, your body will continue to sweat, and continue to heat up, but it won’t cool down. Moving air across the skin is the fastest way to evaporate any perspiration created, through heat transfer.
- Myth: Sweating alone cools the body down enough, you don’t need a fan. If you want to cool down faster, sweat more!
Fact: Incorrect. Sweating only brings the body’s heat to the surface of the skin in the form of perspiration. It’s the act of evaporative cooling from exhaled perspiration that actually cools the body and brings the temperature down. A room that is cooler than your body’s rising temperature can help evaporation, but you have to be able to evaporate the perspiration faster than you’re producing it, for the effects to work. A fan (or fans) helps accellerate that process.
- Myth: Teaching your body to work harder in higher temperatures avoids the need for cooling or a fan.
Fact: There’s a very distinct difference between acclimating your body to working out under higher temperatures and over-heating your body by restricting the necessary evaportive effects that moving air across perspiration provides. Your body still needs to “breathe” to cool itself down, to evaporate any accumulated perspiration on the surface of the skin. Block or restrict that, and you’re going to cause harm to your systems.
- Myth: Drink less and you’ll sweat less, so your body will stay cooler.
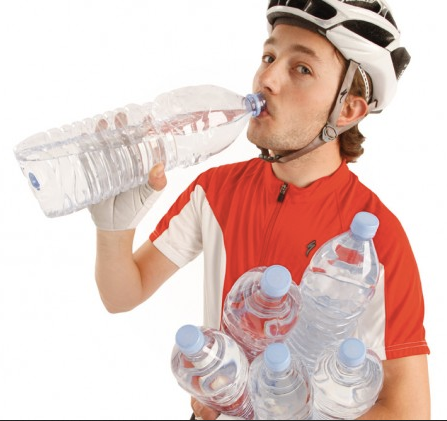
Fact: Dangerous advice at any level. The body needs water and fluids packed with electrolytes to replenish what it has lost through exercise. If you’re not drinking, you’re not replenishing what the body needs to function correctly. If you’ve “run out of sweat”, you’re dangerously close to heat stroke and/or dehydration.
The Science
 This isn’t just an opinion, it’s backed by science. A lot of science:
- Evaporation of Perspiration: Cooling Mechanisms for Human Body, HyperPhysics Concepts at Georgia State University
- Exercise, Heat, Hydration, and the Brain. R.J. Maughan, S.M. Shirreffs, and P. Watson. Journal of the American College of Nutrition. October 2007.
- Exercising in the Heat. Dr. Stephen D Ball, Ph.D., Nutrition and Exercise Physiology, University of Missouri Extension.
- ACSM position stand on fluid replacement guidelines
Riding or working out without proper cooling, will lead to dramatic and measurable degradation in your performance. As Professor Ron Maughan (Chair of the IOC Medical Commission’s Sports Nutrition Group) states, if you’re “warming up” before a workout, you’re hurting your performance.
The Math
Up to 3% dehydration levels during a hard ride effort (previously considered harmful), has been shown through studies, not to hurt your performance at all, according to a May 2015 study in the Scandinavian Journal of Medicine & Science in Sports. Anything more however, and you’re going to do harm to your heart, your circulatory system and your performance will suffer.
But perspiration itself is not a measurement of how difficult your effort on the bike is. It also plays no significant role in increased weight loss. There is a very short-term amount of loss by reduced blood volume, as H2O is removed from the body by sweating.
During a very hard workout, you may have the appearance of losing 1-2 pounds of weight, but it’s always 100% water loss from perspiring, not actual fat cell content. Once you rehydrate, that weight comes right back. If you want to read more on this specific point, read Jennifer Klau’s article Ask The Expert: Sweating, Weight Loss, and Fitness
The Reasons
 There are numerous reasons to keep your indoor cycling environment cool, and have that cooler air moving across your body as you work out on the bike. Here’s just a few:
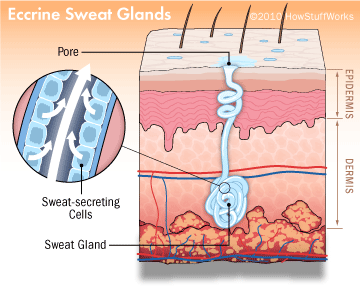
- There are millions of sweat glands on the surface of your skin. These glands secrete large amounts of liquid when you’re perspiring (“sweating”). When that perspiration is evaporated, it helps to cool the skin, which in turn cools the blood and ultimately the rest of your body.
- Moving air across your torso will remove any accumulated heat that remains there, and will help evacuate the perspiration that builds on your skin. The side benefit is that it will also help simulate a headwind, just like you’re actually riding on the real road.
- Proper ventilation will help circulate the air and help reduce increasing CO2 levels, as you exercise. If your room is in a completely closed-off space, you may want to ensure you have a way to vent the additional CO2 your body will produce by exercising. Keep a door open and that fan will help move that air through the open spaces and doorways outside of your workout area.
Unfit riders are more likely to suffer from inadequate cooling than those already in good health and fitness, but everyone needs cooling when they’re riding.
Prevention is Key
 Some precautions you can take to keep cool and avoid overheating are:
- Before a strenuous ride, drink plenty of water and other fluids. Always drink before you get “thirsty”, and at regular intervals. Remember though, excessively high levels of hydration will negatively hurt your performance. Drink enough, but don’t overdo it.
- Water is one important component, but as your rides get longer indoors you need to replenish crucial electrolytes that the body has lost. Make sure you’re consuming adequate amounts of electrolytic fluids or fruits and vegetables rich in electrolytes which also contain larger amounts of water.
- Don’t forget to drink plenty of fluids after the workout to replenish the fluids you’ve lost through perspiration. Your body has lost fluid, and it needs to be replaced. Progressive losses without replenishing the fluids can have dramatic and negative health and performance impacts.
- Periodically monitor your heart rate with a heart rate monitor (HRM) and make sure you keep your heart rate within your target heart rate zones.
- Manage the temperature and humidity in your environment. Increased temp and humidity could require that you decrease the intensity of your ride.
- Monitor your weight before and after each ride. If you have lost more than 3% of your total body weight before your next ride, skip the ride completely. For example, 3% of 175 pounds is about 5 pounds. If you’ve lost that amount of weight during your ride, make sure you drink fluids to replenish that weight, and don’t ride again until you have.
- Expose as much skin as possible to increase the surface area to cooling by evaporation of your perspiration.
- Last, and most-important! Recognize the early warning signs of insufficient cooling. These can include muscle cramping, excessive sweating, cold or clammy skin, unusually elevated body temperature, pale palor to the skin, dizziness, a weak or rapid pulse, shallow breathing, nausea or unexpected headache.
The Equipment
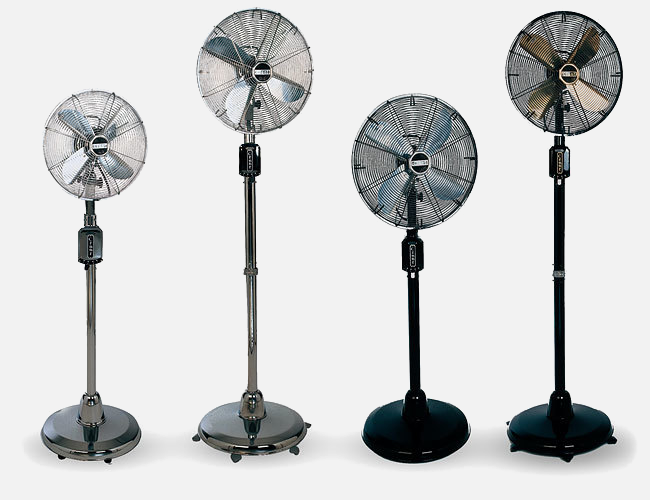
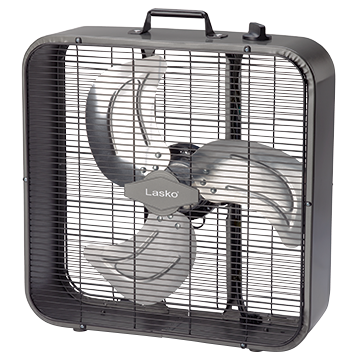
 So with all of that mind-numbing science, math and anecdotal evidence, what fan should you get? Really, any fan will do, as long as it brings air into your space, across your body as you ride, and removes the heat produced by your workout.
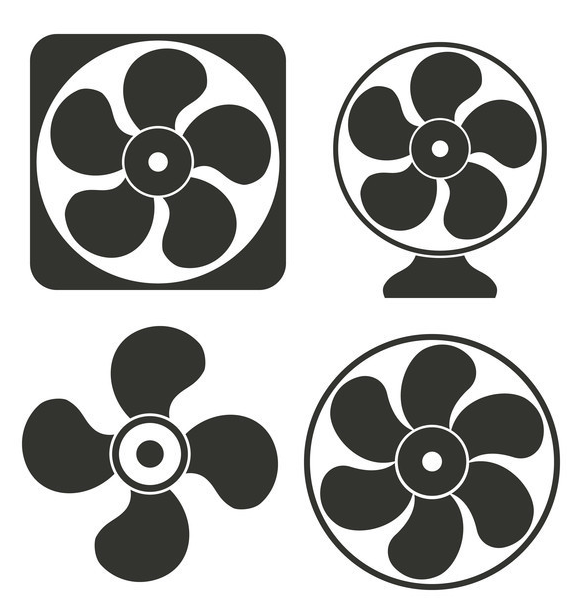
There are dozens of models, styles and colors to choose from: floor fans, tall fans, box fans, window fans, ceiling fans and dozens of other choices. Check your local online or big-box retailer for options. You may even find good deals on fans during the Winter season, like buying a snowblower in July in the US.
Let your individual space dictate which fan makes the best sense.
Positioning the Fan
 The best position for your fans is to have one aimed at you from the front, or obliquely in front of your bike. You want to simulate as close to a headwind as possible. You want to push the heat away from your body, front to rear if possible.
If you’re using just a single fan, place it in front of you and off to the side at about the 10-11 or 1-2 o’clock positions. The goal is to direct the air to flow over as much of your skin as possible, and from these positions you can get moving air on your face, chest, arms, shoulders, and legs.
Having the fan dead-center in the front of you will only blow across your narrowest profile, but that won’t cool you down as much as if you’re blowing slightly from the side. If you have a second fan, position it behind you so it’s blowing against your back. This is the next largest area of your body not being cooled by the fan (or fans) in the front.
Multiple fans is great, but may not always be possible, given your environment and your budget. It can also make your body and your workout space too cool.
Don’t forget to close those heater vents in your workout space! It’s an often-missed point, but you don’t want to be heating the room at the same time as you’re trying to cool it down with your fan(s).
If possible, cracking a window in your workout space could also help bring in some cool air from the outside, as well as keep the air clean and circulated while you’re working out. Just don’t forget to close that window when you’re done, or you might have a freezing house by the next morning!
New Fan Ideas
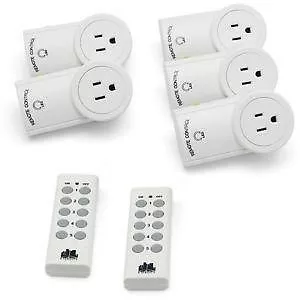 Some enterprising riders in the Zwfit community have invented some really creative ways to keep their environments cool, including remote-controlled outlets to turn on and off their fans, multiple fans with multiple remote controls, voice-controlled fans using their Amazon Echo IoT device, IFTTT recipes, and even automatic, terrain-controlled fans based on the environment visible in Zwift itself.
Going downhill in Zwift? Fans speed up. Going up a steep hill? The fans slow down.
A Word of Warning
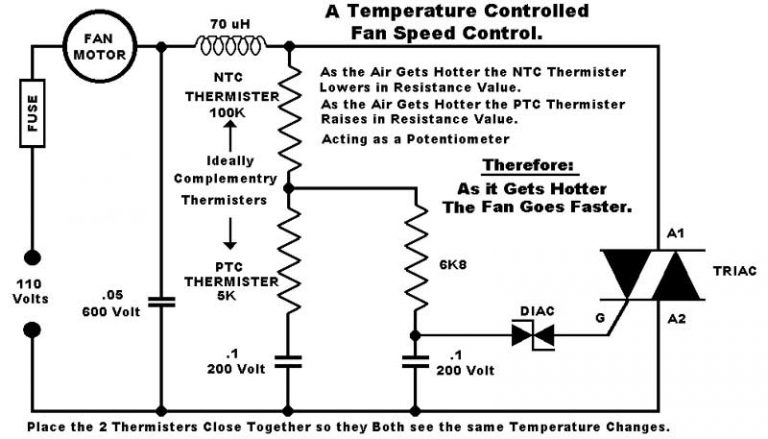
Warning: If you want to be creative with your fans, remember NEVER to use a dimmer switch meant for dimmable lighting fixtures for oscillating fan motors. You will overheat the motor by driving too much current through it, and could potentially start a fire of the wiring inside your walls. Don’t do it without a proper triac circuit. Here’s one to start with:
Good luck out there, and stay cool!
- 190 views
Does Zwift have any discussion forums other than Facebook?
Does Zwift have any discussion forums other than Facebook? setuid Sun, 11/22/2015 - 10:51 There have been many attempts to spin up discussion forums outside of the various Zwift Facebook groups, which didn't gain any momentum or traction.
Now that the Zwift Riders Facebook group has surged past 10,000 members (congratulations!), it makes sense to start thinking about breaking out the discussion topics into forums again. There's just too many topics and discussions that happen every day to find what you want in a flat, single-threaded Facebook group.
Also, Facebook has changed the way replies are managed, allowing "nested" replies, which breaks the Facebook search through those replies. Dedicated forum software packages are much better-suited to the kinds of topics and conversations that happen around Zwift than using Facebook for those discussions.
There are several places hosting Zwift-specific discussion forums:
- Zwift Riders Forums on Staminist (using "Phorum", run by Skye Nott)
- Zwift Discussions over on Zwifting (using "NodeBB", run by Richard Giles)
- Zwift Talk Boards at Boards (using "ProBoards", run by Rachel Ruby Zambrano)
- Zwift Forums at Zwift Riders (now disabled in favor of the above alternatives)
- Zwift Discussions at ZwiftWorld (temporarily [?] disabled, run by Daren Chandisingh)
- ...and a few others I can't remember (I'll update this as I find them).
If you want to search specific topics for discussion, by all means visit those discussion forums and contribute to the threads there.
Facebook's search is very challenging and often doesn't return the results you're looking for because of the way nested replies work, but many of the forum packages out there are much richer in capability and search.
Try them out and see if they work for you. If not... there's always Facebook!
- 9780 views
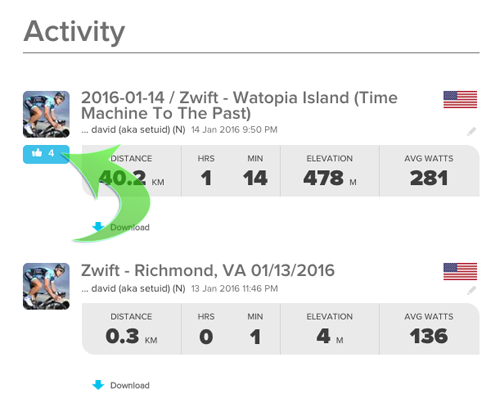
How can I download my ride data to import into other tools/sites?
How can I download my ride data to import into other tools/sites? setuid Sun, 11/22/2015 - 11:15After your Zwift ride is over, you have the option of saving your ride to Zwift, saving and uploading your ride to Zwift + Strava, or discarding your ride data altogether.
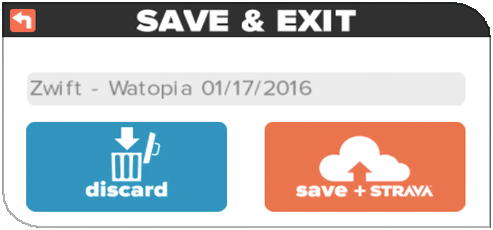
If you choose to Save or Save + Strava for that activity, Zwift will cache a copy of your ride data in .fit format (Flexible and Interoperable Data Transfer) for you. You can then download this data as a .fit file and upload or import it into any other site or tool you wish that can read that format.
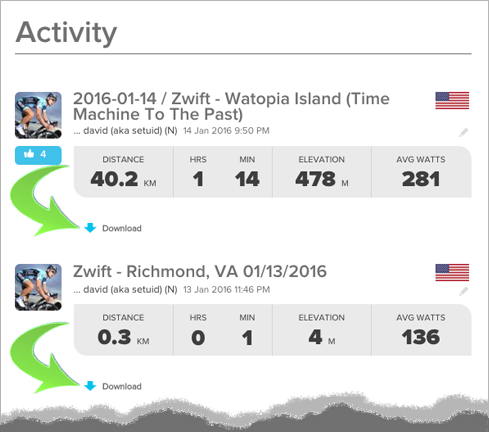
To do this, log into the main Zwift website with your rider's account. Once logged in, you'll see a list of your current and previous activities posted to your main user page. For the activities you want to download, simply click the "Download" option beneath each activity to download that individual activity in .fit file format.
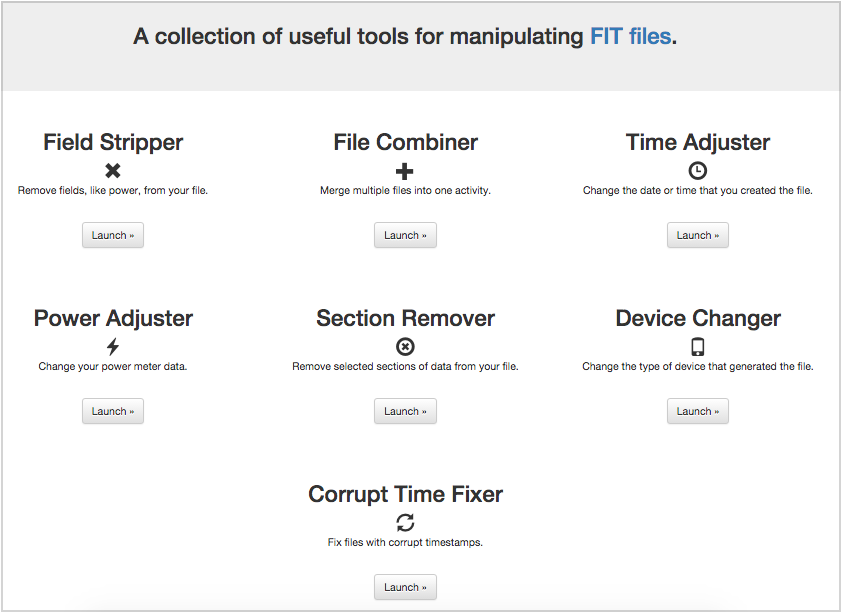
If you want to patch, update, edit or correct the data in your .fit activities, you can use "Fit File Tools" to do any number of digital gymnastics to the .fit files.
Good luck and #RideOn!
- 43025 views
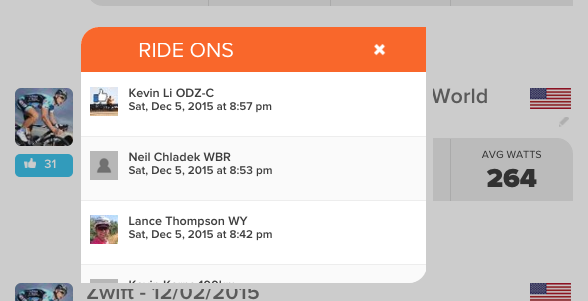
How can I see the RideOns I received during my ride?
How can I see the RideOns I received during my ride? setuid Wed, 11/22/2017 - 11:18A "RideOn" is a thank you, kudo and bonuses in the game. They are the social equivalent of vitamins on Zwift! We all love to get them, even from complete strangers half-way across the world while we're riding. They fill our pockets and give us the extra boost we need to keep pushing harder and harder!
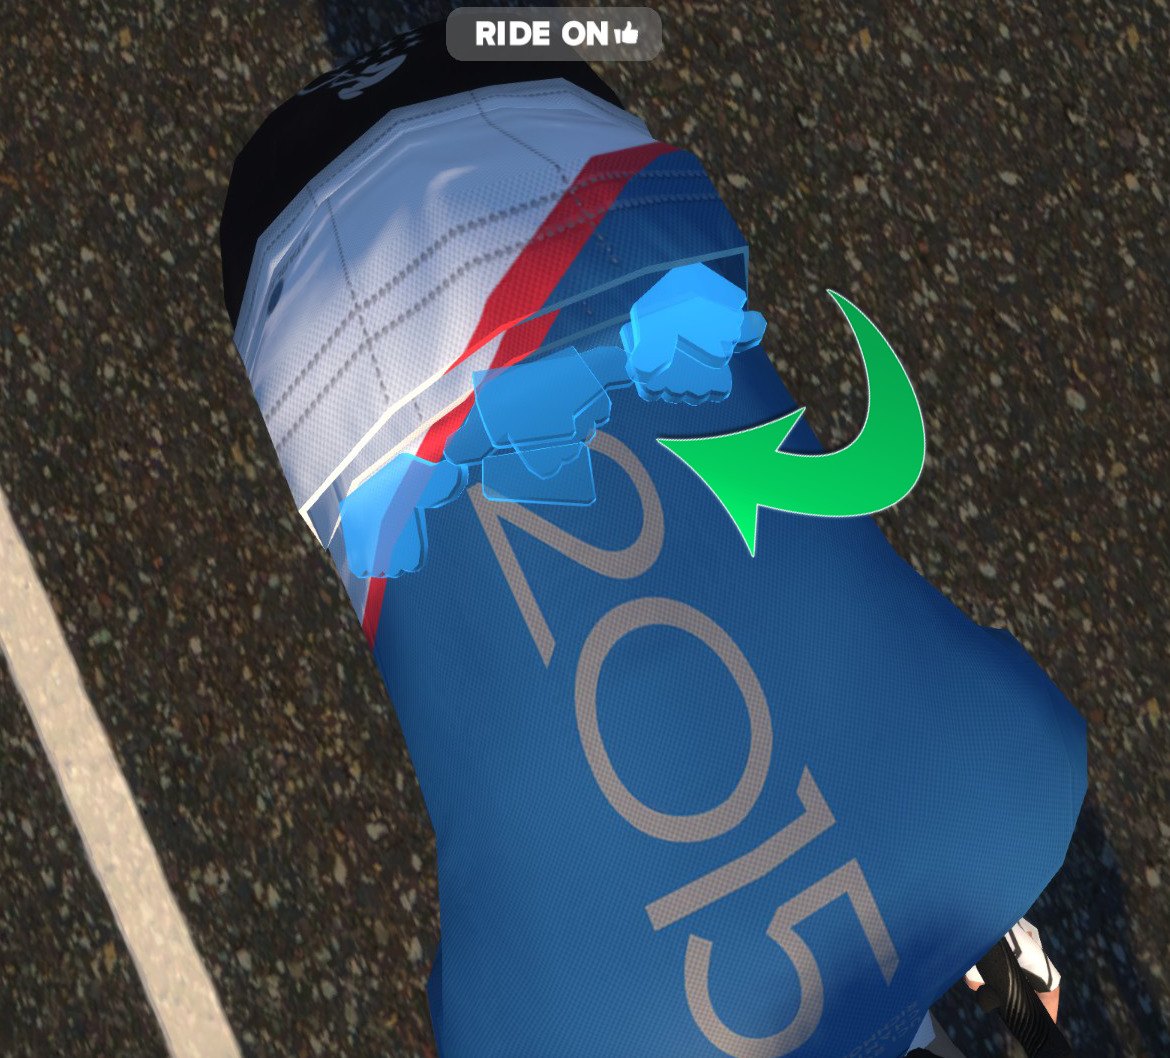
But sometimes we don't know who is giving them to us (or why!), and it's nice to reciprocate those RideOns and thank them back when you can. The desktop application doesn't (yet) give you the ability to reciprocate RideOns, but there is still a way to see who gave them to you, so you can find them and reciprocate.
If you log into the main Zwift website with the account you're interested in, you'll see a number of your current and past rides on the main page listed on your dashboard.
Clicking on the "RideOn" icon next to your activity will pop up a window showing you the names of the people who have given you those RideOns.
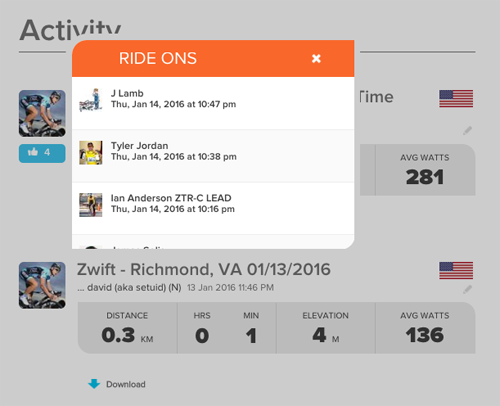
You can now meet those riders in-game, or search for them on the Zwift Mobile Link app (ZML) and reciprocate those RideOns if you wish.
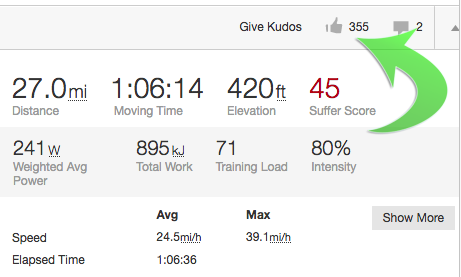
If your account is connected to Strava, and you receive "Kudos" for your ride activity via Strava, you can go back there and, find those thankful friends and comment or reciprocate their kudos in the same way.
That's it, pretty simple! Now get out there, ride and don't forget to give others your thanks in the form of that precious social currency: RideOns!
- 15126 views
How do I "shadow" a friend I've followed in-game?
How do I "shadow" a friend I've followed in-game? setuid Wed, 11/22/2017 - 11:20- 544 views
How do I add a ride to the Zwift calendar and TeamUp site?
How do I add a ride to the Zwift calendar and TeamUp site? setuid Wed, 11/22/2017 - 11:21Group rides and races on Zwift can be fun. They tend to be social, entertaining and in the case of the ZTR style races, the riders push hard on the course (be prepared with fans and water nearby!) The live Zwift calendars are at the bottom of this article.
Some of those rides may not suit your time or intensity, so there's an easy way to create your own ride for your group, team, club! The Zwitft TeamUp Calendars!
- Create your Event on Facebook
- Sample Event Template
- Timing Is Everything
- Correct PC Time
- Adding your event to TeamUp
- Starting your ride in 3... 2... 1...
- Live Zwift Group Ride Calendars
Here's how to create your own ride on the Zwift calendar:
Create your Event on Facebook
If you're a member of the Zwift Riders group on Facebook, log into the appropriate group for your ride, and create your new ride as an "Event" in the group. All Zwift rides that you want to show up on the Zwift TeamUp calendar must be added as an event to the appropriate Facebook group first. TeamUp should always be considered downstream to the Facebook Group event.
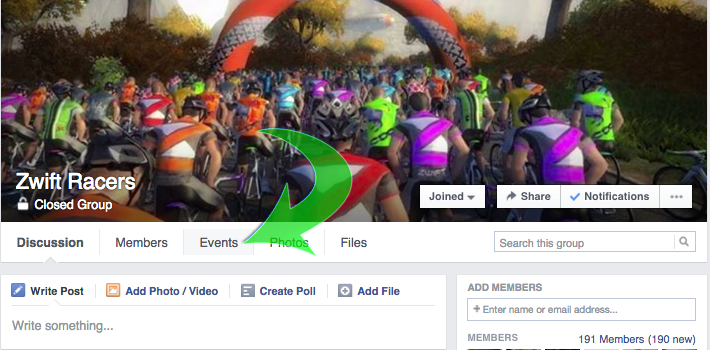
Go to the Facebook group you want to organize the ride in, and choose "Events" from the menu below the group's header image:
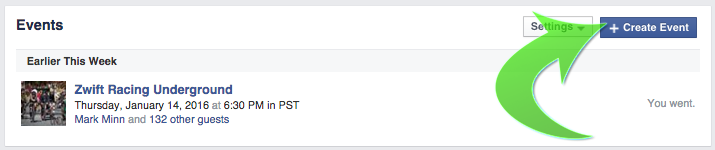
When you click on "Events" from the menu, you'll see a new page. Click on "Create Event" on the right side of the page:
A new page will open up with some additional details about your ride. Fill those in as appropriate for your ride, including an image, Start time, End time, ride direction, # of laps, pace, required jersey kit (if any) and any other additional details you might need to convey to your group.

One thing that really helps a ride, as a ride organizer or a ride leader, is to provide good details about your ride. Here's a template you can use to help with your ride:
Sample Event Template
Course:
- Watopia Reverse SELECT HILLS WHEN STARTING RIDE!!!
Race Distance: 4 laps (22.5 miles or 36 km)
- Neutral start until the beginning of the bridge before the reverse KOM climb.
- Please stay behind the ride leader during the neutral.
Ride Leaders:
- Groups A & B will roll out promptly at 6:00 am EST (11:00 UTC)
- Groups C & D will roll out promptly at 6:02 am EST
- Please add XYZ and your to the end of your name.
Groups:
- Groups are by speed. Pick a group that gives you the best level of competition for your fitness level.
Here are some basic guidelines:
- A: 4.0 w/kg FTP or higher
- B: 3.2 w/kg to 4.0 w/kg FTP
- C:: 2.5 w/kg to 3.2 w/kg FTP
- D: Under 2.5 w/kg FTP
Women may add "W" after their group to indicate they wish to be placed separately (e.g. XYZ-A W).
Summary of important rules:
- Include any relevant other rules, guidelines or details your rides may need.
Timing Is Everything
If your ride is intended to be a race or otherwise timed event, make sure you communicate to your fellow riders that correct and precise timing is critical to placement of the race results. Any rider whose PC time is off or inaccurate, will directly impact the results, since their local PC time is what determines the time of each lap and the Start and Finish times.
Correct PC Time
To help correct and calibrate your PCs time, you can use a site dedicated to testing whether your PC time is correct; time.is is a great resource for preciselyt this:
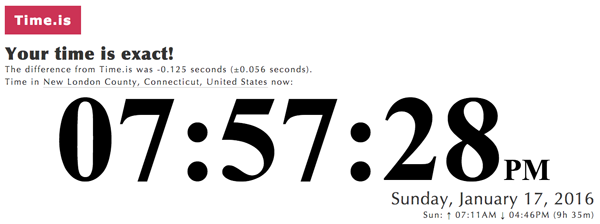
If you need to correct your PC time and ensure that it remains correctly configured, David A. Desrosiers has written a very detailed HOWTO on exactly that, called "HOWTO: Correct and avoid clock skew on Windows and OS X platforms".
Follow the steps in the HOWTO and you can make sure your Windows or Mac PC time is always accurate up to the second. You can then verify that after making the adjustments by visiting time.is again.
Another veryuseful resource to add to your calendar event, is a "countdown timer". When all users use this at the same time, it ensures that they all roll ahead with your ride at the exact same second, which negates any potential in-game group chat lag, client PC clock synchronization issues or missing ride leader at the Start of the ride.
Adding your ride to the TeamUp Calendar
The next step, once you've created and saved your event on Facebook, is to recreate the event on TeamUp. There's no direct linking or synchronization between Facebook and TeamUp, so you'll have to do some cut-and-paste between the two events to create them.
The permissions on the Zwift calendars have recently changed, so you'll need to join the "Zwift Rides Calendar Access" private group on Facebook to get the code to edit the calendar to add your event. Previously, the calendars were wide open, but this left the calendar vulnerable to other users editing or deleting events that they didn't own. The new authorization helps mitigate this issue until/unless a new solution can be implemented to support owner-edit-only style roles.
Once you've been given the access code link to edit the TeamUp calendar, visit the calendar via that link and create your event.
Make sure when you create your event, that you put it on the correct calendar by choosing it from the dropdown list in the event details box, as show here. We want to make sure "Social" rides don't land on the "Race" calendar for example:
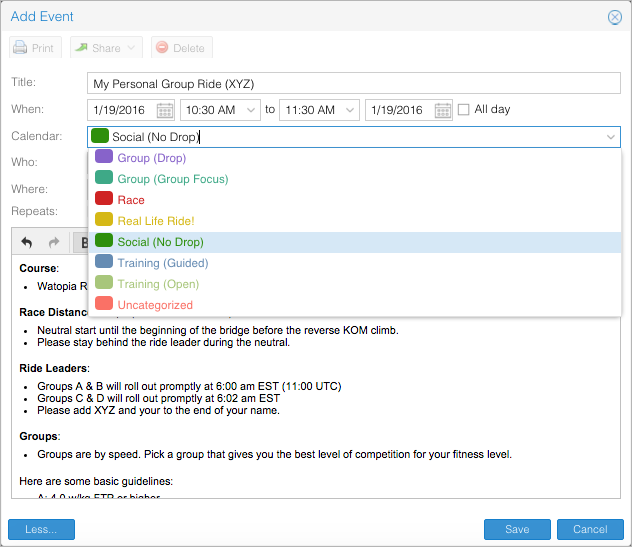
When you're done, click 'Save' to save your event to the TeamUp calendar specific for that ride type.
VERY IMPORTANT: If you change or reschedule the event or update the event details on Facebook, you must make sure that you replicate those changes over to the same event on TeamUp. Changes in Facebook don't change the TeamUp events and changes in TeamUp don't change the Facebook event. You have to keep them in sync yourself.
Starting your ride in 3... 2... 1...
Including the link to an accurate countdown timer in your Event ensures that all riders are aware of the precise need to start your ride. The Web Countdown Timer is a great site to set up your own timer.
Visit Web Countdown Timer and set your start date/time and click through the settings to customize your event start time.
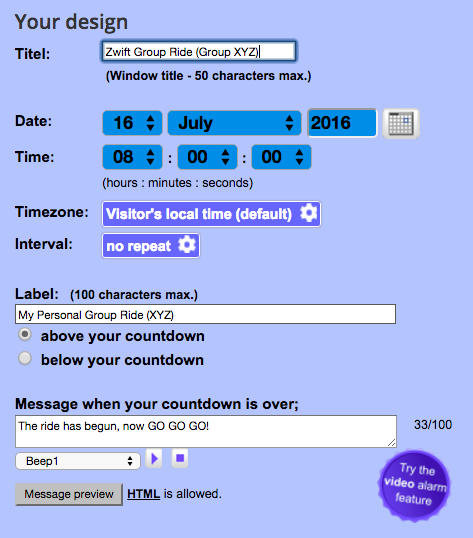
Once you save the timer, you'll get a custom link to the site + timer. You'll put this link into your event on Facebook:
http://www.webcountdown.net/?a=QW6P2zO
The final result should look like this
Live Zwift Group Ride Calendars
- 27323 views
How do I change my name in Zwift?
How do I change my name in Zwift? setuid Wed, 11/22/2017 - 11:23Changing your name in Zwift is a straightforward process, although it may not seem intuitive the first time you do it.
Changing your name in Zwift is very useful to change your name to reflect your location, or the group ride you're in or any other prefixes or suffixes you want to add. There are two ways to do it. Here's how!
TODO: add screenshots here to illustrate the steps
Before you log into Zwift
The easiest way to change your name, priorto logging into the Zwift application, is to do it via the main Zwift website.
- Log into Zwift and then choose "Edit Profile" in the upper-right of your dashboard.
- You'll now have a form where you can change your "Last Name" value. The first name field gets truncated in Zwift to a single character, so that's not very useful if you're trying to represent a ride suffix. Change your last name to something meaningful.
If your name is Sally Smith for example, in-game, Zwift will show that as S.Smith. If you're riding a Weekend Social Ride, you may want to add (WSR) to your name. You'd do that by changing your last name to "Smith (WSR)" in the profile form.
- Don't forget to click the orange [Save] button at the bottom of the profile to save those changes.
Once saved, you can log into the Zwift application and your name will be reflected to you, as well as other riders on the course.
While logged into Zwift
If you're already logged into the Zwift desktop application and don't want to log out, you can change your name there too.
- Simply come to a stop on the course (stop pedaling, you'll come to a stop and the "Pause" screen will come up.
- At the very top of the "Pause" menu is a little pencil icon next to your name. Click that icon, and you can edit your name there.

- Simply click "Ok" at the bottom to save the edits and then click "Back" (or start pedaling) to bring yourself back to the course riding.
The edit you made in-game will also be reflected in the your Zwift dashboard on the main Zwift website as well, and any future rides you do until you change that name again.
Note: There is a small caveat with this method. While you won't see your name change reflected in the game when you go back to the main course, others on the course will see your name change reflected immediately. This is a long-standing bug that is merely cosmetic, it doesn't affect anything else in-game in any way, other than your own view of your name in the rider listing.
From Zwift Mobile Link (mobile app)
You can also change your name from the Zwift Mobile Link (ZML).
- Open ZML on your mobile device and tap the menu icon in the upper-left corner of the main application screen. A panel will slide into view.

- Tap on "Settings" here (note: not "Profile")
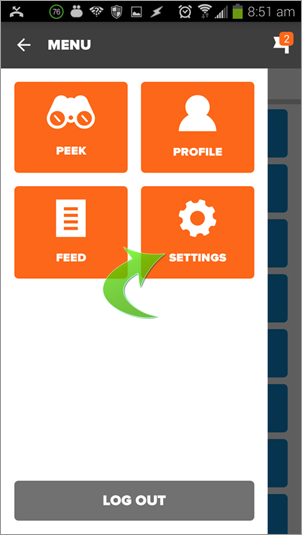
- Tap on "Profile" at the top from the list of options on the screen. You'll now see your profile data.

- It's not intuitive, but those fields are editable. Just tap any one of them and add whatever you want to the end of your name to represent your name in-game.

-
There is no "Save" button on the app, so simply editing and going back to the previous panel or screens will save that data for you.
That's it. Good luck!
- 371535 views
How do I create a race on ZwiftNation?
How do I create a race on ZwiftNation? setuid Wed, 11/22/2017 - 11:58
All credit for Zwift Nation and this fantastic race results tracking resource goes to René Rolighed, as this was his idea and creation.
To create an a new race on the ZwiftNation website, follow the instructions below:
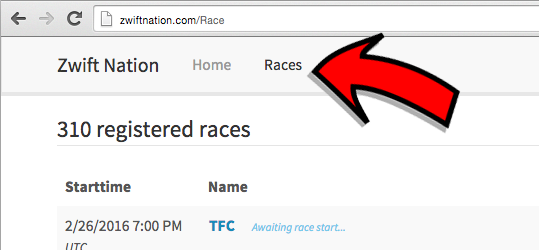
1. Login to www.zwiftnation.com
2. Select the "Races" menu from the top of the page
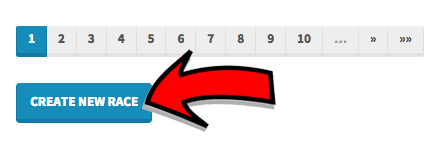
3. Click Create "New Race" at the bottom of the page
4. Enter the race information in the "Create a new race" form. The information includes:
- Name: The name of the race (e.g. Wednesday Night Watopia Flat Crit)
- Race Type: The type of race which can be selected from the following:
- Generic
- Time Trial
- Road Race
- Criterium
- Starttime: The date and time that the race is scheduled to begin.
- Endtime: The date and time that the race will be completed
- Strava Segment: The Strava segment that is used to determine the race route.
- Race ID: The name that is contained in a rider's Strava activity which is used to identify the riders that participated in the race. (e.g. ZTR)
- Apply Race ID Filter on Results: If checked, only activities that contain the Race ID will be displayed in the race results.
- Category Filter: The race categories that will be included in the race results. One or more can be selected from the following:
- A: Cat A
- B: Cat B
- C: Cat C
- D: Cat D
- E: Cat E
- W: Women
- M40: Men (40-49 years)
- M50: Men (50-59 years)
- M60: Men (60+ years)
- W40: Women (40-49 years)
- W50: Women (50-59 years)
- W60: Women (60+ years)
- Allow Unclassifed Results: Include riders that included the Race ID when they saved their activity in Strava but didn't include the category
- Require Heartrate Monitor: If checked, only activities with heart rate information will be included in the race results.
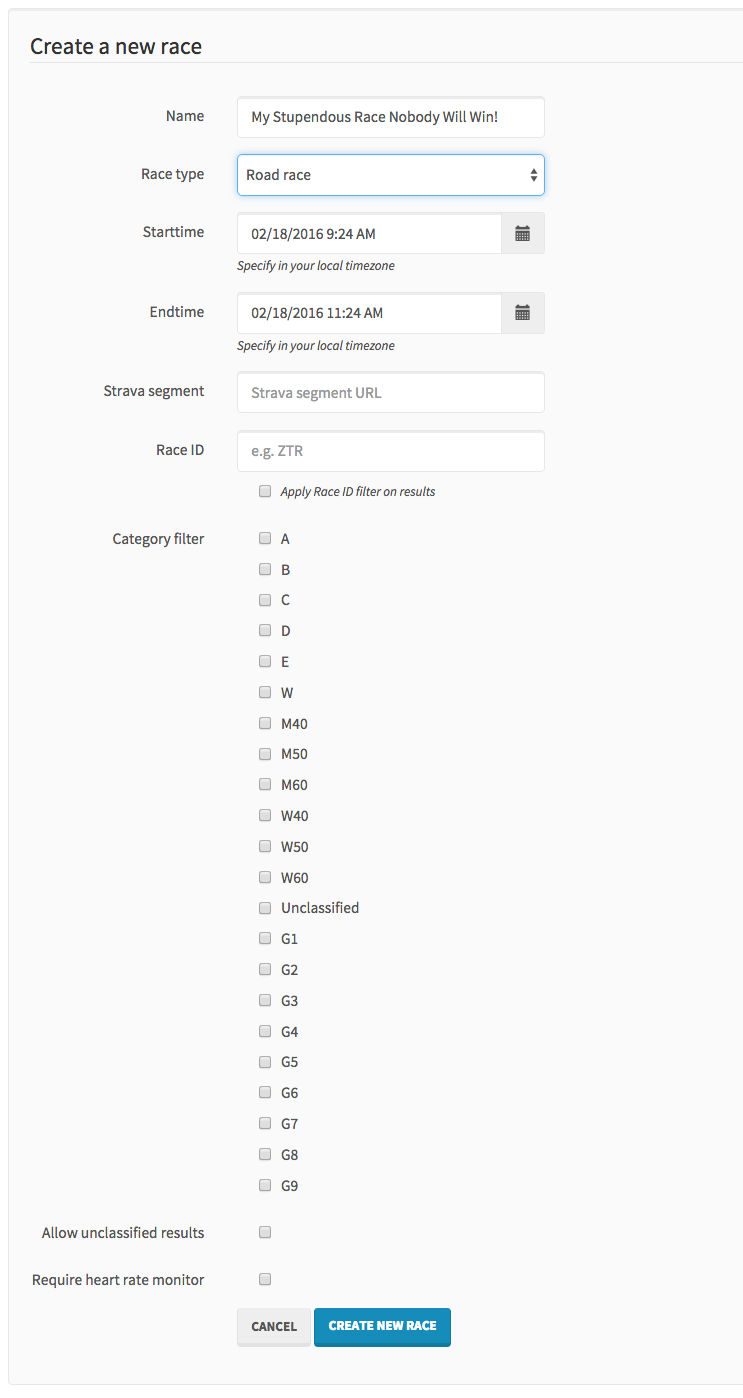
5. Click "Create New Race" to save the race on the ZwiftNation site.
- 777 views
How do I flag or report another rider on Zwift?
How do I flag or report another rider on Zwift? setuid Wed, 11/22/2017 - 12:08
Flagging riders on Zwift is a relatively new feature (January, 2016) to the mobile application, and there are several reasons you might want to flag or report a user on Zwift. Here are some:
- Inappropriate behavior on the course
- Profanity, harassment or abusive messages on Group Chat
- "Flying" around the course with incorrectly-configured zPower or setup
- Harassing or abusive username in the rider list
Note: You have to be actually riding, or have your ANT+ sensors paired and attached to the desktop Zwift application before the flagging options in Zwift Mobile Link will become available buttons.
Also, when you flag another rider, they will disappear from your rider list as a 'blacklisted' rider, so choose wisely. Don't flag your friends, even as a joke, because you won't get them back.
Be very careful when flagging or reporting users. Flagging is not meant to be a retaliatory measure against a rider who beat you to the finish line, or somene who you have a personal grudge with for their comments on the Facebook groups or any other non, in-game behavior. If they are generally being abusive, harrasing, using profanity, intentionally misconfigured or similar, then flagging is the appropriate measure. Please use good judgement when using this feature.
To flag a rider:
Launch Zwift Mobile Link (ZML) on your mobile device and search for the rider in the main rider listing that you want to report/flag. Tap on their name and you will see some new buttons:

Tap on "Flag Rider" and you will now see some additional options available to flag or report that user for their activities.
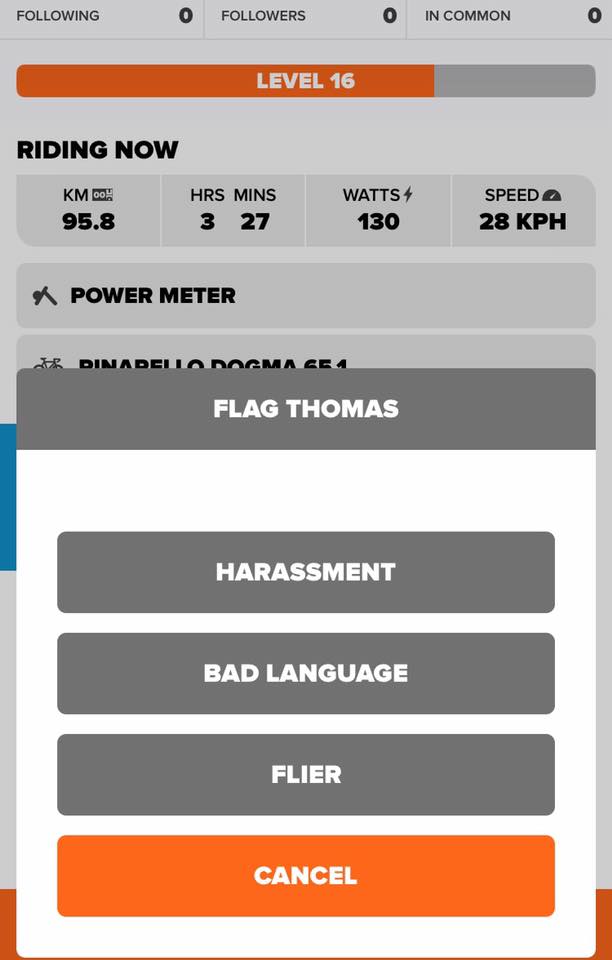
Once flagged, the Zwift support team will analyze that rider's configuration, settings and chat messages and address the incident accordingly.
Good luck out there and #RideOn!
- 6170 views
How do I know which ride or group category I should be in?
How do I know which ride or group category I should be in? setuid Sat, 11/21/2015 - 17:29Zwift ride/race categories and real-world Cat classifications don't directly map, but there is some aspects of similarity between them.
Real world group rides typically break down into Group A, Group B, Group C and so on, depending on the level of fitness of the riders in those groups. If you're a fast rider, you float into Group A. If you're not so fast, you'll drift down into starting with one of the othe groups, based on the speed you can handle (or sometimes the mileage).
Real-world race classifications are very different, and require active placement in the race results standings, frequent races per-year to maintain that classification and moving up from Cat 5 through Cat 1 requires points to be accrued to move up the rankings. See "Real World Racing Classifications" for greater detail on this breakdown.
Zwift Ride and Race Categories
If you're an active rider in Zwift, you probably have a good idea what your top-end performance and fitness is. If you've done an FTP test, this becomes painfully clear (quite literally in some cases!). You should know what w/kg (watts-per-kilogram) you can sustain for an entire 1-hour ride.
Some ride and race events openly advertise what those levels should be for each category. The Tuesday Night ZTR race is one such ride that has done a great job of clarifying this.
- Category/Group A: 4.0 w/kg FTP or higher
- Category/Group B: 3.2 w/kg to 4.0 w/kg FTP
- Category/Group C: 2.5 w/kg to 3.2 w/kg FTP
- Category/Group D: Under 2.5 w/kg FTP
It's best to start at a level you know you're comfortable with and move your way up (as long as you're not sandbagging that ride), than to start with an aggressive decision and have to be pushed back down into the next category lower.
Real World Racing Classifications
In the US, all men start at Category 5 and all women start at Category 4. For the men to move up to Category 4, the quickest way is to complete 10 mass-start races permitted by USAC. The races must be at least 15 miles long if it's a road race and 10 miles long if it's a criterium ("crit").
Once a rider is classified as Category 4, the category upgrades start to reveal the underlying experience and performance, while the minimum length of the race. To move from Category 4 to Category 3, a potential racer can do either of the following:
- Compete in 25 qualifying races with a minimum of ten (10) top-10 finishes with fields of 30 or more riders, or 20 pack finishes with fields of more than 50 riders.
- Complete 20 upgrade points in a single 12-month period. Points are awarded based on a chart. Finishing 3rd place in a road race with 35 starters will give you 5 points. Finishing 2nd place in a criterium with 17 starters nets you 3 points. (Complete charts can be found in the USA Cycling Rule Book).
To move up from Category 3 to Category 2 requires 25 points in any 12-month period. Moving from Category 2 to Category 1 requires 30 points in a 12-month period. Once you're looking to upgrade to Category 2, sanctioned stage races can earn you points
- 689867 views
How do I reciprocate a RideOn during a ride or after?
How do I reciprocate a RideOn during a ride or after? setuid Wed, 11/22/2017 - 12:13RideOns, those digital and social power vitamins we receive while we're riding on Zwift, are a great way to recognize a rider for a hard effort, or just to say "Hey, ride on!".
But you may get RideOns in-game that and miss the opportunity to see who gave you the RideOn to reciprocate them back.
You can look on the Zwift website after logging in, to see who gave you RideOns during your ride, but that's after the ride has been saved nad uploaded to Zwift, not during the ride.
From there, you can go back and find those riders in-game and give them RideOns via the Zwift application itself, or via the Zwift Mobile Link (ZML) app on your handheld or mobile device.
Finding other riders on the course and giving them a RideOn is the same process on the mobile device. See "How do I follow/unfollow others using the Zwift Mobile Link app?" for more details on how to do that.
Good luck and #RideOn!
- 31635 views
How do I report a bug or request a new feature for Zwift?
How do I report a bug or request a new feature for Zwift? setuid Wed, 11/22/2017 - 12:16 A bug? In Zwift? Nooo! Surely you jest!
Seriously though, we do find them from time to time. Sometimes they're just annoying (like the longs-standing weight bug) and others cause application crashes or instability.
The process is the same for reporting a bug you've found or requesting a new feature. We all hate bugs, but they exist. Reporting and closing bugs is how the product matures and improves, and from that, everyone benefits!
- The first thing you want to do, is be able to reliably reproduce that bug. It makes it easier for the Zwift Support team to reproduce it themselves, as well as document it for Zwift Engineering to zoom in on a fix.
- If you did have a genuine bug that you can reproduce, savely save your Computer_Specs.txt file from \Documents\Zwift\Logs\ on your Windows machine and Log.txt from the same location on both Windows and Mac. These debug logs will help the support team diagnose your issues.
- Next, search the Zwift support site for others who may have reported the same bug. You don't want to create a new support ticket for an issue that others may have reported and send multiple tickets to Zwift for the same bug. If you do find someone else reporting the issue, add your comments and other details to their issue. It will help the Zwift support team color in the issue that was found and reported.
- You may also want to check this site for common questions that have been answered, as well as checking the Zwift Riders Facebook group. With 10,000+ members strong, that group has seen it all. Literally. No, really. If they haven't seen it, absolutely feel free to report it. Go to the Zwift Support page and report your issue and don't forget to be verbose and include those logs!
- 939 views
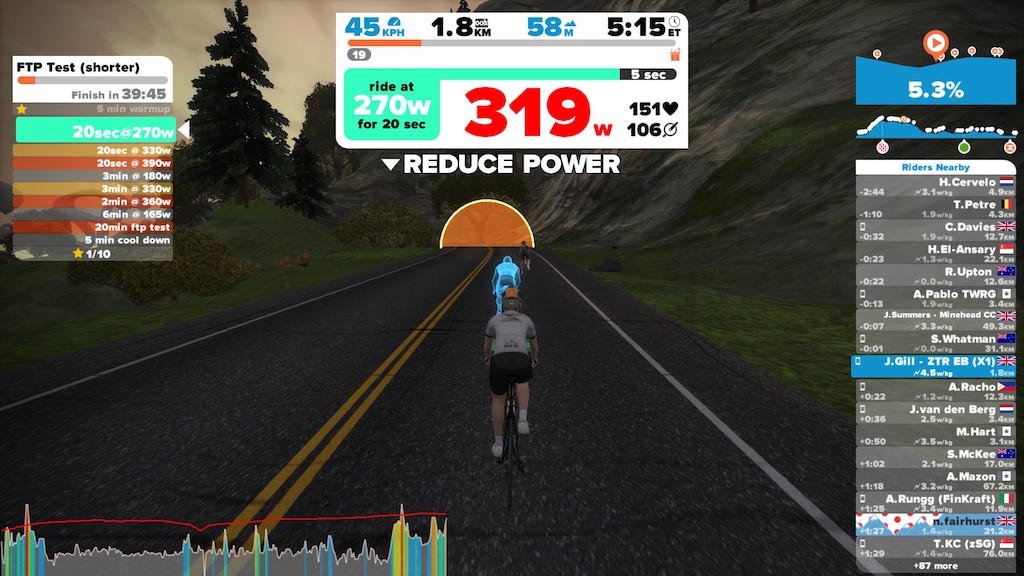
How do I ride any course on any day with Zwift?
How do I ride any course on any day with Zwift? setuid Sat, 11/21/2015 - 00:03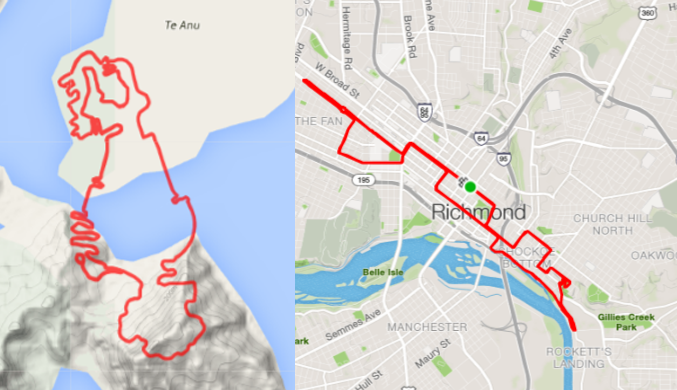
IMPORTANT NOTE: DO NOT insert any bogus values into the XML file!!
There are no "hidden" courses, secret maps or back doors by inserting the wrong values into your XML file. If it's invalid, Zwift will just behave unpredictably, or just crash the client. Don't do it. Follow the instructions below carefully!
There are a number of Zwift riders who prefer to ride one Zwift course over another, overriding the default course selection of the day, but the software does not have an intuitive way to choose the course you want, and it's not exposed in the GUI (yet)
Here are some of the most popular reasons people want to ride alternate courses that we've seen in the community:
- It's the weekend and your time off to ride a long course, but this weekend is a Richmond weekend and you wanted Watopia.
- You want to do hill intervals on Richmond's Libby Hill and 23rd Street to train up for a real-world ride.
- You want to do some high-altitude training in the mountains at 10%+ grades on Watopia's Mountain Route, but today is a Richmond day.
- Richmond is too crowded with scheduled race and rides, and you want a more private, solo day riding on Watopia.
- ...and many more
But there are at least two ways to do this, which you can do without breaking your existing rides or workouts, and without breaking anything else on your PC:
DO NOT change the date or time/clock on your machine to try to "hack" around the world maps!
Previously, there were some individuals who were forcing the time on their PC to be a previous day of the week, to trick Zwift's client into serving up the opposite course than the default course selected for the day. This is BAD for a number of reasons:
- Scheduled tasks that run at specified times, days or intervals may be triggered prematurely
- Backup jobs may not run or complete in time, or be truncated as you change the days
- Software that relies on timing intervals to check for updates or trial expiration may prematurely trigger or fail entirely
- Time-sensitive logging will be dramatically impacted, breaking the atomicity and correlation of your system's events.
- Any data sent or received may be seen as untrustworthy or out of date by the receiving system, such as mail or cloud services
- Your Zwift activity's created .fit file will have an incorrect date on it, and when synchronized to Strava and/or TrainingPeaks, will show up on the wrong date than you actually executed the activity, which could blow your own training plan's integrity.
- ..and plenty of other reasons
In short, don't change the date on your PC, affecting everything, globally, just to trick one app into serving up yesterday's course.
The correct way to change the course is as follows:
Modify your Zwift Preferences
In your Zwift user data directory is a file called "prefs.xml". This file has a number of options that are stored there by changing your Zwift settings in-game. Some of them are undocumented, but still powerful. The ability to change the course is one of these options.
- Watopia Island: <WORLD>1</WORLD>
- Richmond, VA: <WORLD>2</WORLD>
- London UK, <WORLD>3</WORLD>
- New York City, NY: <WORLD>4</WORLD>
- Innsbruck, Austria: <WORLD>5</WORLD>
- Giro d'Italia Bologna: <WORLD>6</WORLD>
- Yorkshire, UK: <WORLD>7</WORLD>
- Crit City <WORLD>8</WORLD>
If you don't know where your Zwift user data is stored, the following KB article should help:
Open the file in any text editor and append the following line to your configuration, directly above the closing </ZWIFT> line. This is a one-line change to a simple text file. Anybody can do it!:
For riding on Watopia:
<ZWIFT>
<CONFIG>
<PROFANITYFILTER>0</PROFANITYFILTER>
<POWERSMOOTHING>0</POWERSMOOTHING>
<BATTPREFS>0</BATTPREFS>
<SHOWGROUPMSGS>1</SHOWGROUPMSGS>
<IMGPREFS>1</IMGPREFS>
</CONFIG>
</ZWIFT>
For riding on Richmond:
<ZWIFT>
<CONFIG>
<PROFANITYFILTER>0</PROFANITYFILTER>
<POWERSMOOTHING>0</POWERSMOOTHING>
<BATTPREFS>0</BATTPREFS>
<SHOWGROUPMSGS>1</SHOWGROUPMSGS>
<IMGPREFS>1</IMGPREFS>
</CONFIG>
</ZWIFT>
For riding on London:
<ZWIFT>
<CONFIG>
<PROFANITYFILTER>0</PROFANITYFILTER>
<POWERSMOOTHING>0</POWERSMOOTHING>
<BATTPREFS>0</BATTPREFS>
<SHOWGROUPMSGS>1</SHOWGROUPMSGS>
<IMGPREFS>1</IMGPREFS>
</CONFIG>
</ZWIFT>
This method allows you to ride on the "other" course, which may be what you want. If it is, stop here, you're done.
However, if you want to ride Watopia solo, with no riders on the course at all other than yourself and it's a Watopia day, this workaround won't work, so that's why I came up with the "ApocaZwift©" solution that does give you this capability and doesn't mess with your PC clock date (and all the downstream impacts that brings). Read the following KB article on "How do I ride solo on Zwift?" for that solution:
If you're unsure which segment you want to ride on Zwift (flat, hilly, mountain, etc.), there's a KB article describing that as well:
Use the GUI, Luke
One of our own Zwift'ers, Jesper Rosenlund Nielsen, has created a GUI for modifying these, as well as other in-game, hidden preferences, called "Zwift Preferences"!
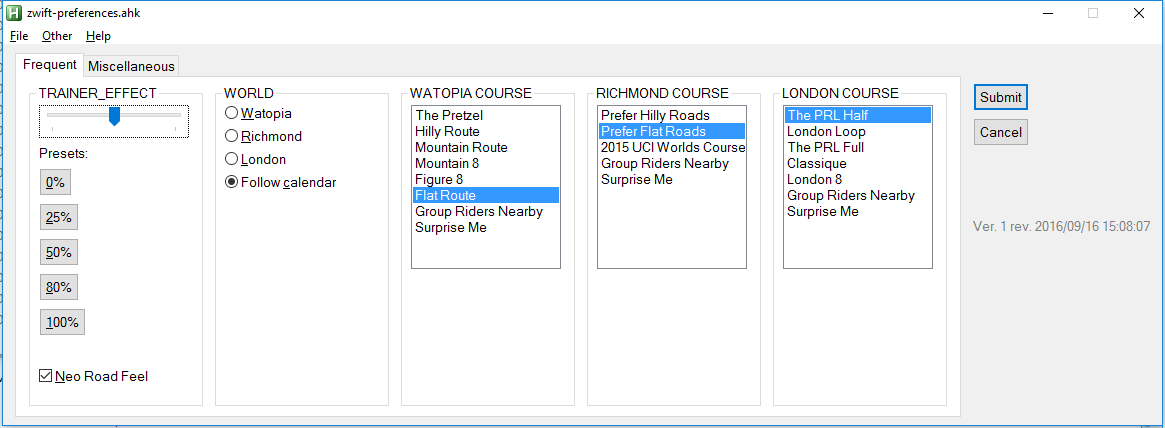
Just download the latest version from Jesper's site, install the pre-requisites (Zwift and AutoHotKey), and you're ready to go!
Jesper also has some other Zwift Add-Ons you might be interested in checking out.
If you want to contribute to the Zwift add-ons for the community, there's also a Facebook group called "Zwift Coders" that caters to the community of developers and contributors making Zwift better every day!
Good luck and #RideOn!
- 24065 views
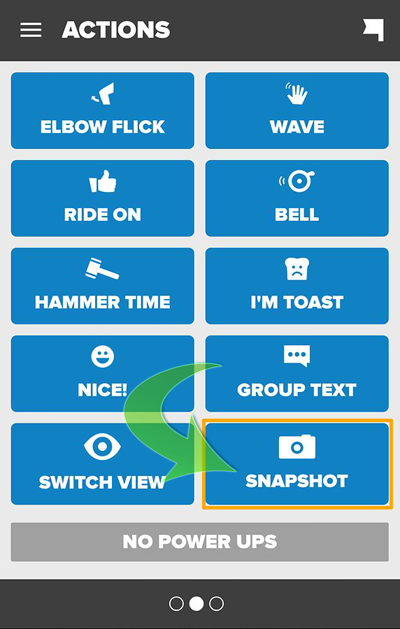
How do I take a screenshot of my Zwift session?
How do I take a screenshot of my Zwift session? setuid Sat, 11/25/2017 - 23:28Taking screenshots in Zwift is a great way to showcase your jersey win, your latest sprint, your huge wattage burst, or just share some of the great views in and around Watopia and Richmond.
From the desktop
To take a screenshot from the Zwift desktop application, just hit the "F10" key on your keyboard, Mac and Windows.
On Windows and Mac, those screenshots will appear in your \Pictures\Zwift folder inside your home directory.
If you're not sure where your Zwift data is stored, see the following KB article for details:
From Zwift Mobile Link
To take a screenshot from the Zwift Mobile Link application, tap the "Snapshot" button on the bottom of the button screen to take snapshots. Depending on your moble application permissions, these screenshots will land in your photo "Gallery" (on Android) or your Camera Roll (on iOS).
I've used symlinks (on Mac) and NTFS Junctions (on Windows) to link my \Pictures\Zwift\ folder into my Dropbox folder, so every screenshot I take, is near-instantaneously available on all of the devices on my LAN, including my iPad and Android devices.
Future plans for my use of Zwift screenshots include adding IFTTT support so I can auto-upload the screenshots to Twitter and Instagram.
- 60608 views
How do I use TeamSpeak with Zwift?
How do I use TeamSpeak with Zwift? setuid Wed, 11/25/2015 - 23:36
Karissa Bramhall Minn, a well-known Zwift "Elder", has written this very detailed guide on integrating TeamSpeak with Zwift:
This guide just covers the free TeamSpeak client, not the non-free, commercial mobile app. Note: This guide was written for PC users. For Mac OS X users, where "right click" is mentioned, just do whatever it is you do to bring up a context menu.
For a great quick introduction to TeamSpeak, please watch this video by Chris Haskell:
- First, download the free TeamSpeak client for your OS and install it using your operating system's normal method of installing software.
- Then, open TeamSpeak, click "Settings" at the top of the screen, and click "Setup Wizard." You can choose Voice Activation Detection or Push-To-Talk. With Voice Activation Detection, you'll set a sensitivity level that will let you talk freely while keeping background noise from getting through. If you don't want your microphone to record everything you say, or you notice that you're annoying people with your heavy breathing, choose Push-To-Talk and assign a hotkey. You can use any speakers/headset and microphone that works with your computer, including the ones built into your computer if it has them. If you'll be using TeamSpeak a lot, though, it might be worth an upgrade from your built-in microphone or iPhone earbuds to something with better quality so you can hear and be heard more clearly. Nothing fancy needed - unless you want it, of course!
- Close the server list if it pops up at the end of the setup wizard - you don't want that. Instead, click "Connections" at the top of the screen and hit "Connect." Type "ts21.gameservers.com:9149" for the server address (there is no server password) and choose a nickname. To avoid confusion, it's best to use something similar to how you are known in Zwift.
- Click the "Connect" button to join the TeamSpeak server.
- To save these server settings, click "Bookmarks" at the top of your screen and hit "Add to Bookmarks," then click "OK."
In the channel list in the left panel, you should see your name under "Default Channel". Typically, you won't want to stay here and chat - it's more of a "lobby" area for people to sit in before they join a channel. Instead, scroll down the list of channels and double-click one of the listed channels to join in on that channel's discussions.
Some are all-purpose, general channels (like "Zwift 1," "Zwift 2," and "Zwift 3") while others are meant for specific teams or group rides (like the "WSR Channel").
If the icon to the left of the channel name is yellow instead of blue, and there is a padlock icon to the right, then that channel is locked and requires a password (for example, "WSR Leads"). Under each channel name is a list of who is currently in that channel. You can collapse or expand these by clicking the little triangles to the left.
To voice chat while you're in a channel, either just start talking (if you set up Voice Activation Detection) or hold down your Push-To-Talk button while speaking. You'll notice that the blue dot next to your name glows when you speak.
If you want to mute your microphone on TeamSpeak completely, hit the microphone icon with the red "X" in your toolbar. To mute sound from TeamSpeak, click the speaker icon with the red "X" next to it. Your blue dot will change to show other users that your microphone or speakers are muted. If you try voice chatting with someone who has a muted speakers icon, then, don't be surprised if they give you the cold shoulder!
You can still talk on TeamSpeak without voice chat, though. At the bottom of your screen should be two tabs; one with the server name and one with the name of the channel you're in. If you click the channel tab, you can use the text box below to type a chat message to everyone in that channel, just like IM or IRC.
Please keep in mind that many people aren't looking at their computer screen and may not see your messages or respond right away! It's also possible to create a private chat with another person in TeamSpeak. Just double-click on the name of the person you want to send a message to, and a new tab should appear. When you click one time on someone's name, you can see some information about them in the right panel.
If one person in a channel is a lot quieter or louder than the others, TeamSpeak will let you adjust that person's relative volume. This setting will stay the same each time that person logs on from the same computer.
To do this, right click their name and select "Change Volume." You can also block someone from the right click menu - or add someone as a friend, which will cause the TeamSpeak voice cues to identify the person as "Buddy" instead of "User." To manage your contacts (friends, people you've blocked, and people whose volume you've adjusted), click the icon with two people in your toolbar.
When you need to step away from the computer, you can let people know you're away by clicking the gray sign icon in the toolbar at the top. Your blue dot will change to an away sign. Click the button again to show that you've returned. If you right click your own name, you can change your name or add/change an avatar. Please keep it clean!
Nathan Guerra is the server admin of ts21.gameservers.com and has special powers, which you can see when he's online by the "S" icon next to his name. He also has his own set of channels, and while he is there he will also have a "C" icon.
Nathan says requests for channels are welcome, and requests for admin privileges (as needed) are welcome from regulars and people he knows. He can mute, kick, or ban you, so make sure that you thank him and Vision Cycling profusely for allowing us to use their TeamSpeak server for Zwift!
- 1591 views
How much bandwidth does Zwift consume?
How much bandwidth does Zwift consume? setuid Wed, 11/25/2015 - 23:37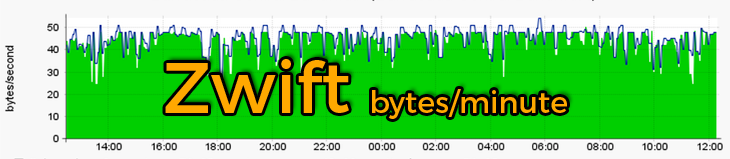
Some riders in the Zwift Riders Facebook group have asked how much bandwidth Zwift consumes per-minute when run across slower links, such as a phone's hotspot over 3G/4G, so here are the quick-and-dirty results (graphs will be forthcoming shortly)
- A "Fan View" session of Zwift taking 688 seconds (roughly 11 minutes) consumed 1,637,477 bytes from initial login to final exit.
- The captured network activity included numerous chat messages to and from other riders as well as clicking around through various views of each rider in the list.
- There were 339 riders on the course for the full duration of the test.
- There was roughly 0.3 - 0.5 seconds of lag between typed messages sent on the Zwift PC until they were received and displayed on Zwift Mobile Link running the host phone running the hotspot.
Breaking this down, equates to 2.3kB/second or roughly 1.6Mb/minute of data across the WWAN segment.
- 17172 views
How to convert a real-world ride into a Zwift Workout
How to convert a real-world ride into a Zwift Workout setuid Mon, 11/21/2016 - 17:13
I've been asking for this ability to be built into Zwift since mid-2015, and now it's finally possible!
I do a short, 10km, weekly time-trial during the season with one of the cycling clubs I ride with. I wanted to be able to practice it during the winter to bring my times down further before next season. Now I can!
Now you too can take a real-world ride you've done on your bike and convert it to a workout you can ride directly on Zwift. Here's how:
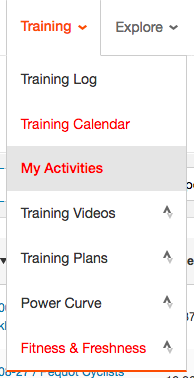
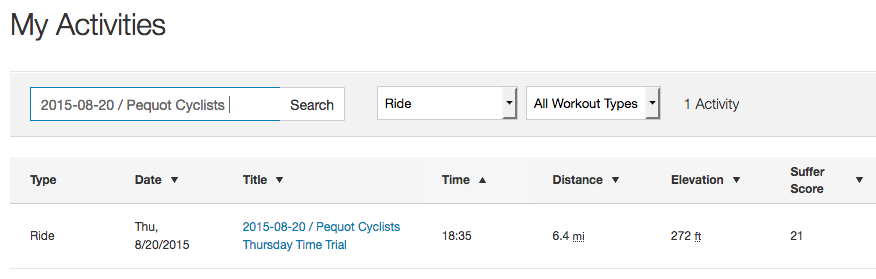
First, log into Strava and go "Training" → "My Activites".
From the search, locate your specific real-world activity. In my case, its my weekly TT ride:
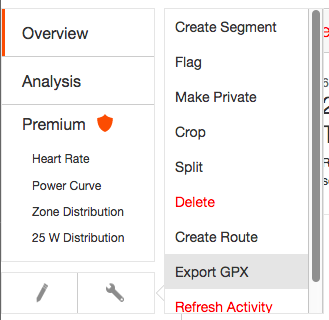
Open up the activity and on the left side of the activity, click the little wrench icon. A menu will pop out and from that menu, you want to choose "Export GPX":
Save that GPX file somewhere on your system so you can find it later.
If you're have a .fit file for your activity, you can use any number of online tools to convert that to a clean, validated GPX file. I've successfully used "Garmin Connect" to do exactly that, by uploading my activity using a .fit file, and immediately downloading it as a GPX file.
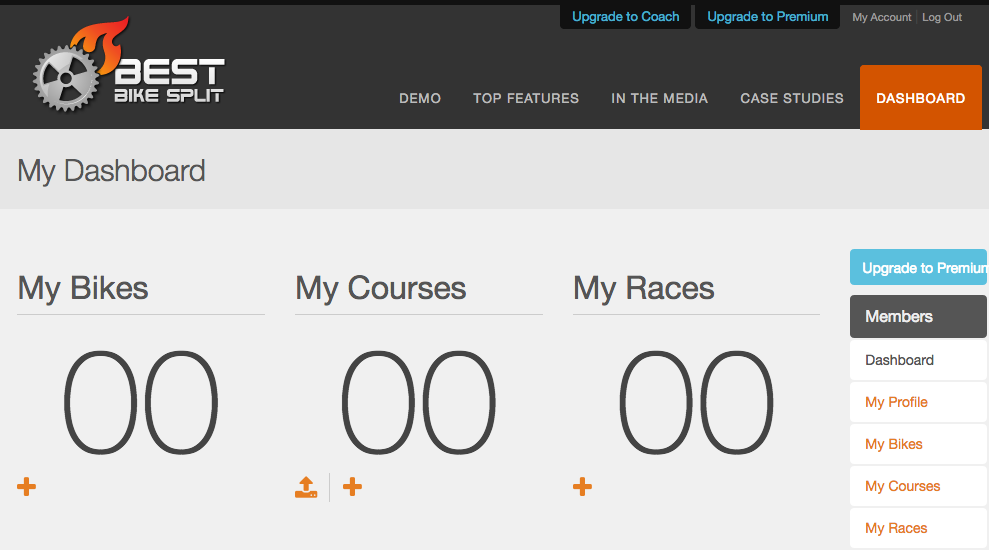
Now, head over to BestBikeSplit and log in (or create a free account if you don't already have a login), and go to your Dashboard.
Unless you're a regular user of the system and have created bikes, courses, races and activities, you should see a 'blank' dashboard, with no bikes, no courses and no races:
Click on "My Races" on the right-side menu and you'll see something that looks like this:
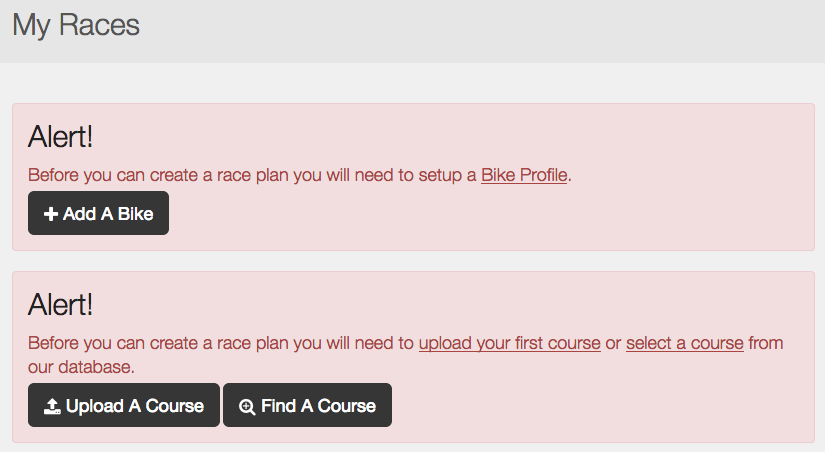
Click on "Upload A Course" on the lower warning dialog. Or, if you want to, set up a "Bike Profile" first by entering your specific bike's data, and then go back to "My Races" and choose "Upload A Course".
From here, you can upload the GPX file you downloaded from Strava, or if your bike computer supports its own GPX file, you can just use that instead of the one from Strava, and drop it onto the landing pad you see here:
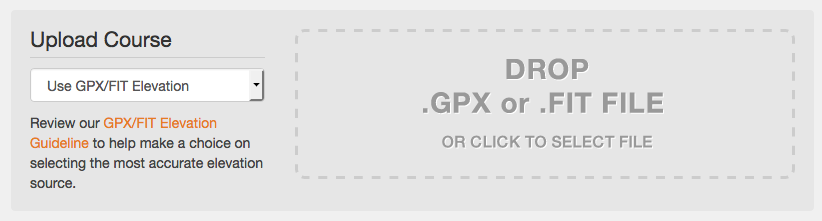
There are two options on the Upload screen, depending on whether you trust Strava or your bike computer to have the correct elevation.
Most people can just accept the defaults, but if you don't trust the elevation data within your GPX file, choose "Use Corrected Elevation" from the dropdown.
Give the system a moment to process the uploaded file, and when complete you should see something that looks like this:
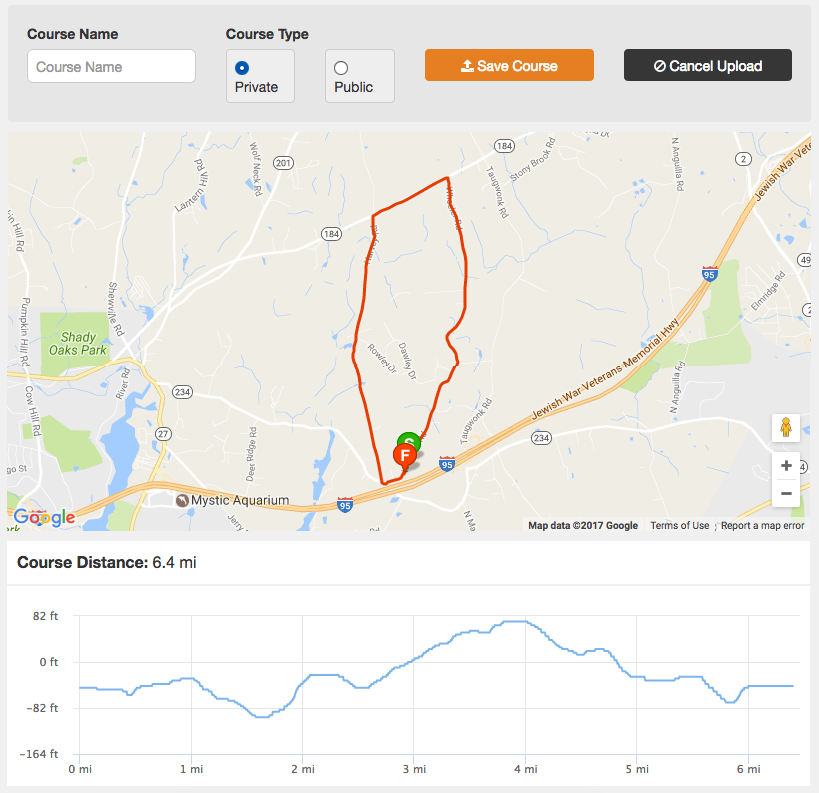
If you got this far, great work! You're almost done!
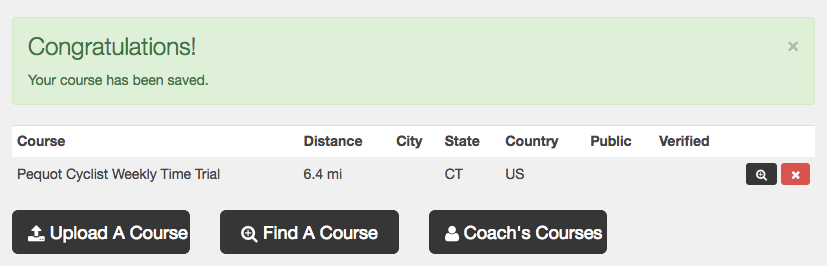
Give your course a name at the top, and click "Save Course". Your new course should now show up in your list of "races":
Now click "My Races" on the right side again, and click "Add a Race".
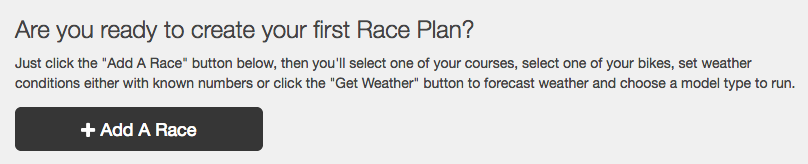
If you don't see this, and see a warning prompt to add a bike, go ahead and do that, and be as accurate as possible when configuring your components (wheel size, width, dish, weight, etc.).
Give your Race a name, and select the bike you created from the dropdown, and then select the Course you just uploaded from the course dropdown, and fill out all of the other data.
Scroll all the way down to the bottom of the page and click on "Add Race Plan". Once the system processes your Race Plan, you should see a summary page that looks something like this:
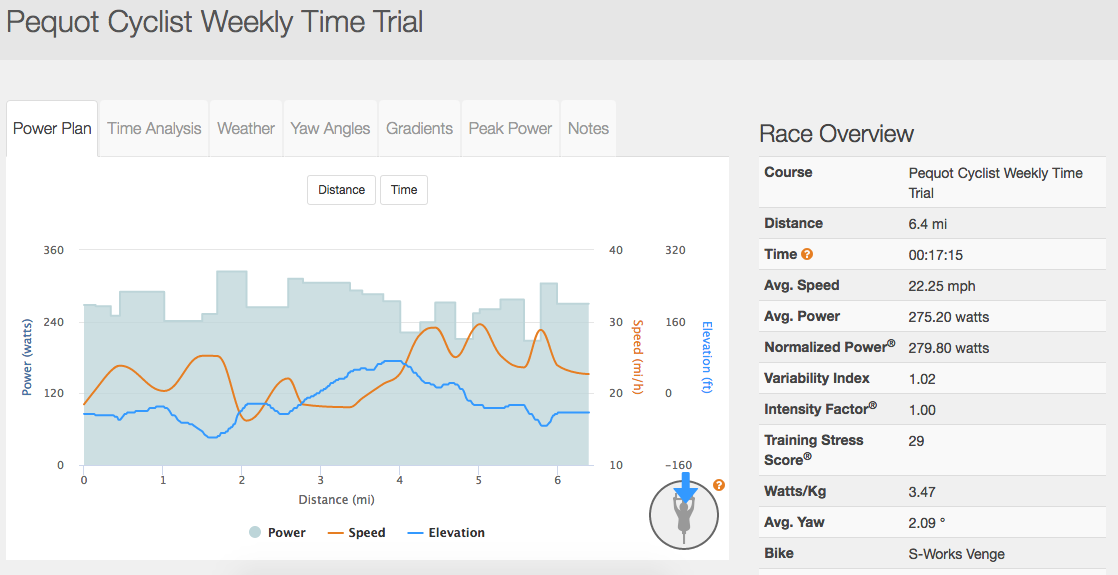
Now if you scroll down a little bit, on the right side, you'll see a number of file download options:
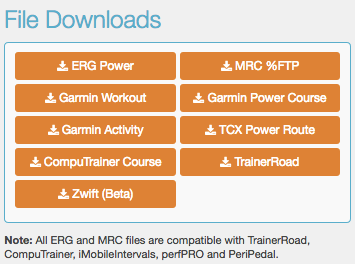
Choose "Zwift (Beta)" from the list, and download your "race" in Zwift's custom .zwo XML format. Save that file somewhere safe that you can locate, as you'll be using it in a moment.
In a file browser of your choice (depending on your OS: Windows Explorer for Windows, Finder for Mac OS X/macOS or iMazing for interacting with iOS devices), navigate to \Documents\Zwift\Workouts.
If you want to organize your workouts, you can create subdirectories in your Workouts folder to build a heirarchy, which Zwift will read and treat as "categories" inside the Workout section of Zwift. I keep mine very organized for precisely this reason, broken down by the 4 cycling clubs I ride with. Feel free to organize them however you wish.
Simply copy the .zwo you downloaded from BestBikeSplit into this directory, or a subdirectory therein.
Launch Zwift as you would normally, and go to the Workouts section from the drop-in menu. You should see your new workout there in the list at the bottom:
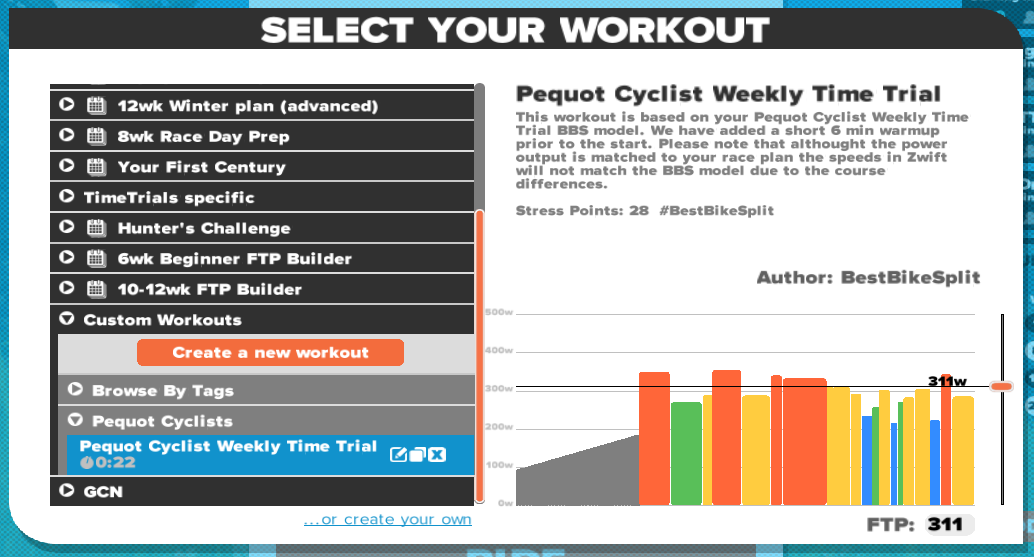
That's it! Now you can ride that workout with your smart trainer and it should perfectly simulate the real-world effort you need to build on those improvements!
#RideOn!
- 47583 views
What is a "Lead Out" in a Zwift Race event?
What is a "Lead Out" in a Zwift Race event? setuid Sat, 11/25/2017 - 23:04
A "Lead Out" is a sprinting technique often used by the lead-out rider where the rider will accelerate to maximum speed close to the sprint point with a teammate in tow.
The sprinter is normally drafting behind the lead-out rider, hoping to create space between the sprinter and the rest of the pack, saving energy for the attack.
When the lead-out rider in front is exhausted, he will move to the side to allow his teammate to take his place and race for the sprint finish. Often a line of lead out cyclists will be used to form a lead out train to drive the speed higher and higher (and to reduce the chances of other riders attacking) over the closing stages of a race.
The purpose of a lead out is for the sprinter to achieve high speed at the sprint approach using as little of his own energy as possible, so he has as much energy as possible for the final sprint.
Here's a great video by our friends at GCN describing this in great detail:
And another, more-technical video describing the underlying benefits of a draft and lead-out attack:
- 15607 views
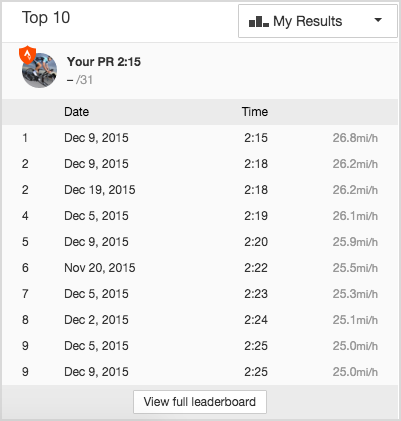
Where do my 30-day PRs go after a month has passed?
Where do my 30-day PRs go after a month has passed? setuid Sat, 11/25/2017 - 23:01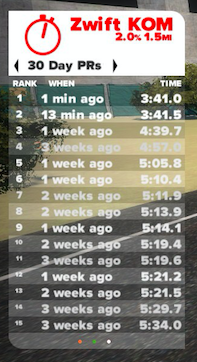 Personal Records, or PRs in Zwift are kept for 30 days. They'll track your Sprint, Lap and KOM results across the previous four (4) weeks.
Those PRs will roll over with each new day. 30-day ago PRs will disappear tomorrow.
If you want to keep track of those PRs, you'll want to make sure your account is connected to Strava. Once your account is connected to Strava, you can use the tools provided there to keep a record of your PRs past that 30-day mark.
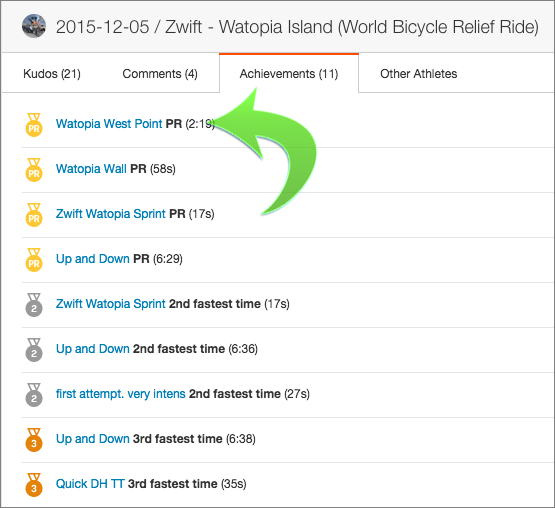
Log into Strava, and then search through one of the activities you've done in the past. If you look at the activity, you may see a little trophy-shaped icon, showing your PRs.

Click on that little trophy to open the PRs for that specific activity. You'll see a list of the various PRs next to "Top Results":
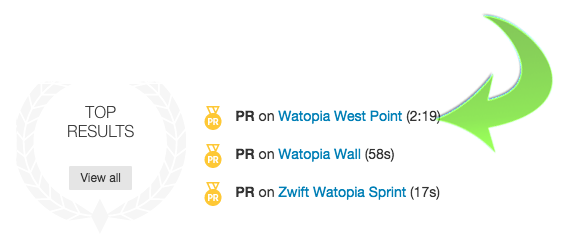
You can also see these at the top of your activity under "Top Results". Those will look like this:
Click on any one of those segments to get greater detail on the PR you received:
Hope that helps you find your Personal Records and keep track of them!
- 32854 views
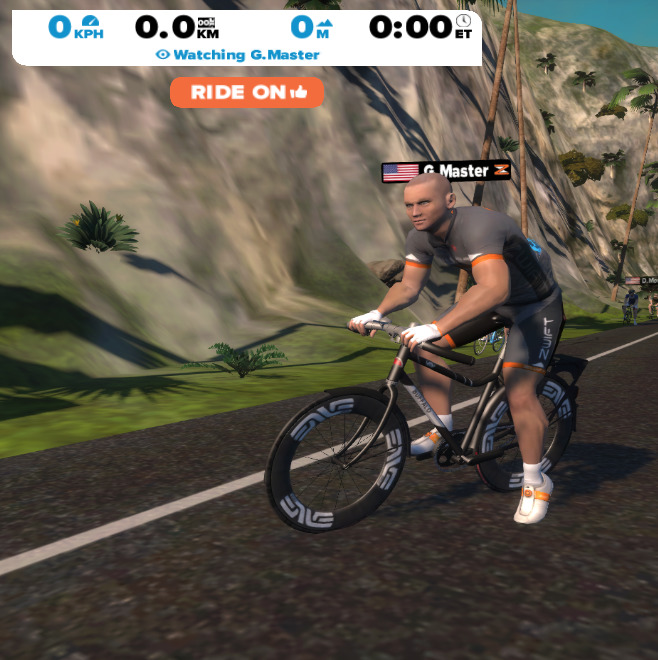
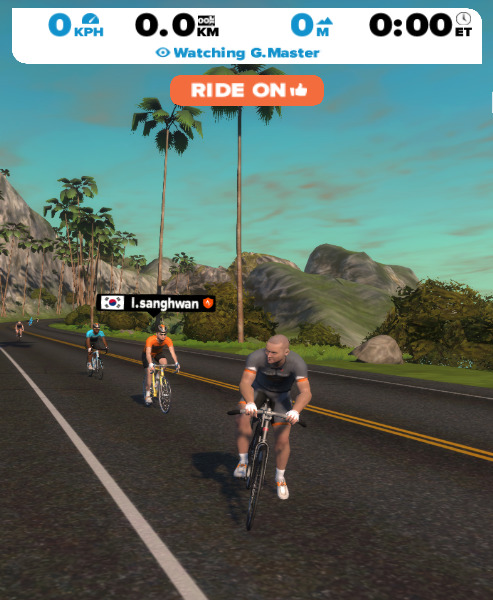
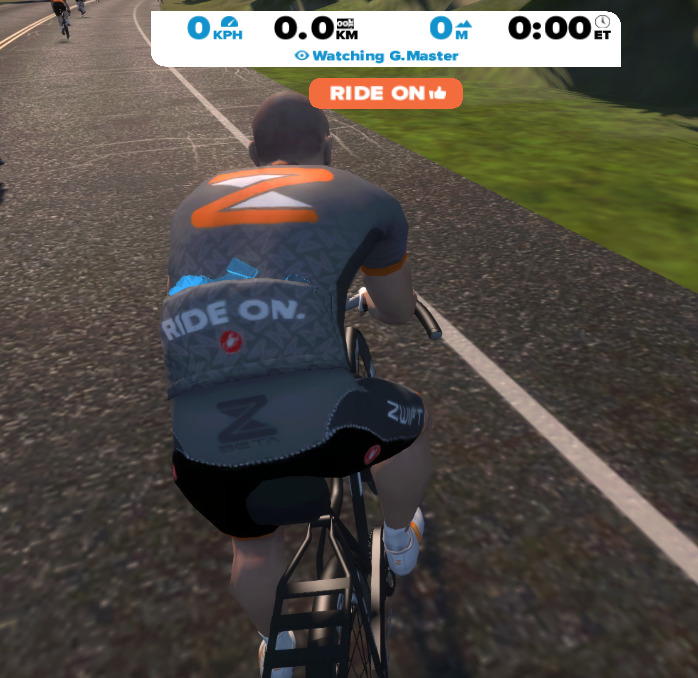
Who is G.Master and why does he never seem to be riding?
Who is G.Master and why does he never seem to be riding? setuid Sat, 11/25/2017 - 22:59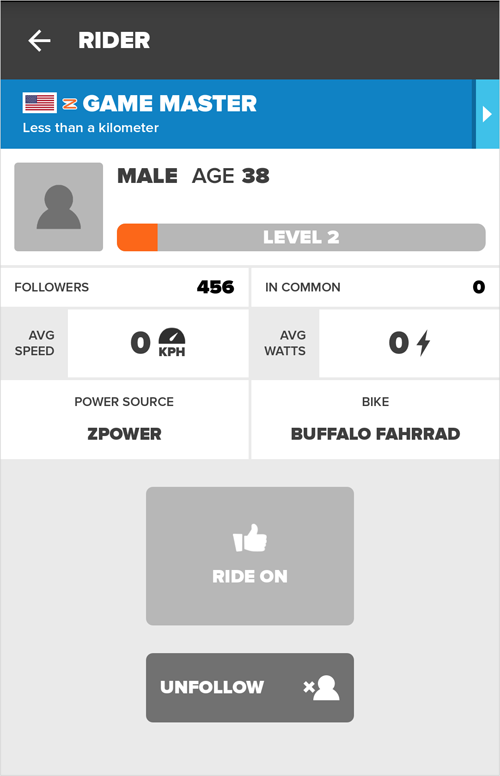 Frequently when you're riding on Zwift, you might see a user named "G.Master" aka "Game Master" just idling on the side of the road, not pedaling, not riding, with no mileage next to his name... wearing a jersey stuffed full of RideOns given to him by others riding by.
Who is this mysterious rider?
Why doesn't he ride?
Is he some sort of stalker?
Does he have my car keys?
Not to worry! G.Master is simply a computer player, a placeholder on the course, put there by Zwift HQ on certain days when there are NPCs on the map.
Sometimes you'll see him, and other times he'll be hiding inside a building or way off the course in a field or in the middle of the water. Other times he's not online at all.
G.Master also controls the NPCs, the blue Non-Player Characters you may see on the map from time to time.
He also coordinates the time of day across all players when he's logged on. This means that two players logged in at the same time, will experience daytime, sunrises, moon views and other elements of the shifting times, syncrhonously. They'll both see the same events. Without G.Master logged in and active, one player may see their view as night while another sees their view as daytime.
He's harmless, but feel free to give him a RideOn when you pass by!
- 382 views
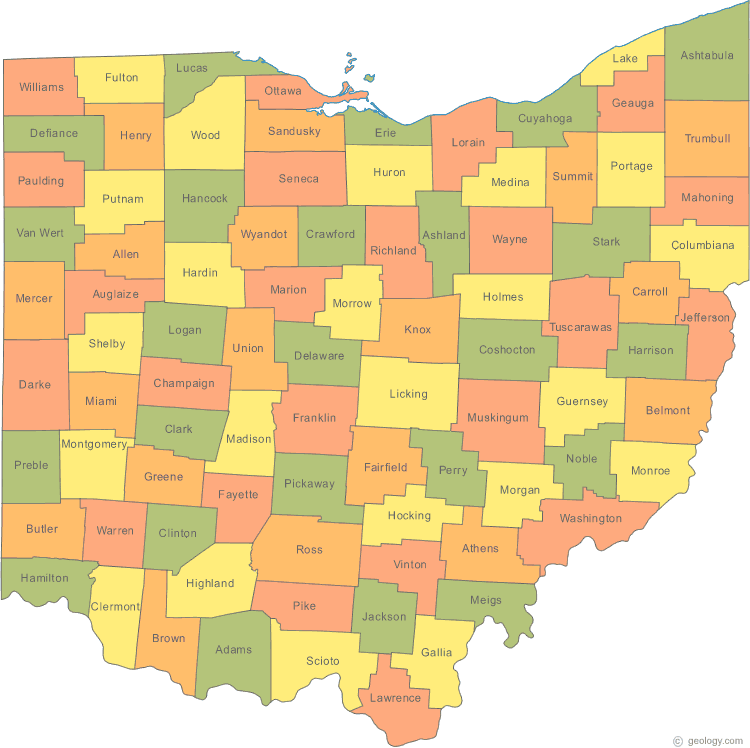
Why does everyone on Zwift seem to be from Ohio?
Why does everyone on Zwift seem to be from Ohio? setuid Sat, 11/25/2017 - 22:55No matter where you're from in the world, when you're riding on Zwift, you're from Ohio.
No, really. Just accept it.
In all seriousness, it's a running gag that started on the Zwift Riders Facebook Group and grew into the broader Zwift community and into the application itself. Everyone else jumped onboard, even those who weren't "in on the joke", which made us all smile. Digitally smile, that is.
So when someone asks you where you're from, tell them you're from Ohio, and when you're on Zwift, let everyone on Group Chat know: "Hi from Ohio!"
Pick a county in Ohio from the map below and tell them that's where your from, but remember: You're from Ohio!
We all are!
- 3623 views