Operating Systems
Operating Systems setuid Tue, 11/21/2017 - 16:56- 914 views
Apple OS X and macOS
Apple OS X and macOS setuid Sat, 11/21/2015 - 16:57- 393 views
How do I save my Zwift username and password on macOS?
How do I save my Zwift username and password on macOS? setuid Wed, 11/22/2017 - 11:16On Microsoft Windows, you can save your Zwift credentials (your username and password) into the "Internet Settings" keystore, but on Mac, things are different.
Zwift on Mac, by-default, does not let you save your credentials anywhere that it can use when you launch the app, but David A. Desrosiers (aka "setuid") has written a detailed HOWTO that uses Automator on Mac to do just that!
HOWTO: Fully automated Zwift login on Mac OS X
Not only does it auto-log into Zwift for you with a double-click of the icon, but it also securely stores the password in the Mac OS X "Keychain", an encrypted key store that will protect those credentials for you!
If you want to change the icon of the Automator script after you create it for Zwift, he's created a useful YouTube video that describes that process too!
- 7050 views
How can I avoid software updates from interrupting my Zwift activity?
How can I avoid software updates from interrupting my Zwift activity? setuid Wed, 05/27/2020 - 18:00
Many of us have fallen victim to this one on various platforms. You're 5 minutes away from starting that important Zwift activity.
- Air in the tires? Check!
- Batteries in the HRM and power meter? Check!
- Full bidons and nutrition within arm's reach? Check!
- Towel, fan, shoes, phone, TV remote control? Check, check, check!
Then you fire up Zwift to log in... boom, there's a new Zwift update you didn't plan on, or even worse, Windows or macOS decide NOW is when you need to have that new series of operating system patches and fixes installed. Not later, but NOW!
What do you do?
- How do you stop these updates from interrupting your Zwift activity?
- Can you just delay them?
- Can you stop the updates?
The answer to all of these questions is absolutely yes! This also includes those who run Zwift on their Apple iOS device or Android phone/tablet. I'll got through each of them below.
- Why do I want to pause software updates, don't I need them?
- Pausing updates for your desktop or laptop
- Pause updates for your tablet or phone
- Stop Zwift from updating at launch
- #SixLinesOfPython
- Conclusion
Why do I want to pause software updates, don't I need them?
There's a lot of malicious intent on the live Internet, and keeping your software current and up-to-date helps to protect you from any possible information leaks, breaches or malware from reaching your computer or tablet/phone.
Turning on "Automatic Updates" is usually suggested as one way to always stay clean and current so you're on the latest version of the operating system software or individual applications you're using. But automatic updates can also be a Pandora's Box that can cause problems, while it attempts to mitigate others.
The biggest and most-important concern with automatic updates, is that there's no way to roll back, if the new version introduces a new bug or compatibility issue while it attempts to protect you from others. You can't upgrade your OS from macOS Mojave to macOS Catalina, then find that none of your 32-bit software that worked fine under Mojave suddenly does not work at all under Catalina, then uninstall Catalina and go back to Mojave again. Not without a complete wipe and reinstall of the OS and its applications and data.
Likewise for applications you use. If the new version of an application has a new requirement that you don't like or want, or removes features you're used to using, you can't usually go back to the App Store or Google Play Store and reinstall the previous version you were running before. They're typically not there, and Apple has taken a hard line against "side-loading" apps that didn't come directly through them.
What's the solution then?
Backups of course! But you can't really keep Automatic Updates enabled and make sure your device has a full, working, complete backup before the updates are installed. You usually have to choose one or the other. It's best to have backups anyway, in case the updates cause your device to crash, brick or "boot-loop".
So you can disable OS and app updates, until you have a chance to fully back up your device, in case of an issue or error, you can restore from that backup. This allows quite a bit more flexibility, but does require that you do query for your own updates on your own schedule.
- Backups ensure your device will never lose data, and you can always restore from the backup
- You can roll back from a faulty or buggy update/patch/application
- If features are removed in newer versions, you can go back to the prior state/app version
- A backup allows you to test the updated application or OS, and return to the prior state when your testing is done.
You should always test new software/applications in an isolated way where possible, before making the move to using them full-time on your daily driver device or machine.
Apple is particularly prickly in this situation, since a device backup and immediate restore never leaves you with the same applications and configuration you started with. If the applications you were running immediately prior to the backup are no longer available on the App Store, your device restore will not put them back. You'll essentially lose applications you were running before, if this is the case.
Apple will often remove applications that it deems violates its own Terms of Service or competes with their own offerings. That's disastrous in almost every situation when you want to restore the previous state of your device.
I'll go through the steps to disable/pause updates on each OS and device below.
Pausing Microsoft Windows 7 updates
The process to disable updates in Windows 7 is very straightforward. Here's how:
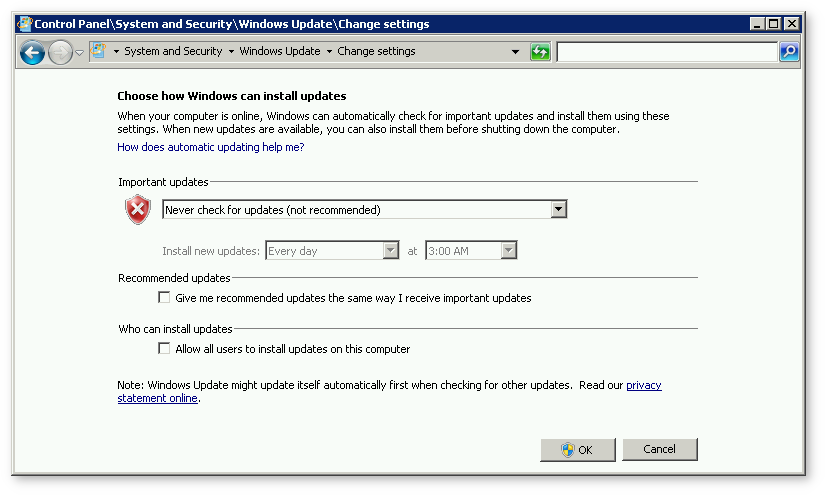
- Click Start → Control Panel → System and Security → Turn automatic updating on or off
- In the Important updates menu, select Never check for updates.
- Deselect Give me recommended updates the same way I receive important updates.
- Deselect Allow all users to install updates on this computer and click OK.
Alternatively, in Step 2 above, you can choose to have the updates downloaded, but not installed until you're ready to install them.
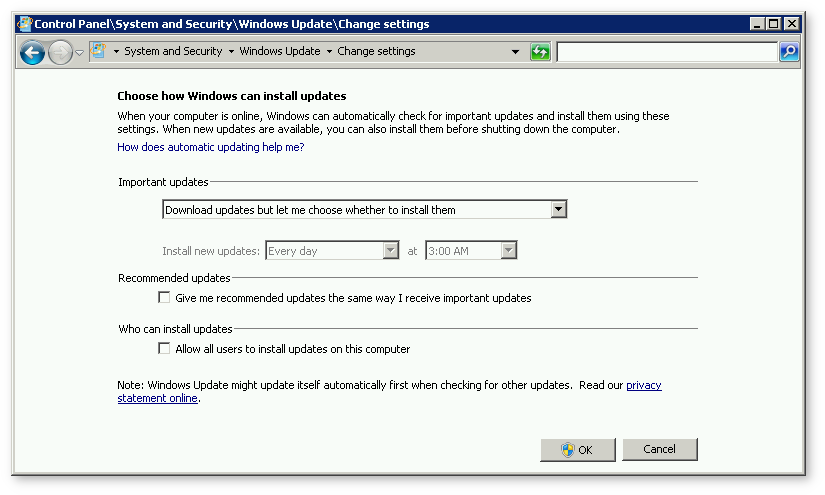
The caveat here is that if there are a large number of updates, you could be downloading them while you're on Zwift, which could lead to some network congestion and delays.
Make the choice that best fits your individual needs.
Pausing a Microsoft Windows 7 update that has already started downloading
If an update has already started downloading and you're about to start an event, you can still stop the download/update process in progress, by using the following steps:
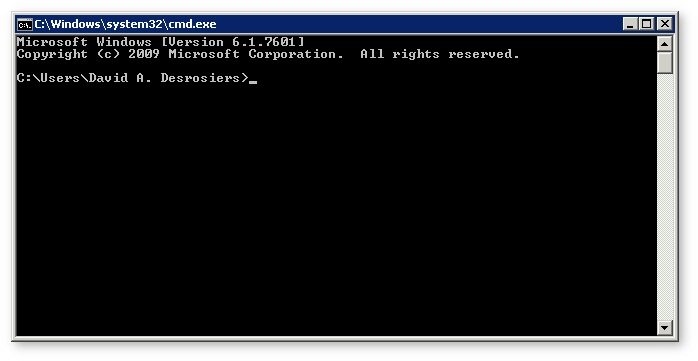
Open a "cmd" prompt as the Administrator. To do that, just go to Start and type 'cmd.exe' into the dialog. Do not just hit [Enter], that will run the Command Prompt as your normal user. You want to use Ctrl+Shift+Enter, which will prompt you to accept the UAC and run the Command Prompt as the Administrator. You'll know you did it right if your window title has the word "Administrator" in it, as shown here:
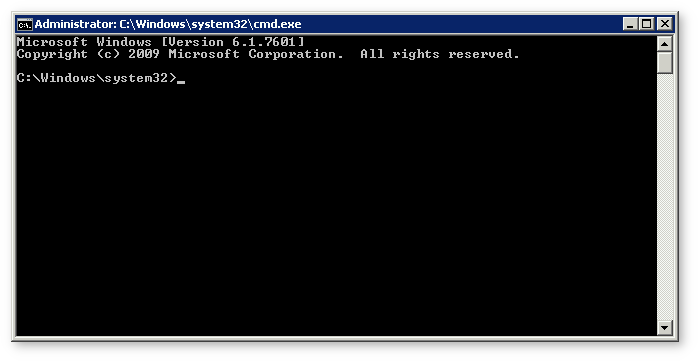
Oops, this one is not an elevated prompt!
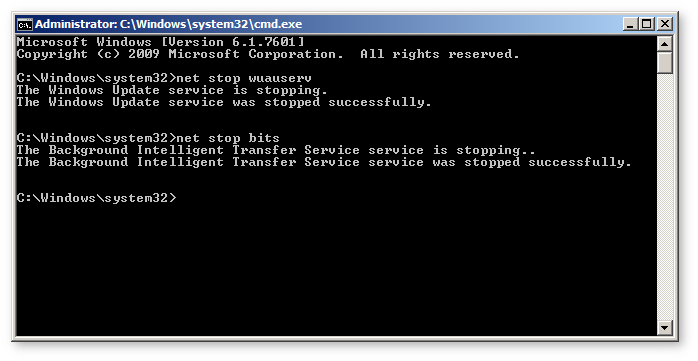
The first thing we need to do is stop the "Windows Update service". Run "net stop wuauserv" (minus the quotes) inside that Administrator cmd prompt window.
Next, stop the "Background Intelligent Transfer Service (aka "BITS") by running the command: "net stop bits"
The output of those commands should look something like this:
Don't forget to resume those services when you're done with your Zwift activity, by running the following:
- net start wuauserv
- net start bits
Pausing Microsoft updates for Windows 10
Unfortunately for Windows 10, there's no permanent way to disable updates, without some risky surgery on your Windows machine itself. I wouldn't recommend that, but you can pause updates for a period of time that will get you past your current and upcoming activities. Here's how!
Stopping the Windows Update Service
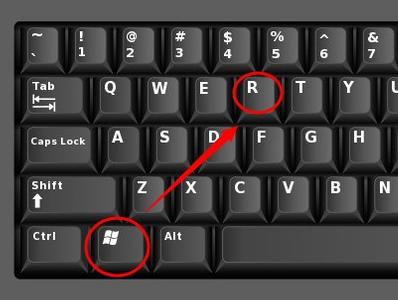
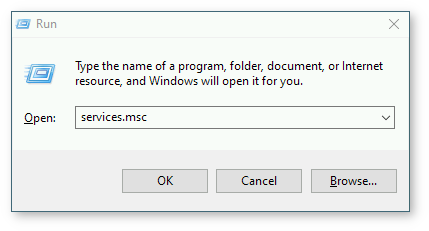
Start by hitting the Win+R key combination and type "services.msc" in the dialog that shows up:
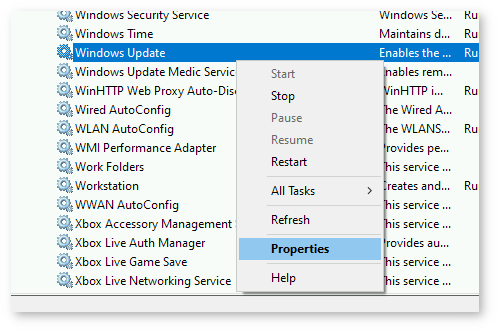
While in the Services applet, scroll down to "Windows Update", right-click on it and choose "Properties" from the menu:
Now you want to set the action to "Disabled" in the "Startup type" section of the Properties for Windows Update:
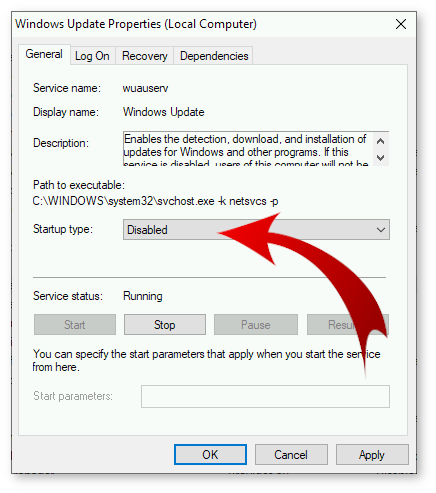
Now your updates should remain disabled until the next critical Windows update hits their queue.
Set your WiFi networks as "Metered" connections
Another way to achieve the same effect, is to set your WiFi networks to "Metered" connections. Note: This only works for wireless network connections, and will not work for Ethernet (wired) connections.
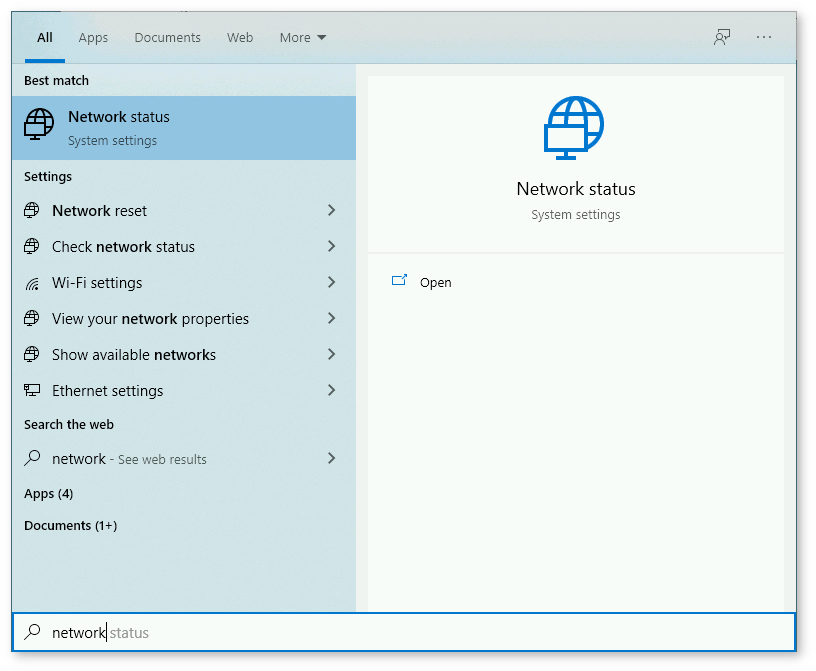
Go to your Start menu and type "Network" to bring up the Network status applet:
From here, click on "WiFi" on the left side, then go to "Manage Known Networks" on the right side. You will now see the WiFi network(s) configured for use on your machine. If you have more than one network or more than one WiFi adapter, you may see more than one network listed.
Click on the network(s) one by one, and go to Properties. On the next screen, you'll want to toggle the "Metered" slider to the "On" position, as shown here:
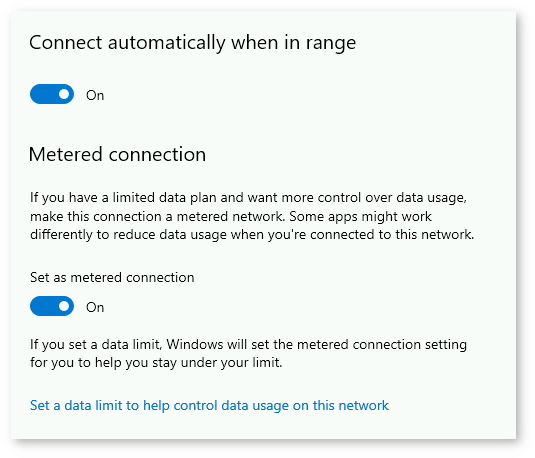
Windows 10 will not download any non-critical updates while your connection is set to Metered. Any urgent, critical patches or updates will be pushed automatically.
For those, you can use the next method, pausing updates for up to 4 weeks.
Pausing updates for up to 4 weeks
If you're willing to leave the Windows Update service enabled and running, you can also pause (defer) your updates for up to 4 weeks. To do that, go to your "Windows Update Settings" applet, and click the "Pause updates for 7 days" option several times until it turns grey.
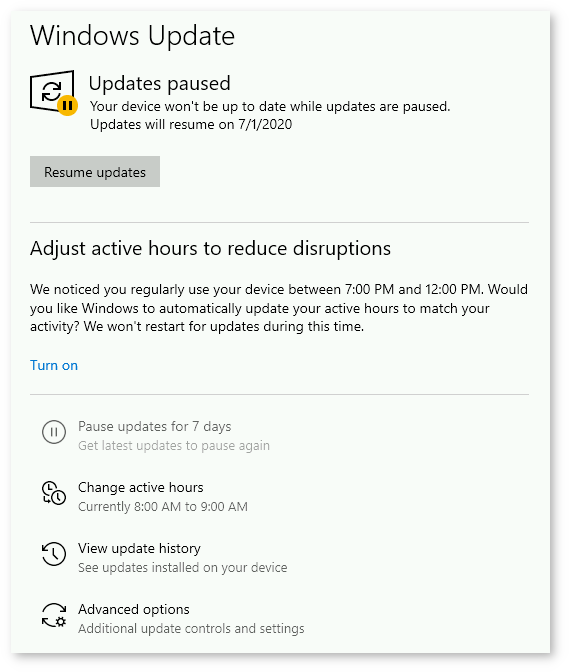
Within this same applet is the ability to set your "active hours", so updates do not impact your ride time. If you know you only ever ride from 7am to 11am, you can set those as your active hours, and Windows will not update your machine during those times.
macOS Mojave, Catalina
With the most-recent Apple macOS versions, you can set your Apple machine to update itself with newer patches and updates automatically. This has its good and bad points. If you don't have a solid, recent Time Machine backup to give you something to restore from in the event that an "update" breaks something you need or rely on, I would set automatic updates as disabled, and just check manually when you feel you need to see if there's new versions of the OS or core applications.
If you have Time Machine running on a regular basis, and you have current backups, you can safely leave Automatic Updates enabled, but make sure they don't impact your Zwift activities.
Disabling automatic software updates from the GUI
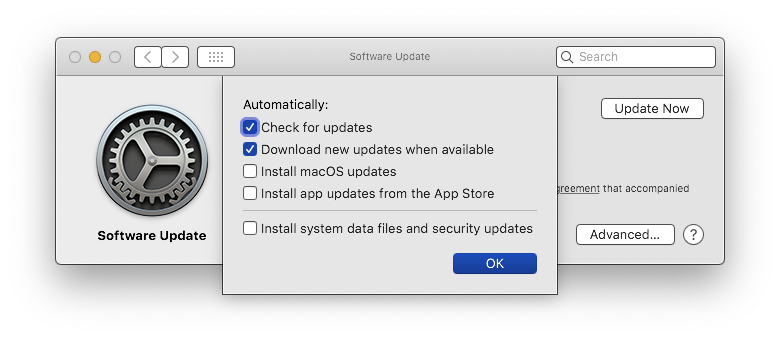
To see if your macOS machine is configured for Automatic Updates, use ⌘ + Space and type "System Preferences", and then click on "Software Update". You should see a window that looks like the following:
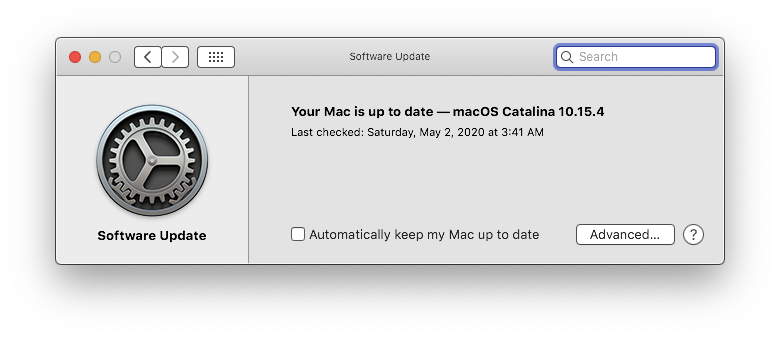
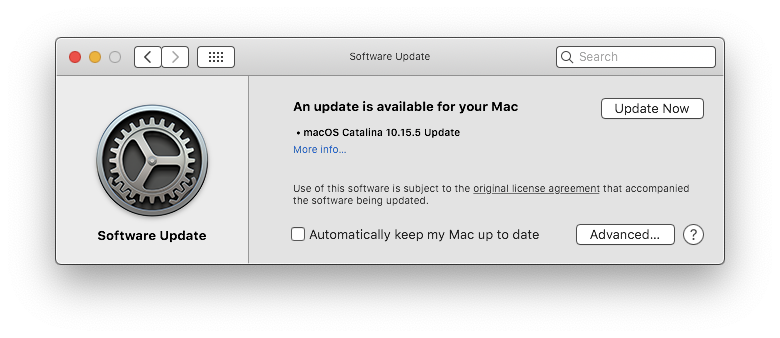
Note that I've unchecked "Automatically keep my Mac up to date". When I click that box, macOS will reach out and look for new updates. It turns out there's a pending update for my MacBook Pro:
I can also check for updates directly from the terminal (which is significantly faster and doesn't require me to reboot when the updates are installed).
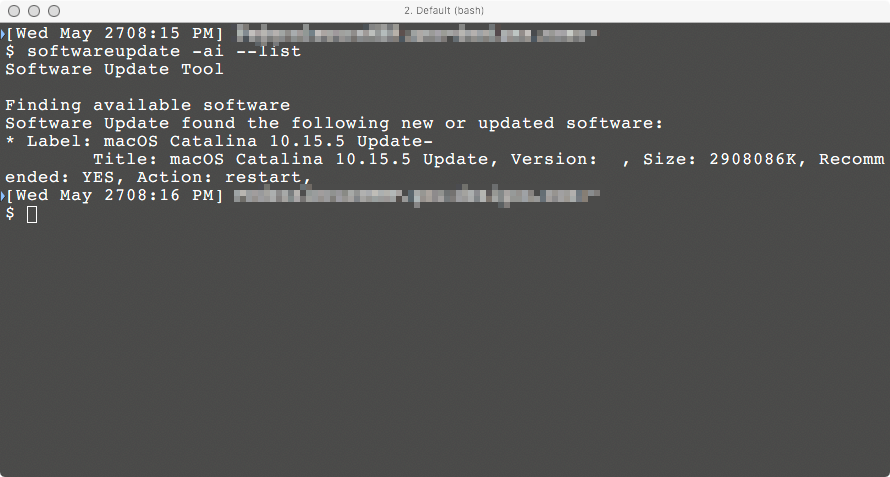
Ideally, I want to be sure those updates don't interrupt my Zwift activities, so I keep them disabled (all checkboxes off). You can tune these options as necessary for your own needs:
Disable background updates from the Terminal
You can also disable background updates directly from the Terminal, by running the following command:
sudo defaults write /Library/Preferences/com.apple.SoftwareUpdate AutomaticDownload -boolean FALSE
To reset those back to enabled, you can just set the value back to TRUE, as follows:
sudo defaults write /Library/Preferences/com.apple.SoftwareUpdate AutomaticDownload -boolean TRUE
Pause updates for your tablet or phone
If you run the Zwift application or the Zwift Companion App on your phone or tablet, and want to avoid any background interruption of those apps when you're riding on Zwift, you can disable OS updates there as well.
Turning off Android OS updates
Android devices are, by default, set to update apps through the Google Play store, as well as have OS updates pushed from the carrier. This is almost never what you want from a stable, predictable device that doesn't change its behavior on you without warning, backup and testing.
To disable Android OS updates, follow these steps:
- Pull down from the top of your screen to expose the Settings and launch that
- Scroll down in the Settings applet until you see the “About phone” section and tap on that
- Tap on the “Software Information” section, and scroll down until you see “Build Number"
- Repeatedly tap on that section until your device says that “Developer mode" has been enabled
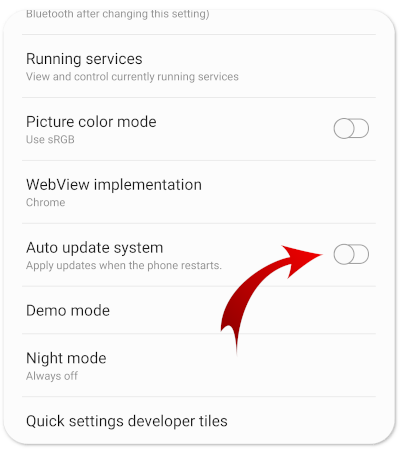
- Go back to the main Settings screen and scroll down again. You should see a new “Developer options” section near “About phone”
- Tap on "Developer options", and then look for the “Automatic system updates” option. Make sure it’s set to "Disabled"
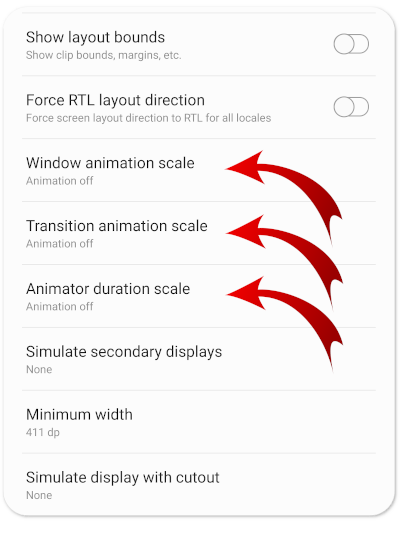
While you're in the same "Developer options" menu, set the 3 scaling options to "Off" as well, which will drastically increase snappiness and response time of your Android device:
Turning off Android application updates
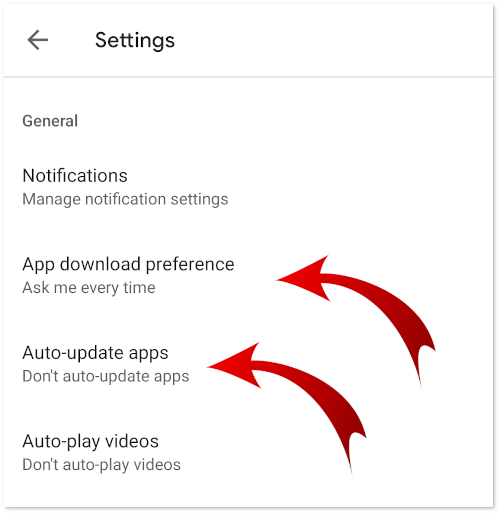
If you want to make sure your device doesn't kick off some unexpected Google Play App Store updates of any key apps (especially Zwift itself or the Zwift Companion App), then you can disable them there as well. To do that, follow these steps:
- Launch the Google Play Store application
- Tap the "hamburger" ☰ menu in the upper-left corner
- Scroll down and go to Settings
- Make sure the following two settings are changed to "Ask me every time" and "Don't auto-update apps"
An even quicker and easier way, is to disable Google Play Store itself, completely. There's an application called "Package Disabler Pro" that makes this very easy to do. Just install that, search for 'Google Play", and check the box. Now Google Play is disabled, and will not attempt to update your apps automatically.

To return it back to normal function, just go back into "Package Disabler" and uncheck the box next to Google Play.
Package Disabler is great for disabling annoying carrier software or unnecessary applications you don't want loaded, running or using your network in the background.
Note: Be careful with the apps you disable. If you disable software needed to boot or operate the device, you may find your device unable to restart and you'll have to do a Factory Reset. Just disable Google Play Store for now, until you're comfortable disabling the other applications you don't need.
Disable iOS and iPadOS OS updates
If you want to be sure your iOS device doesn't pull a large iOS or iPadOS update, you can go into Settings → General → Software Updates → Automatic Updates and set that to "Off", as shown here:
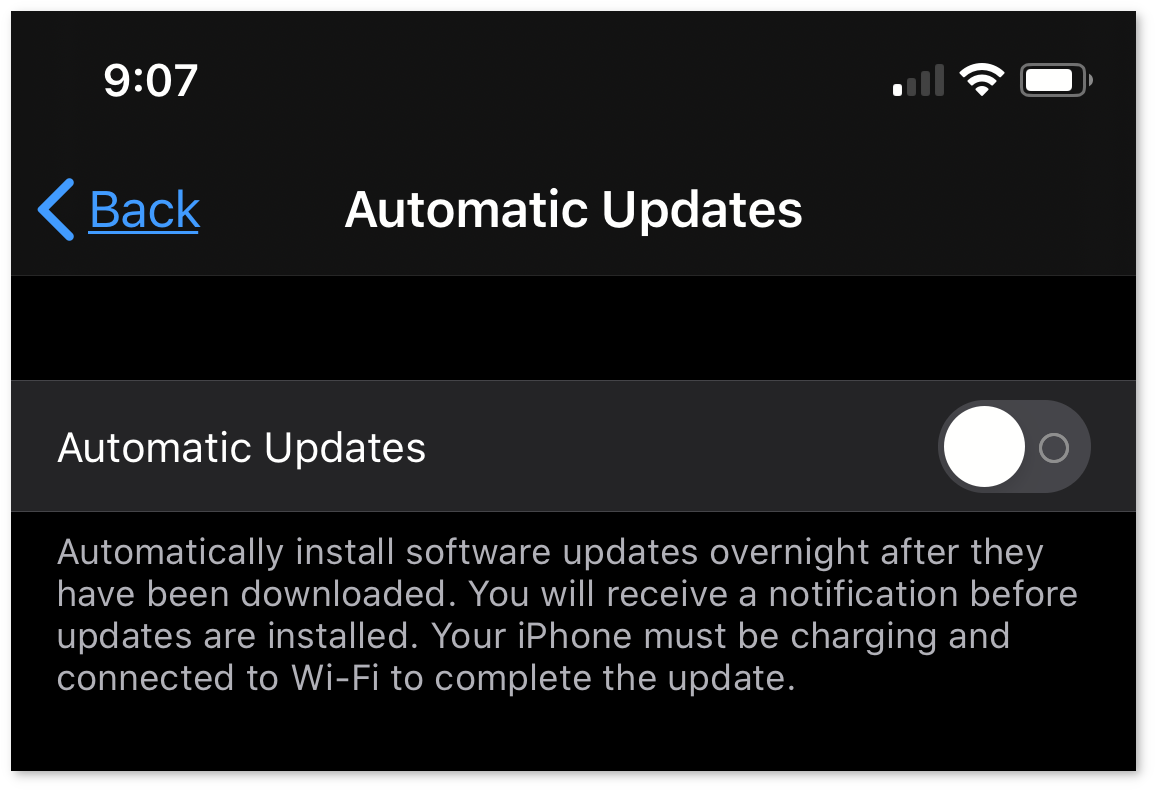
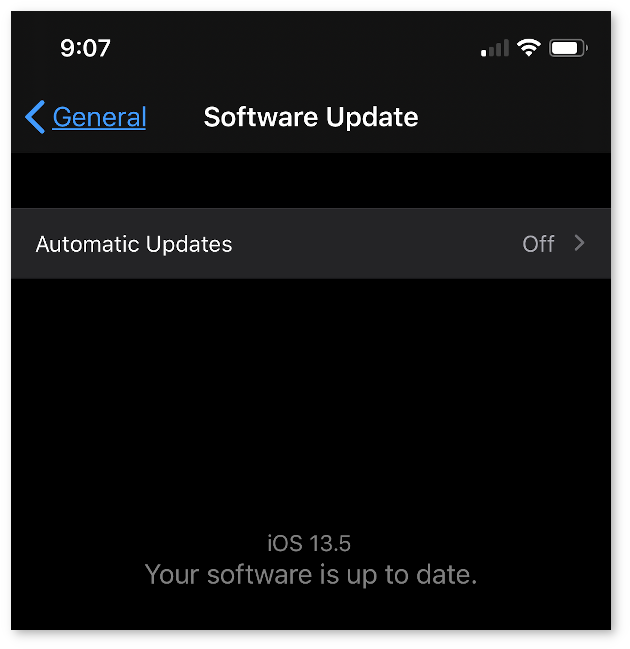
That's it. When you want to check for a new OS update, you can go back in there and just check for updates. You do not need to turn on Automatic Updates to check for or install new OS releases.
Disable App Store application updates
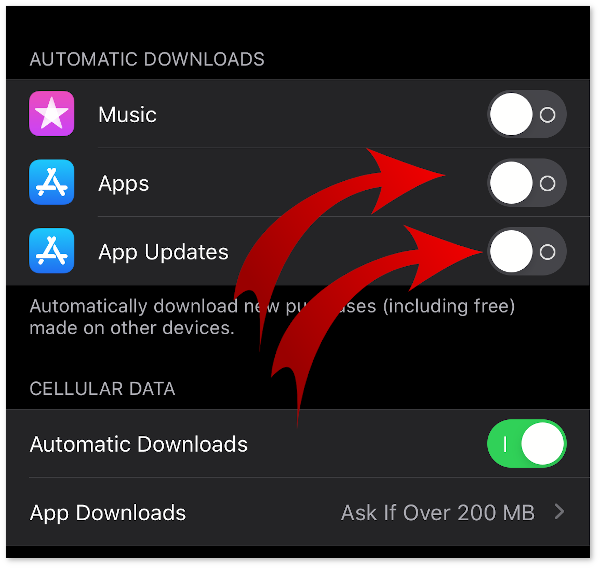
To stop iOS or iPad OS from automatically updating packages on your iPhone/iPad device, follow these steps:
- Open Settings as you did above, and tap on your iCloud account icon at the top of the Settings screen
- Tap on iTunes & App Store just below iCloud about mid-way down the screen
- Turn off the slider for Apps and App Updates, as shown here:
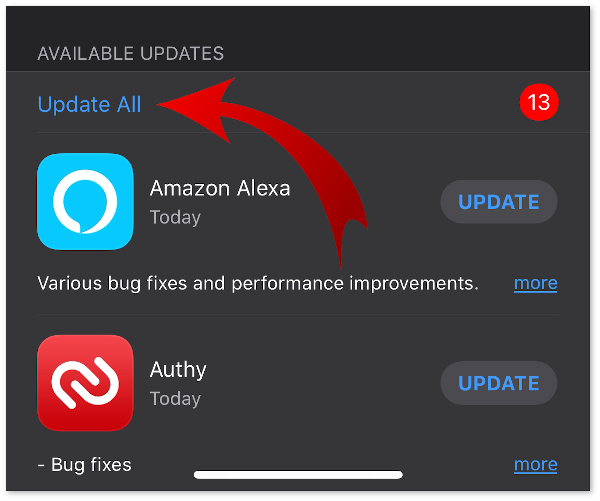
- Not to worry, you can still update your apps by visiting the App Store directly, and clicking "Update All" from the menu, as shown here:
Stop Zwift from updating at launch
Zwift's launcher (aka "ZwiftLauncher) on Windows and macOS both have in-menu options to disable updates, or updating in the background. You can find those with the following:
Windows
- Launch Zwift and let the login window show up, but do not log in. In your Start Menu at the bottom, should be an icon for the Zwift Launcher.
- Right-click that icon, and you'll see the following menu:
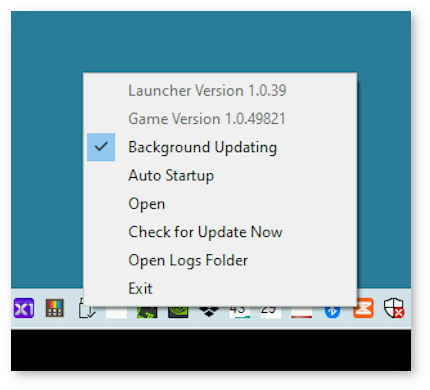
- Choose the options that are appropriate for your needs, and then complete the login into Zwift to begin your activity
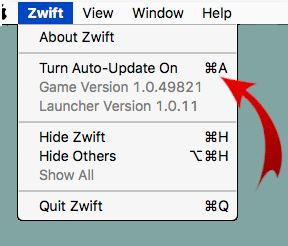
Apple macOS
A similar menu to Windows is available on macOS, but it's accessed slightly differently. There is no standalone launcher that remains resident on macOS, so you have to access the menu differently.
- Launch Zwift by using the icon or use ⌘ + Space and type "Zwift" from the Spotlight menu
- When Zwift's login dialog shows up, do not log in, leave it on the screen
- In the upper-left, near the Apple menu, click "Zwift" and then you'll see the following menu:
#SixLinesOfPython
Python? Sure, that's an option too. I wrote an offline Zwift downloader in Python called "ZOD" (Zwift Offline Downloader), and recently updated it with much better performance and threading. You can see both versions below. Shh, it's actually 272 lines of Python. With comments.
Version 1 of Zwift Offline Downloader
Version 2 of Zwift Offline Downloader
Conclusion
This KB was a lot longer than I originally scoped, but you should be able to make use of many of these tips and options to help your Zwift activities be interrupt-free! Good luck out there, and #RideOn!
- 1035 views
How do I tune my GPU for maximum performance in Zwift? (Windows)
How do I tune my GPU for maximum performance in Zwift? (Windows) setuid Sat, 11/21/2015 - 16:37Zwift can be very graphically intensive, especially when there are a lot of simultaneous riders on the screen at the same time. This is most apparent during a "ZTR" style racing event, or one of the public events such as the "World Bicycle Relief" event in early December 2015.
There are a large number of graphics cards, configurations and settings you can tune and tweak to maximize your FPS, or "frames per second" while playing, er "riding" Zwfit.
This HOWTO will help dispel some of the myths and provide some solutions that can help you get the most out of your GPU.
- Checking your current FPS
- Configuring your Zwift Settings
- Configuring your GPU settings
- Checking your Zwift Performance
- Tweaking your Zwift Environment Settings
TODO: (this is a living document and will evolve over time)
I only have Intel and NVIDIA gear at my disposal to play with, so I can't (yet) provide screenshots and solutions for AMD/Radeon users, but I will add those when I find someone with a Radeon card who can help me with the "Catalyst" or "Crimson" Radeon GPU suite of utilities.
Checking your current FPS
There are three primary graphics manufacturers supported by Zwift: Intel, AMD/Radeon and NVIDIA. If you have one of these cards in your Zwift PC or laptop, make sure you're on Zwift's supported list of platforms before you begin. Some cards are just too old or under-powered to display Zwift in any usable way.
If you have one of these older, unsupported graphics cards, you're going to need to upgrade the card itself (in the case of a PC that has a replaceable graphics card), or replace the entire machine (in the case of a laptop where the video card is integrated into the motherboard).
Before we do anything, let's check your baseline FPS. Grab any of your recent Zwift logs (found in your Zwift log directory) and drop it onto the top of the "Zwift Log Parser" web application. This should give you a very nice, graphical overview of your most-recent FPS values in-game.
There's another KB article dedicated to FPS in Zwift, which you can find here:
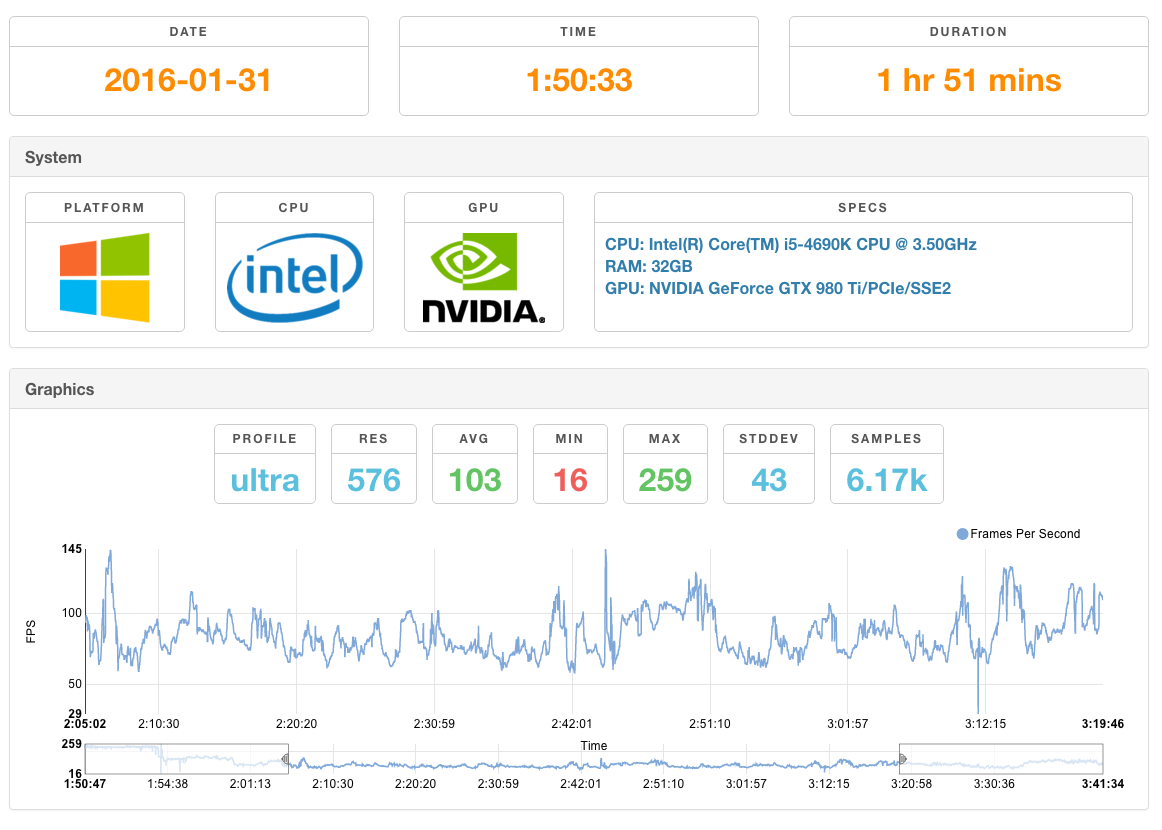
The "Zwift Log Parser" will analyze your log, extracting a number of key pieces of data and produce output that tells you what your min, max and average FPS were for that session. It is a very valuable debugging tool if you're not sure what kind of performance you're getting.
Configuring your Zwift Settings
There are some additional in-game settings you can modify that will help give you some performance gains.
Each Zwift client has a configuration profile that is used when you change your "Game Resolution" in the Settings. If you use "Low", you're using low.txt to customize your experience. If you use "Ultra", you're using ultra.txt and so on. If you're not sure where to find your Zwift data directories, the following KB article should help:
Edit the respective file that matches your game resolution, and add the following line to the end of the file, and save the file in the same location:
set gShowFPS=1
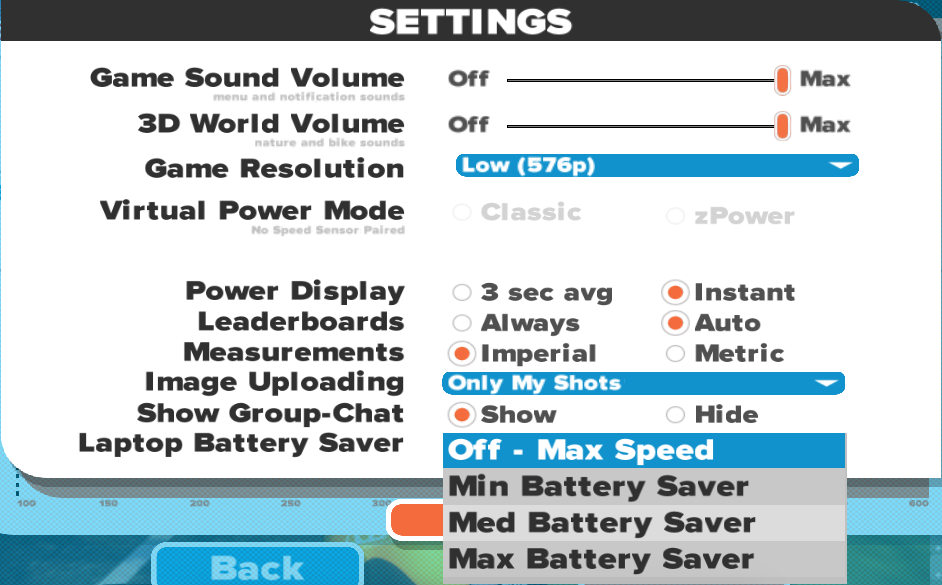
This setting will then allow Zwift to represent your current FPS in-game, at the top-left of the screen, where you normally see your own ride data (watts, cadence, heart rate). You'll see something like this:
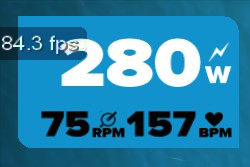
Launch Zwift and go into "Settings", so we can check your performance at this point. While you do that, you should see the new FPS showing up in the upper- left corner, as other riders ride by you while you have the Settings window open.
You may notice the latest Zwift has some "Battery Saver" settings you can use to reduce the FPS, thus saving battery for a longer ride if you're on a laptop, if you're not directly plugged into the mains (AC) power using your wall adapter.
If you are plugged into the wall, you can and should disable the Battery Saver option. If you're on a dedicated, wired PC, these settings will not help you and could negatively hurt your Zwift performance.
On my 11" 2015 MacBook Air, setting the Battery Saver option to Maximum gives me ~15FPS. Moving to Medium gives me ~20FPS, up to Minimum, I get ~25FPS and disabling it entirely gives me ~30FPS using the "Low" profile in Zwift. You'll see these changes reflected almost immediately when you change the options in the Battery Saver dropdown.
Play around with these settings first, before making any adjustments to your graphics card, so you know what your baseline FPS is to start with. Knowing what your baseline FPS is, will help you determine if any of the changes we make later are helping or hurting your performance.
Close down and exit Zwift, we won't need to keep it running while we make these next changes...
Configuring your GPU Settings
Let's go into the video card settings itself and make sure it's being set in the most optimal way for Zwift and any other games you might play on the same machine.
NVIDIA Graphics Cards
If you have the correct and latest NVIDIA drivers installed directly from NVIDIA (this is important), you should have an icon in your Windows system tray that you can use to open those settings. Right-clicking on this icon should give you a couple of options:
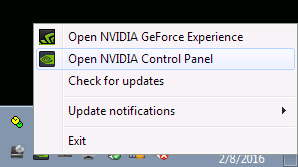
Select "Open NVIDIA Control Panel" from the options and you'll see a familiar looking control panel to configure the NVIDIA card. There's two primary settings we want to inspect and modify here, leaving all others untouched for the moment.
First, we want to make sure that the GPU itself, is being told to handle all of the PhysX calls that games request of your machine. PhysX is the real-time physics engine that NVIDIA uses to create effects like air, dirt, smoke, water and other elements in-game.
By default, this setting is going to be set to "Auto-select (recommended)" but this is not what you want if you want maximum performance from your card.
Change the setting in this section to force it to your primary (fastest) GPU, and dedicate it to this card. If your setting was set to "Auto-select" or "CPU", you're not going to get the best graphics performance out of your machine. Do not leave this set to "Auto-select", even though it says "recommended".
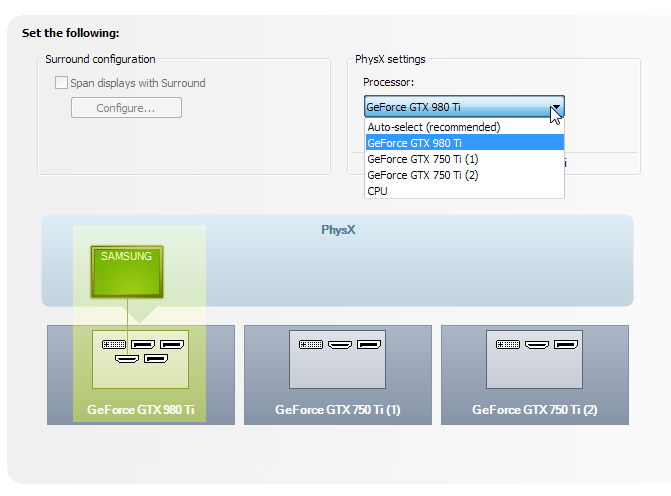
Save and Apply the change you've made here.
If you now go into "3D Settings" on the left-side of your NVIDIA Control Panel. On the right-side, if you scroll down will be a setting for "Vertical Sync" under the "Global Options" tab. No matter what the settng is set to, disable this.
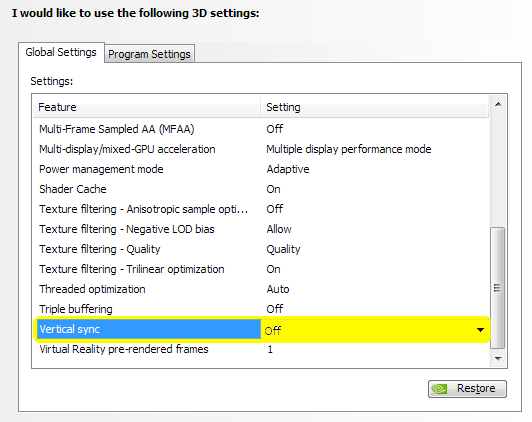
Save and Apply these changes.
AMD/Radeon Graphics Cards
(placeholder for now until we can get some community user data on tuning AMD cards using Catalyst/Crimson)
Intel HD Graphics Cards
(placeholder for now, until I'm able to write this up and get comlete screenshots)
Checking your Zwift Performance
Now go back into Zwift and see if your FPS up in the upper-left corner has made any improvements from earlier. You should see an almost doubling of the FPS, if these settings had a positive impact.
Tweaking your Zwift Environment Settings
There's still more to tweak, if you're still not seeing the kind of performance you want out of Zwift. If you look at your Zwift log, it will tell you which "Game Resolution" it is using, and it is that resolution's name that determines which configuration file to modify. If you open up your Zwift log in an editor, you'll see a line that looks like this, near the top:
[22:06:01] Using high graphics profile
Using the above example, I'm using the 'high' profile. Open up "high.txt" from your Zwift configuration directory in an editor and insert the following settings, right below the gShowFPS line we added earlier:
set gShowFPS=1 # Below options deprecated by Zwift in 2016-02-24 releaseset gDoReflectionMap=0set gSimpleReflections=1set gSimpleShadows=1
These settings will tell Zwift to reduce the quality of the reflection on the water surfaces, as well as use a much simpler, less real-time algorithm for drawing shadows that appear from trees, buildings, rocks and the ambient occlusion of sun rays shining down.
Turning those to their opposite values will increase the complexity needed to display the environment (consuming more FPS), and could impact your performance. If you have a high-end GPU, by all means, set them all the way up! I have 3 high-end GPUs in my Zwift machine, so I can turn all the dials, knobs and switches. You may not have that flexibility.
Here are some more settings to play with. If you decide to turn these off, you can tune the environment way back, so it basically turns Watopia into Dubai
UPDATE: ALL of the configuration options below have been deprecated and removed from Zwift as of the 2016-02-24 release. They no longer work to tune your client experience.
set gShowGrass=1set gShowGround=1set gShowBikes=1set gShowMountains=1set gShowRiders=1set gShowRoad=1set gShowRocks=1set gShowSky=1set gShowTrees=1set gShowWater=1set gShowBugs=1set gSunRays=1
There are dozens of other settings, but they're not really going to improve your graphics performance, so I won't go into each of them here,
I've worked with several people on the Zwift Riders Facebook group who have gone through these exact setting changes and have had significant gains in performance. They do work!
- 281238 views
Microsoft Windows
Microsoft Windows setuid Sat, 11/21/2015 - 16:58- 2594 views