Software
Software setuid Sat, 11/21/2015 - 16:19- 7052 views
Operating Systems
Operating Systems setuid Tue, 11/21/2017 - 16:56- 914 views
Apple OS X and macOS
Apple OS X and macOS setuid Sat, 11/21/2015 - 16:57- 393 views
How do I save my Zwift username and password on macOS?
How do I save my Zwift username and password on macOS? setuid Wed, 11/22/2017 - 11:16On Microsoft Windows, you can save your Zwift credentials (your username and password) into the "Internet Settings" keystore, but on Mac, things are different.
Zwift on Mac, by-default, does not let you save your credentials anywhere that it can use when you launch the app, but David A. Desrosiers (aka "setuid") has written a detailed HOWTO that uses Automator on Mac to do just that!
HOWTO: Fully automated Zwift login on Mac OS X
Not only does it auto-log into Zwift for you with a double-click of the icon, but it also securely stores the password in the Mac OS X "Keychain", an encrypted key store that will protect those credentials for you!
If you want to change the icon of the Automator script after you create it for Zwift, he's created a useful YouTube video that describes that process too!
- 7050 views
How can I avoid software updates from interrupting my Zwift activity?
How can I avoid software updates from interrupting my Zwift activity? setuid Wed, 05/27/2020 - 18:00
Many of us have fallen victim to this one on various platforms. You're 5 minutes away from starting that important Zwift activity.
- Air in the tires? Check!
- Batteries in the HRM and power meter? Check!
- Full bidons and nutrition within arm's reach? Check!
- Towel, fan, shoes, phone, TV remote control? Check, check, check!
Then you fire up Zwift to log in... boom, there's a new Zwift update you didn't plan on, or even worse, Windows or macOS decide NOW is when you need to have that new series of operating system patches and fixes installed. Not later, but NOW!
What do you do?
- How do you stop these updates from interrupting your Zwift activity?
- Can you just delay them?
- Can you stop the updates?
The answer to all of these questions is absolutely yes! This also includes those who run Zwift on their Apple iOS device or Android phone/tablet. I'll got through each of them below.
- Why do I want to pause software updates, don't I need them?
- Pausing updates for your desktop or laptop
- Pause updates for your tablet or phone
- Stop Zwift from updating at launch
- #SixLinesOfPython
- Conclusion
Why do I want to pause software updates, don't I need them?
There's a lot of malicious intent on the live Internet, and keeping your software current and up-to-date helps to protect you from any possible information leaks, breaches or malware from reaching your computer or tablet/phone.
Turning on "Automatic Updates" is usually suggested as one way to always stay clean and current so you're on the latest version of the operating system software or individual applications you're using. But automatic updates can also be a Pandora's Box that can cause problems, while it attempts to mitigate others.
The biggest and most-important concern with automatic updates, is that there's no way to roll back, if the new version introduces a new bug or compatibility issue while it attempts to protect you from others. You can't upgrade your OS from macOS Mojave to macOS Catalina, then find that none of your 32-bit software that worked fine under Mojave suddenly does not work at all under Catalina, then uninstall Catalina and go back to Mojave again. Not without a complete wipe and reinstall of the OS and its applications and data.
Likewise for applications you use. If the new version of an application has a new requirement that you don't like or want, or removes features you're used to using, you can't usually go back to the App Store or Google Play Store and reinstall the previous version you were running before. They're typically not there, and Apple has taken a hard line against "side-loading" apps that didn't come directly through them.
What's the solution then?
Backups of course! But you can't really keep Automatic Updates enabled and make sure your device has a full, working, complete backup before the updates are installed. You usually have to choose one or the other. It's best to have backups anyway, in case the updates cause your device to crash, brick or "boot-loop".
So you can disable OS and app updates, until you have a chance to fully back up your device, in case of an issue or error, you can restore from that backup. This allows quite a bit more flexibility, but does require that you do query for your own updates on your own schedule.
- Backups ensure your device will never lose data, and you can always restore from the backup
- You can roll back from a faulty or buggy update/patch/application
- If features are removed in newer versions, you can go back to the prior state/app version
- A backup allows you to test the updated application or OS, and return to the prior state when your testing is done.
You should always test new software/applications in an isolated way where possible, before making the move to using them full-time on your daily driver device or machine.
Apple is particularly prickly in this situation, since a device backup and immediate restore never leaves you with the same applications and configuration you started with. If the applications you were running immediately prior to the backup are no longer available on the App Store, your device restore will not put them back. You'll essentially lose applications you were running before, if this is the case.
Apple will often remove applications that it deems violates its own Terms of Service or competes with their own offerings. That's disastrous in almost every situation when you want to restore the previous state of your device.
I'll go through the steps to disable/pause updates on each OS and device below.
Pausing Microsoft Windows 7 updates
The process to disable updates in Windows 7 is very straightforward. Here's how:
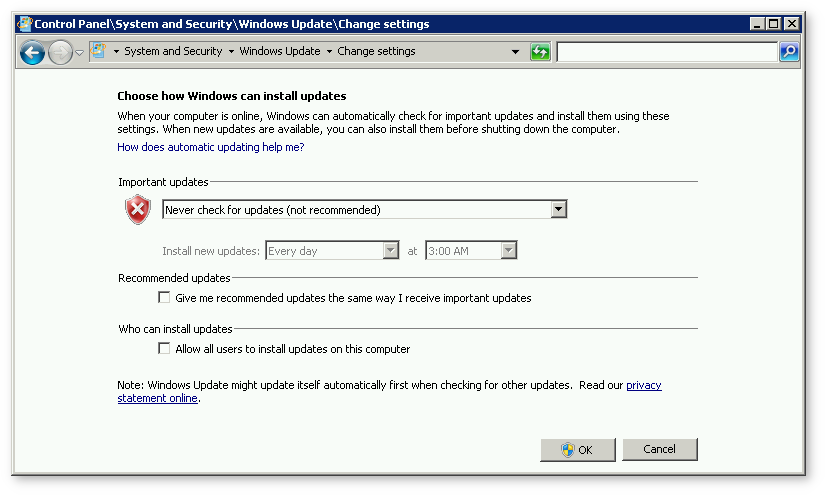
- Click Start → Control Panel → System and Security → Turn automatic updating on or off
- In the Important updates menu, select Never check for updates.
- Deselect Give me recommended updates the same way I receive important updates.
- Deselect Allow all users to install updates on this computer and click OK.
Alternatively, in Step 2 above, you can choose to have the updates downloaded, but not installed until you're ready to install them.
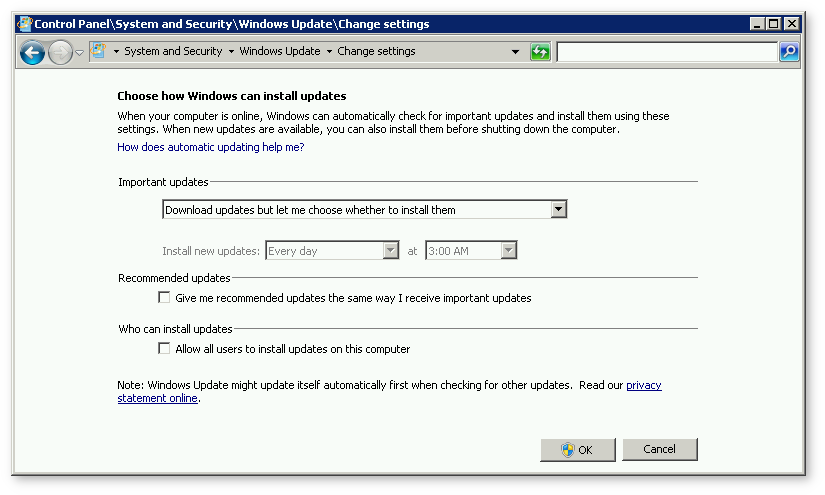
The caveat here is that if there are a large number of updates, you could be downloading them while you're on Zwift, which could lead to some network congestion and delays.
Make the choice that best fits your individual needs.
Pausing a Microsoft Windows 7 update that has already started downloading
If an update has already started downloading and you're about to start an event, you can still stop the download/update process in progress, by using the following steps:
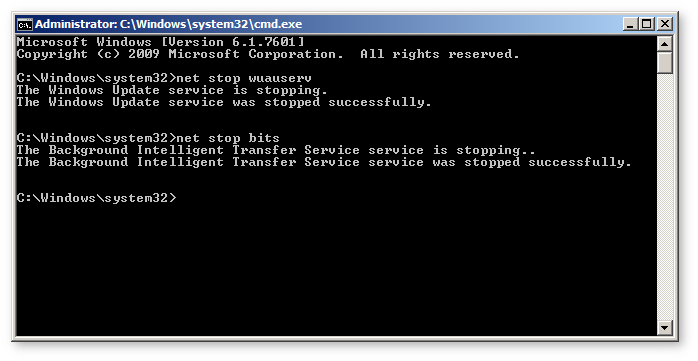
Open a "cmd" prompt as the Administrator. To do that, just go to Start and type 'cmd.exe' into the dialog. Do not just hit [Enter], that will run the Command Prompt as your normal user. You want to use Ctrl+Shift+Enter, which will prompt you to accept the UAC and run the Command Prompt as the Administrator. You'll know you did it right if your window title has the word "Administrator" in it, as shown here:
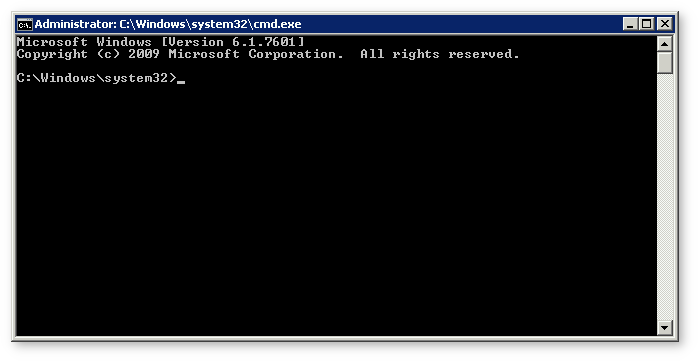
Oops, this one is not an elevated prompt!
The first thing we need to do is stop the "Windows Update service". Run "net stop wuauserv" (minus the quotes) inside that Administrator cmd prompt window.
Next, stop the "Background Intelligent Transfer Service (aka "BITS") by running the command: "net stop bits"
The output of those commands should look something like this:
Don't forget to resume those services when you're done with your Zwift activity, by running the following:
- net start wuauserv
- net start bits
Pausing Microsoft updates for Windows 10
Unfortunately for Windows 10, there's no permanent way to disable updates, without some risky surgery on your Windows machine itself. I wouldn't recommend that, but you can pause updates for a period of time that will get you past your current and upcoming activities. Here's how!
Stopping the Windows Update Service
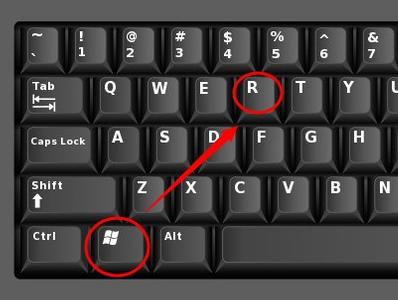
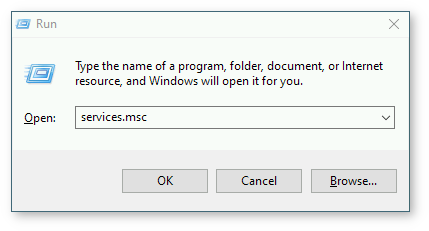
Start by hitting the Win+R key combination and type "services.msc" in the dialog that shows up:
While in the Services applet, scroll down to "Windows Update", right-click on it and choose "Properties" from the menu:
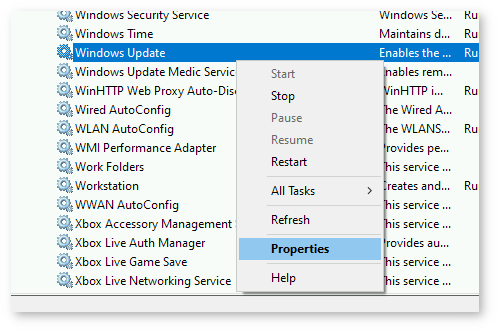
Now you want to set the action to "Disabled" in the "Startup type" section of the Properties for Windows Update:
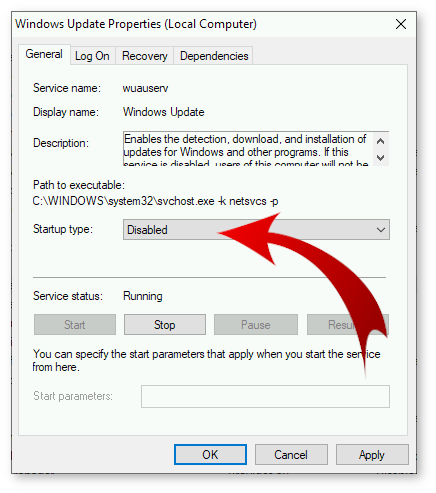
Now your updates should remain disabled until the next critical Windows update hits their queue.
Set your WiFi networks as "Metered" connections
Another way to achieve the same effect, is to set your WiFi networks to "Metered" connections. Note: This only works for wireless network connections, and will not work for Ethernet (wired) connections.
Go to your Start menu and type "Network" to bring up the Network status applet:
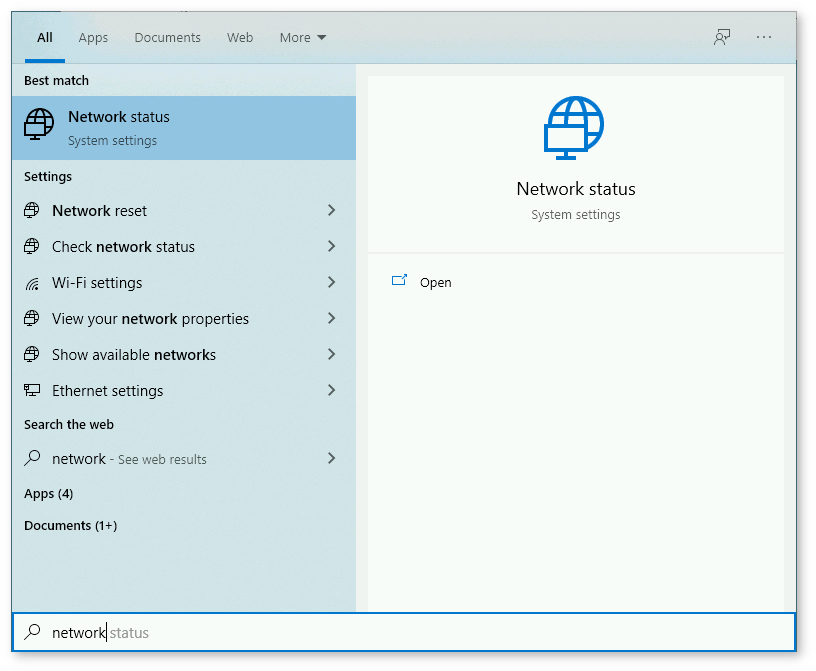
From here, click on "WiFi" on the left side, then go to "Manage Known Networks" on the right side. You will now see the WiFi network(s) configured for use on your machine. If you have more than one network or more than one WiFi adapter, you may see more than one network listed.
Click on the network(s) one by one, and go to Properties. On the next screen, you'll want to toggle the "Metered" slider to the "On" position, as shown here:
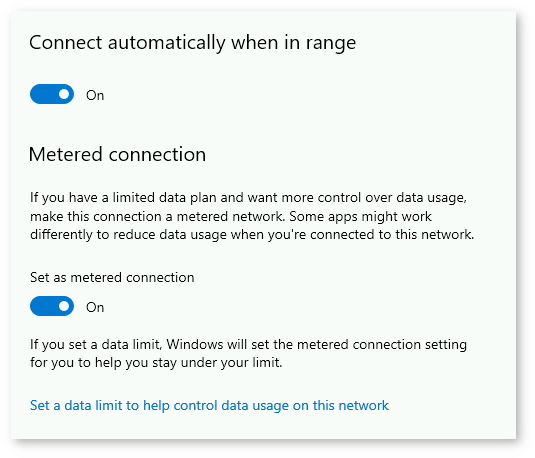
Windows 10 will not download any non-critical updates while your connection is set to Metered. Any urgent, critical patches or updates will be pushed automatically.
For those, you can use the next method, pausing updates for up to 4 weeks.
Pausing updates for up to 4 weeks
If you're willing to leave the Windows Update service enabled and running, you can also pause (defer) your updates for up to 4 weeks. To do that, go to your "Windows Update Settings" applet, and click the "Pause updates for 7 days" option several times until it turns grey.
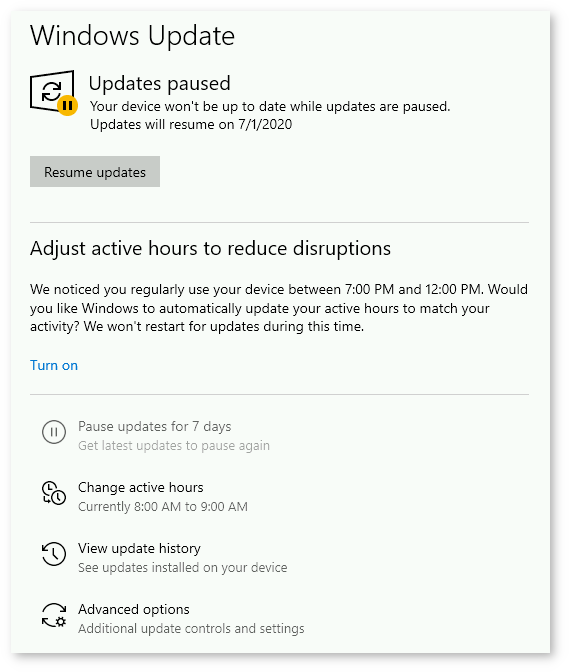
Within this same applet is the ability to set your "active hours", so updates do not impact your ride time. If you know you only ever ride from 7am to 11am, you can set those as your active hours, and Windows will not update your machine during those times.
macOS Mojave, Catalina
With the most-recent Apple macOS versions, you can set your Apple machine to update itself with newer patches and updates automatically. This has its good and bad points. If you don't have a solid, recent Time Machine backup to give you something to restore from in the event that an "update" breaks something you need or rely on, I would set automatic updates as disabled, and just check manually when you feel you need to see if there's new versions of the OS or core applications.
If you have Time Machine running on a regular basis, and you have current backups, you can safely leave Automatic Updates enabled, but make sure they don't impact your Zwift activities.
Disabling automatic software updates from the GUI
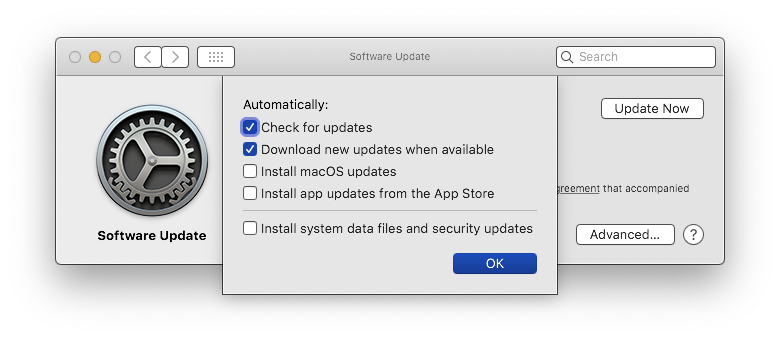
To see if your macOS machine is configured for Automatic Updates, use ⌘ + Space and type "System Preferences", and then click on "Software Update". You should see a window that looks like the following:
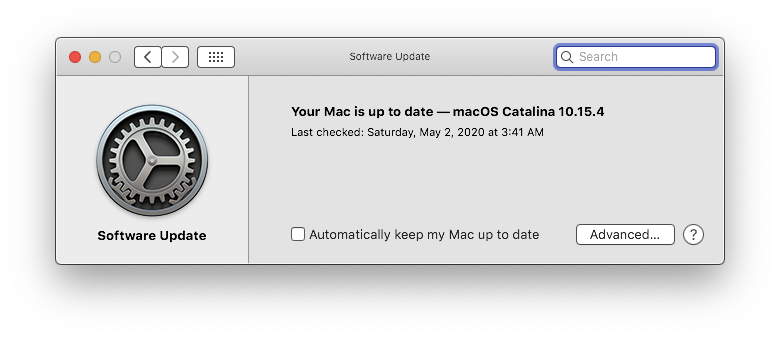
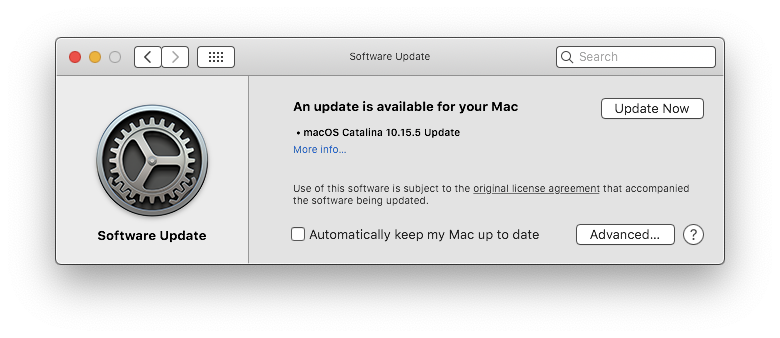
Note that I've unchecked "Automatically keep my Mac up to date". When I click that box, macOS will reach out and look for new updates. It turns out there's a pending update for my MacBook Pro:
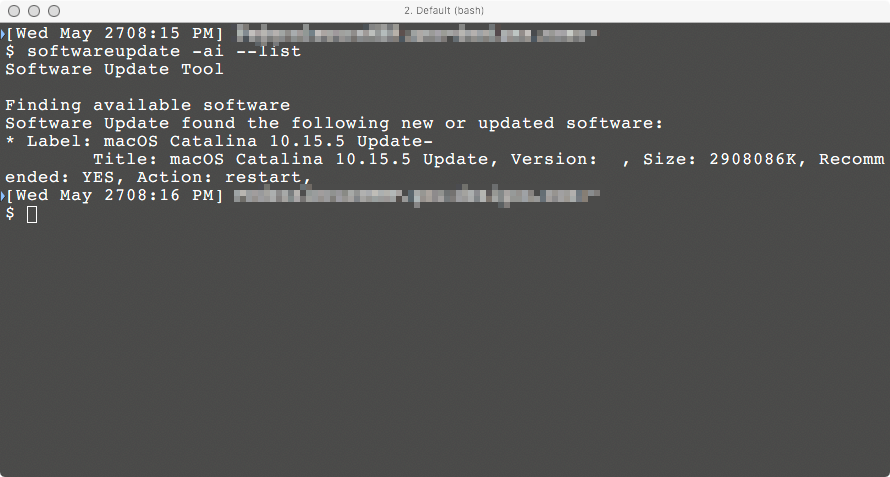
I can also check for updates directly from the terminal (which is significantly faster and doesn't require me to reboot when the updates are installed).
Ideally, I want to be sure those updates don't interrupt my Zwift activities, so I keep them disabled (all checkboxes off). You can tune these options as necessary for your own needs:
Disable background updates from the Terminal
You can also disable background updates directly from the Terminal, by running the following command:
sudo defaults write /Library/Preferences/com.apple.SoftwareUpdate AutomaticDownload -boolean FALSE
To reset those back to enabled, you can just set the value back to TRUE, as follows:
sudo defaults write /Library/Preferences/com.apple.SoftwareUpdate AutomaticDownload -boolean TRUE
Pause updates for your tablet or phone
If you run the Zwift application or the Zwift Companion App on your phone or tablet, and want to avoid any background interruption of those apps when you're riding on Zwift, you can disable OS updates there as well.
Turning off Android OS updates
Android devices are, by default, set to update apps through the Google Play store, as well as have OS updates pushed from the carrier. This is almost never what you want from a stable, predictable device that doesn't change its behavior on you without warning, backup and testing.
To disable Android OS updates, follow these steps:
- Pull down from the top of your screen to expose the Settings and launch that
- Scroll down in the Settings applet until you see the “About phone” section and tap on that
- Tap on the “Software Information” section, and scroll down until you see “Build Number"
- Repeatedly tap on that section until your device says that “Developer mode" has been enabled
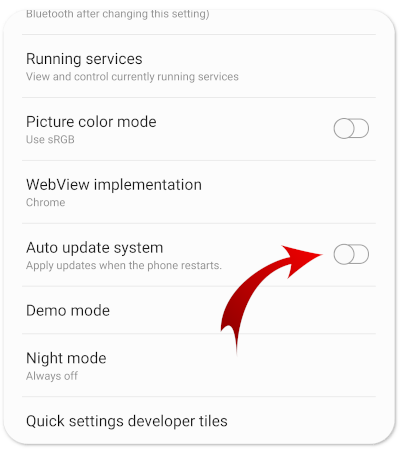
- Go back to the main Settings screen and scroll down again. You should see a new “Developer options” section near “About phone”
- Tap on "Developer options", and then look for the “Automatic system updates” option. Make sure it’s set to "Disabled"
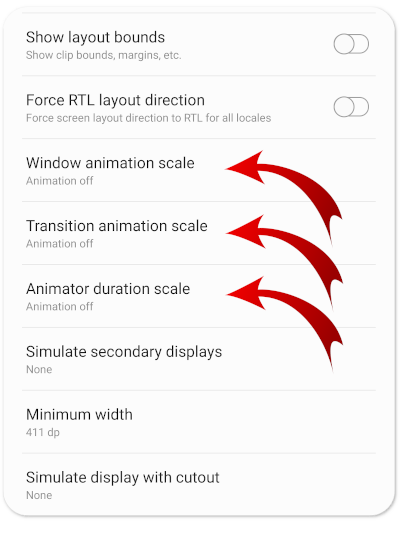
While you're in the same "Developer options" menu, set the 3 scaling options to "Off" as well, which will drastically increase snappiness and response time of your Android device:
Turning off Android application updates
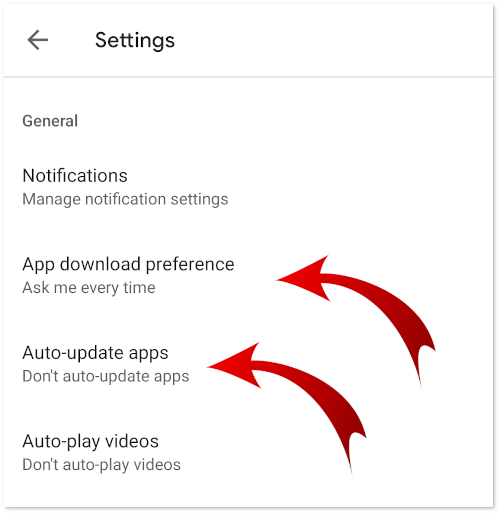
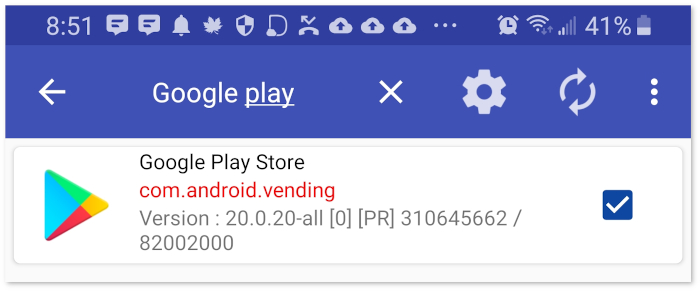
If you want to make sure your device doesn't kick off some unexpected Google Play App Store updates of any key apps (especially Zwift itself or the Zwift Companion App), then you can disable them there as well. To do that, follow these steps:
- Launch the Google Play Store application
- Tap the "hamburger" ☰ menu in the upper-left corner
- Scroll down and go to Settings
- Make sure the following two settings are changed to "Ask me every time" and "Don't auto-update apps"
An even quicker and easier way, is to disable Google Play Store itself, completely. There's an application called "Package Disabler Pro" that makes this very easy to do. Just install that, search for 'Google Play", and check the box. Now Google Play is disabled, and will not attempt to update your apps automatically.
To return it back to normal function, just go back into "Package Disabler" and uncheck the box next to Google Play.
Package Disabler is great for disabling annoying carrier software or unnecessary applications you don't want loaded, running or using your network in the background.
Note: Be careful with the apps you disable. If you disable software needed to boot or operate the device, you may find your device unable to restart and you'll have to do a Factory Reset. Just disable Google Play Store for now, until you're comfortable disabling the other applications you don't need.
Disable iOS and iPadOS OS updates
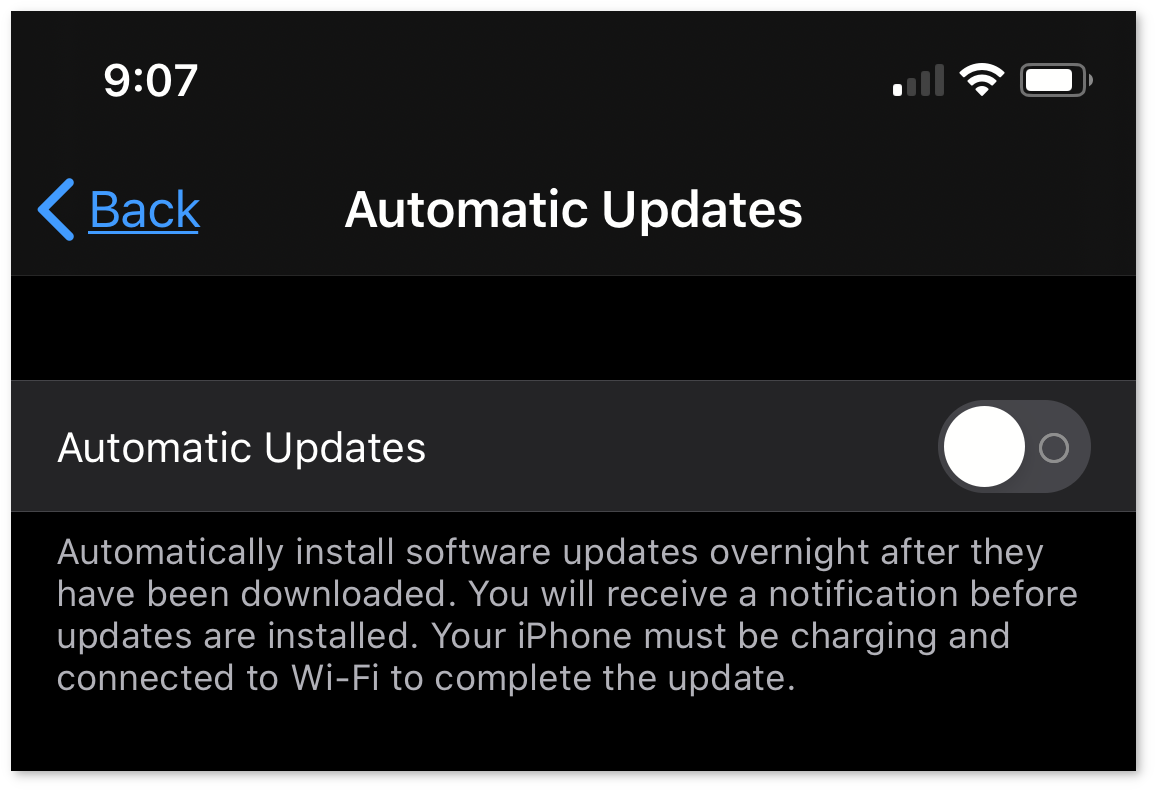
If you want to be sure your iOS device doesn't pull a large iOS or iPadOS update, you can go into Settings → General → Software Updates → Automatic Updates and set that to "Off", as shown here:
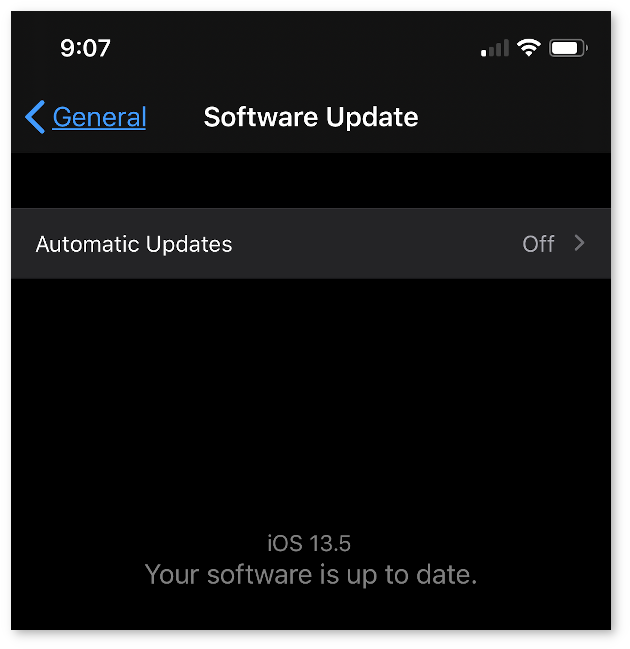
That's it. When you want to check for a new OS update, you can go back in there and just check for updates. You do not need to turn on Automatic Updates to check for or install new OS releases.
Disable App Store application updates
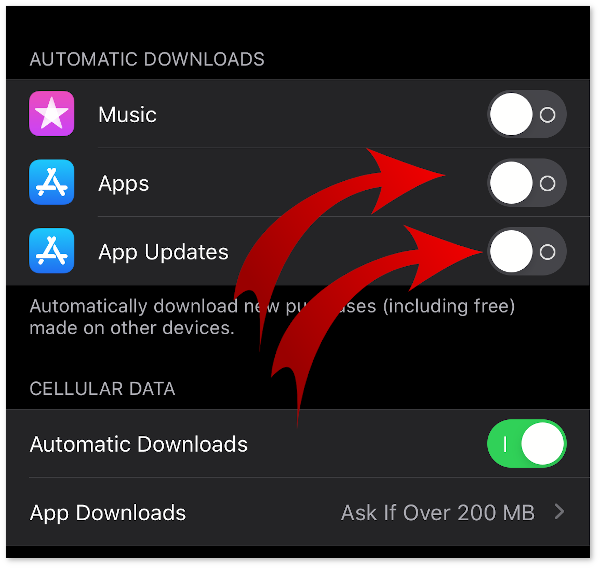
To stop iOS or iPad OS from automatically updating packages on your iPhone/iPad device, follow these steps:
- Open Settings as you did above, and tap on your iCloud account icon at the top of the Settings screen
- Tap on iTunes & App Store just below iCloud about mid-way down the screen
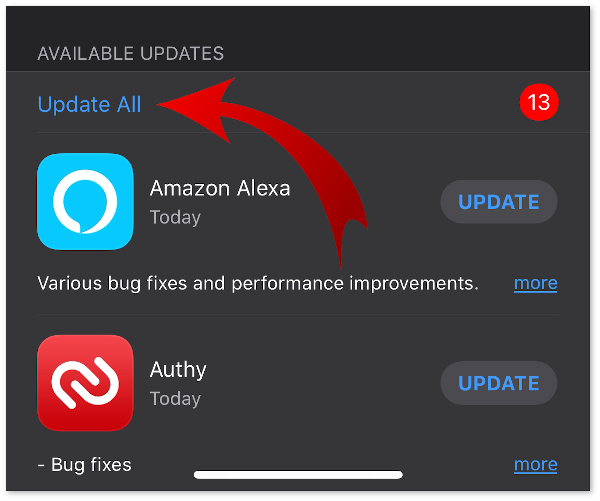
- Turn off the slider for Apps and App Updates, as shown here:
- Not to worry, you can still update your apps by visiting the App Store directly, and clicking "Update All" from the menu, as shown here:
Stop Zwift from updating at launch
Zwift's launcher (aka "ZwiftLauncher) on Windows and macOS both have in-menu options to disable updates, or updating in the background. You can find those with the following:
Windows
- Launch Zwift and let the login window show up, but do not log in. In your Start Menu at the bottom, should be an icon for the Zwift Launcher.
- Right-click that icon, and you'll see the following menu:
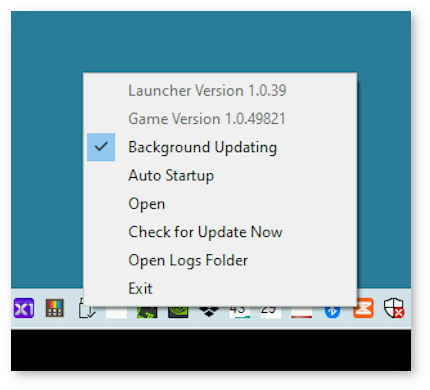
- Choose the options that are appropriate for your needs, and then complete the login into Zwift to begin your activity
Apple macOS
A similar menu to Windows is available on macOS, but it's accessed slightly differently. There is no standalone launcher that remains resident on macOS, so you have to access the menu differently.
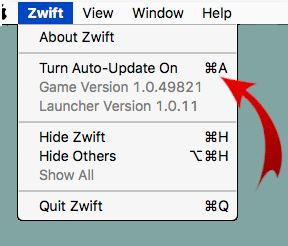
- Launch Zwift by using the icon or use ⌘ + Space and type "Zwift" from the Spotlight menu
- When Zwift's login dialog shows up, do not log in, leave it on the screen
- In the upper-left, near the Apple menu, click "Zwift" and then you'll see the following menu:
#SixLinesOfPython
Python? Sure, that's an option too. I wrote an offline Zwift downloader in Python called "ZOD" (Zwift Offline Downloader), and recently updated it with much better performance and threading. You can see both versions below. Shh, it's actually 272 lines of Python. With comments.
Version 1 of Zwift Offline Downloader
Version 2 of Zwift Offline Downloader
Conclusion
This KB was a lot longer than I originally scoped, but you should be able to make use of many of these tips and options to help your Zwift activities be interrupt-free! Good luck out there, and #RideOn!
- 1035 views
How do I tune my GPU for maximum performance in Zwift? (Windows)
How do I tune my GPU for maximum performance in Zwift? (Windows) setuid Sat, 11/21/2015 - 16:37Zwift can be very graphically intensive, especially when there are a lot of simultaneous riders on the screen at the same time. This is most apparent during a "ZTR" style racing event, or one of the public events such as the "World Bicycle Relief" event in early December 2015.
There are a large number of graphics cards, configurations and settings you can tune and tweak to maximize your FPS, or "frames per second" while playing, er "riding" Zwfit.
This HOWTO will help dispel some of the myths and provide some solutions that can help you get the most out of your GPU.
- Checking your current FPS
- Configuring your Zwift Settings
- Configuring your GPU settings
- Checking your Zwift Performance
- Tweaking your Zwift Environment Settings
TODO: (this is a living document and will evolve over time)
I only have Intel and NVIDIA gear at my disposal to play with, so I can't (yet) provide screenshots and solutions for AMD/Radeon users, but I will add those when I find someone with a Radeon card who can help me with the "Catalyst" or "Crimson" Radeon GPU suite of utilities.
Checking your current FPS
There are three primary graphics manufacturers supported by Zwift: Intel, AMD/Radeon and NVIDIA. If you have one of these cards in your Zwift PC or laptop, make sure you're on Zwift's supported list of platforms before you begin. Some cards are just too old or under-powered to display Zwift in any usable way.
If you have one of these older, unsupported graphics cards, you're going to need to upgrade the card itself (in the case of a PC that has a replaceable graphics card), or replace the entire machine (in the case of a laptop where the video card is integrated into the motherboard).
Before we do anything, let's check your baseline FPS. Grab any of your recent Zwift logs (found in your Zwift log directory) and drop it onto the top of the "Zwift Log Parser" web application. This should give you a very nice, graphical overview of your most-recent FPS values in-game.
There's another KB article dedicated to FPS in Zwift, which you can find here:
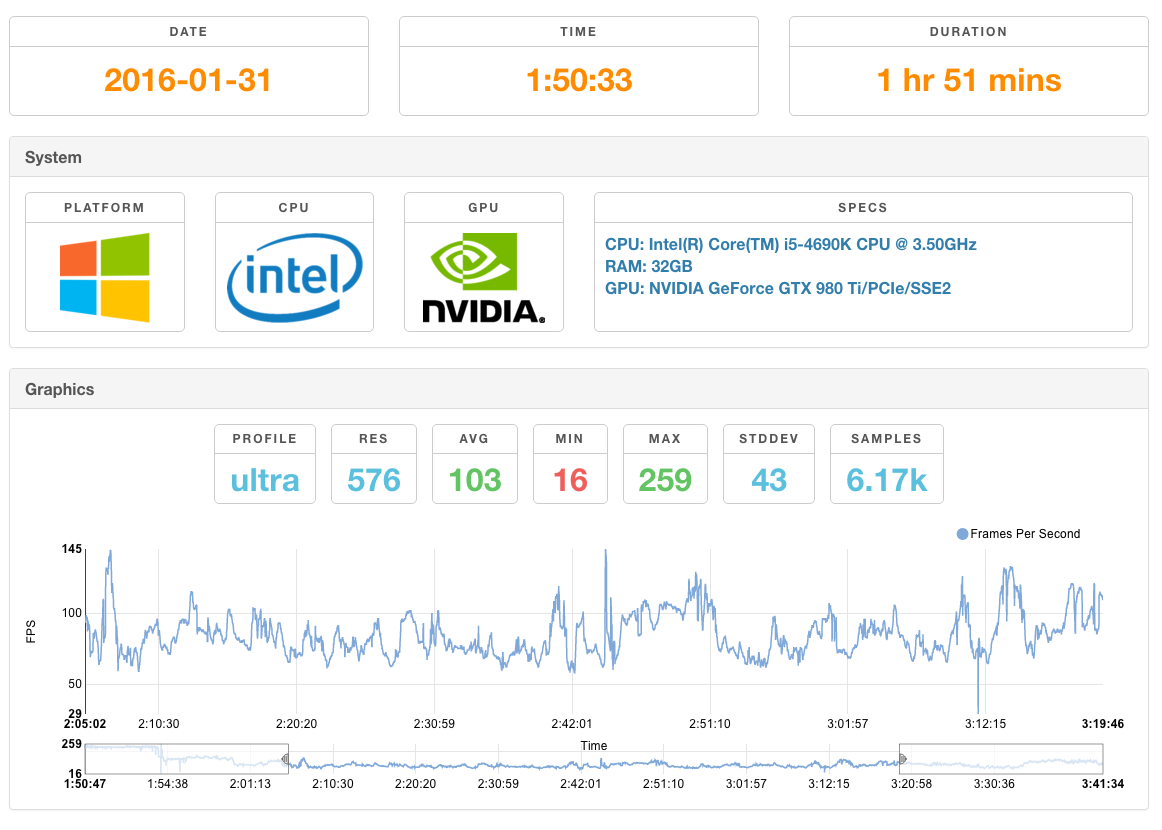
The "Zwift Log Parser" will analyze your log, extracting a number of key pieces of data and produce output that tells you what your min, max and average FPS were for that session. It is a very valuable debugging tool if you're not sure what kind of performance you're getting.
Configuring your Zwift Settings
There are some additional in-game settings you can modify that will help give you some performance gains.
Each Zwift client has a configuration profile that is used when you change your "Game Resolution" in the Settings. If you use "Low", you're using low.txt to customize your experience. If you use "Ultra", you're using ultra.txt and so on. If you're not sure where to find your Zwift data directories, the following KB article should help:
Edit the respective file that matches your game resolution, and add the following line to the end of the file, and save the file in the same location:
set gShowFPS=1
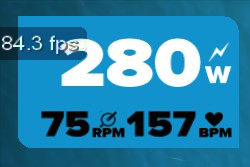
This setting will then allow Zwift to represent your current FPS in-game, at the top-left of the screen, where you normally see your own ride data (watts, cadence, heart rate). You'll see something like this:
Launch Zwift and go into "Settings", so we can check your performance at this point. While you do that, you should see the new FPS showing up in the upper- left corner, as other riders ride by you while you have the Settings window open.
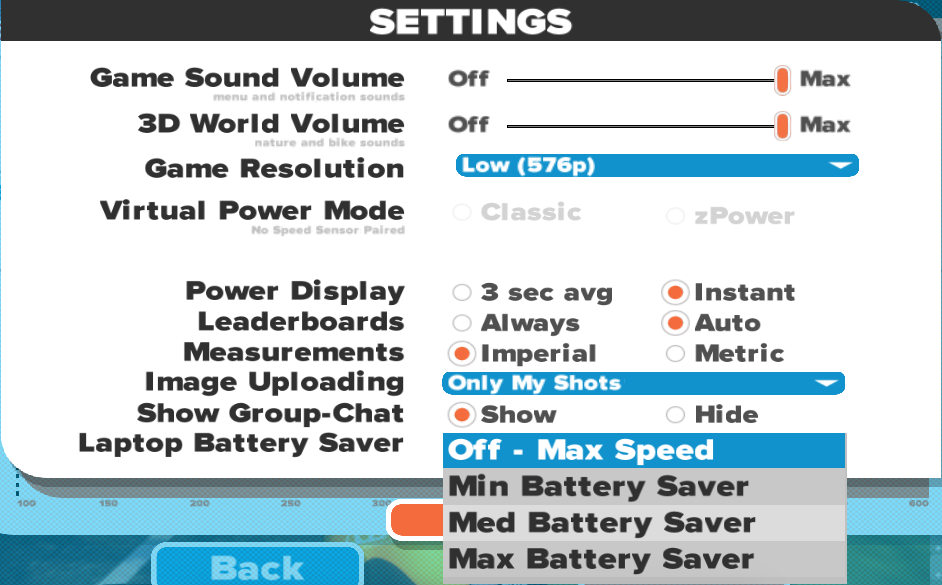
You may notice the latest Zwift has some "Battery Saver" settings you can use to reduce the FPS, thus saving battery for a longer ride if you're on a laptop, if you're not directly plugged into the mains (AC) power using your wall adapter.
If you are plugged into the wall, you can and should disable the Battery Saver option. If you're on a dedicated, wired PC, these settings will not help you and could negatively hurt your Zwift performance.
On my 11" 2015 MacBook Air, setting the Battery Saver option to Maximum gives me ~15FPS. Moving to Medium gives me ~20FPS, up to Minimum, I get ~25FPS and disabling it entirely gives me ~30FPS using the "Low" profile in Zwift. You'll see these changes reflected almost immediately when you change the options in the Battery Saver dropdown.
Play around with these settings first, before making any adjustments to your graphics card, so you know what your baseline FPS is to start with. Knowing what your baseline FPS is, will help you determine if any of the changes we make later are helping or hurting your performance.
Close down and exit Zwift, we won't need to keep it running while we make these next changes...
Configuring your GPU Settings
Let's go into the video card settings itself and make sure it's being set in the most optimal way for Zwift and any other games you might play on the same machine.
NVIDIA Graphics Cards
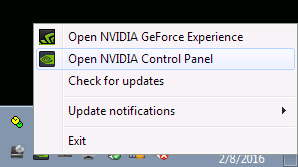
If you have the correct and latest NVIDIA drivers installed directly from NVIDIA (this is important), you should have an icon in your Windows system tray that you can use to open those settings. Right-clicking on this icon should give you a couple of options:
Select "Open NVIDIA Control Panel" from the options and you'll see a familiar looking control panel to configure the NVIDIA card. There's two primary settings we want to inspect and modify here, leaving all others untouched for the moment.
First, we want to make sure that the GPU itself, is being told to handle all of the PhysX calls that games request of your machine. PhysX is the real-time physics engine that NVIDIA uses to create effects like air, dirt, smoke, water and other elements in-game.
By default, this setting is going to be set to "Auto-select (recommended)" but this is not what you want if you want maximum performance from your card.
Change the setting in this section to force it to your primary (fastest) GPU, and dedicate it to this card. If your setting was set to "Auto-select" or "CPU", you're not going to get the best graphics performance out of your machine. Do not leave this set to "Auto-select", even though it says "recommended".
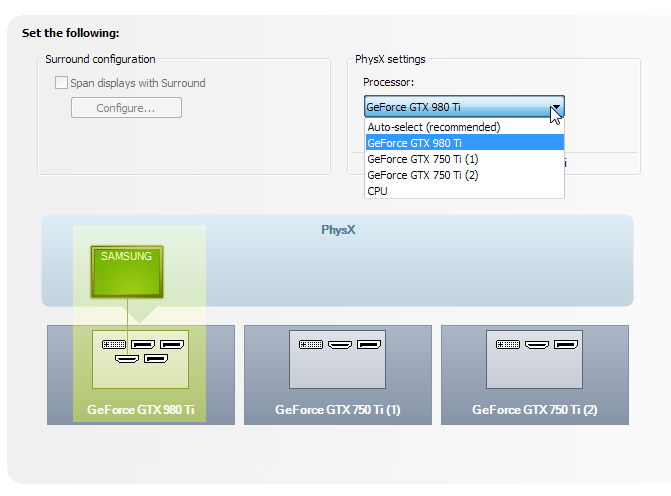
Save and Apply the change you've made here.
If you now go into "3D Settings" on the left-side of your NVIDIA Control Panel. On the right-side, if you scroll down will be a setting for "Vertical Sync" under the "Global Options" tab. No matter what the settng is set to, disable this.
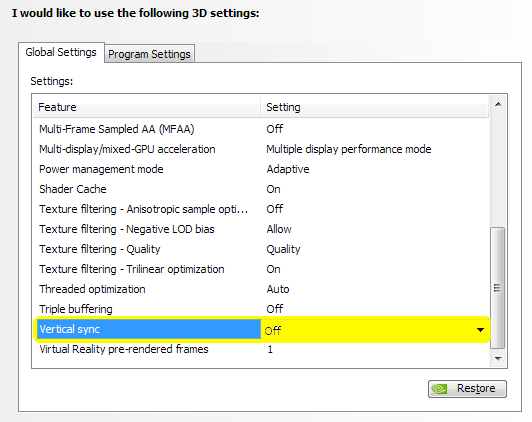
Save and Apply these changes.
AMD/Radeon Graphics Cards
(placeholder for now until we can get some community user data on tuning AMD cards using Catalyst/Crimson)
Intel HD Graphics Cards
(placeholder for now, until I'm able to write this up and get comlete screenshots)
Checking your Zwift Performance
Now go back into Zwift and see if your FPS up in the upper-left corner has made any improvements from earlier. You should see an almost doubling of the FPS, if these settings had a positive impact.
Tweaking your Zwift Environment Settings
There's still more to tweak, if you're still not seeing the kind of performance you want out of Zwift. If you look at your Zwift log, it will tell you which "Game Resolution" it is using, and it is that resolution's name that determines which configuration file to modify. If you open up your Zwift log in an editor, you'll see a line that looks like this, near the top:
[22:06:01] Using high graphics profile
Using the above example, I'm using the 'high' profile. Open up "high.txt" from your Zwift configuration directory in an editor and insert the following settings, right below the gShowFPS line we added earlier:
set gShowFPS=1 # Below options deprecated by Zwift in 2016-02-24 releaseset gDoReflectionMap=0set gSimpleReflections=1set gSimpleShadows=1
These settings will tell Zwift to reduce the quality of the reflection on the water surfaces, as well as use a much simpler, less real-time algorithm for drawing shadows that appear from trees, buildings, rocks and the ambient occlusion of sun rays shining down.
Turning those to their opposite values will increase the complexity needed to display the environment (consuming more FPS), and could impact your performance. If you have a high-end GPU, by all means, set them all the way up! I have 3 high-end GPUs in my Zwift machine, so I can turn all the dials, knobs and switches. You may not have that flexibility.
Here are some more settings to play with. If you decide to turn these off, you can tune the environment way back, so it basically turns Watopia into Dubai
UPDATE: ALL of the configuration options below have been deprecated and removed from Zwift as of the 2016-02-24 release. They no longer work to tune your client experience.
set gShowGrass=1set gShowGround=1set gShowBikes=1set gShowMountains=1set gShowRiders=1set gShowRoad=1set gShowRocks=1set gShowSky=1set gShowTrees=1set gShowWater=1set gShowBugs=1set gSunRays=1
There are dozens of other settings, but they're not really going to improve your graphics performance, so I won't go into each of them here,
I've worked with several people on the Zwift Riders Facebook group who have gone through these exact setting changes and have had significant gains in performance. They do work!
- 281238 views
Microsoft Windows
Microsoft Windows setuid Sat, 11/21/2015 - 16:58- 2594 views
Zwift Companion (formerly Zwift Mobile Link or ZML)
Zwift Companion (formerly Zwift Mobile Link or ZML) setuid Sat, 11/21/2015 - 17:01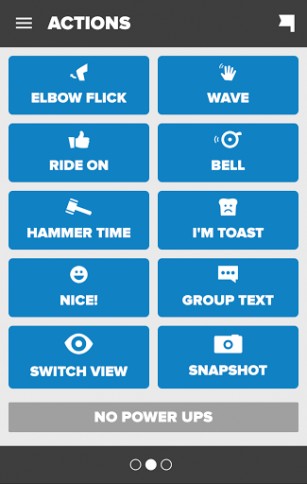 Zwift Mobile Link is an app that runs on your mobile device or tablet. It allows you to enhance your Zwift experience while riding or while simply watching other Zwift friends riding on the course.
You can use Zwift ML to chat, control your avatar, hadn out RideOns, Fan View and follow others. It usually works seamlessly, but some users have reported issues with it.
If you're having issues with Zwift MAL, the answers below should be able to help you resolve them.
- 1548 views
Apple iOS
Apple iOS setuid Sat, 11/25/2017 - 22:30 Zwift's mobile application called "Zwift Mobile Link", is available in the iTunes App Store, runs perfectly on your current Apple iPhone and iPad devices running a current version of Apple iOS.
Zwift Mobile Link allows you to control your Zwift experience from your mobile device as well as chat, pass out "Ride Ons" to other riders, follow other riders and much more.
- 199 views
Google Android
Google Android setuid Sun, 11/22/2015 - 10:52 Zwift's mobile application, "Zwift Mobile Link", is available in the Google App Store, runs perfectly on your current Apple iPhone and iPad devices running a current version of Apple iOS.
Zwift Mobile Link allows you to control your Zwift experience from your Android tablet or handheld device as well as Group Chat, pass out "Ride Ons" to other riders, follow other riders and much more.
- 965 views
How do I check which version of Zwift Mobile Application Link I'm running?
How do I check which version of Zwift Mobile Application Link I'm running? setuid Wed, 11/22/2017 - 11:24This question comes up a few times a month in Zwift Riders on Facebook, so let's knock it out.
To check which version of Zwift Mobile Application Link you're using, follow the steps below. They're identical for both Android and Apple devices.
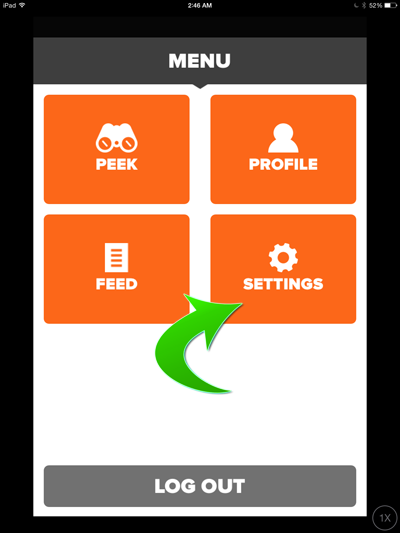
Load up the Zwift Mobile Link Application. You'll see a screen that looks like the one below. If you're actively riding, you'll see a series of control buttons. In either case, tap the little set of 4 square boxes at the upper-left of the screen.
Now tap on the "Settings" icon on the lower-right.
Tap on "About" on the bottom, and you'll see the version of the application.
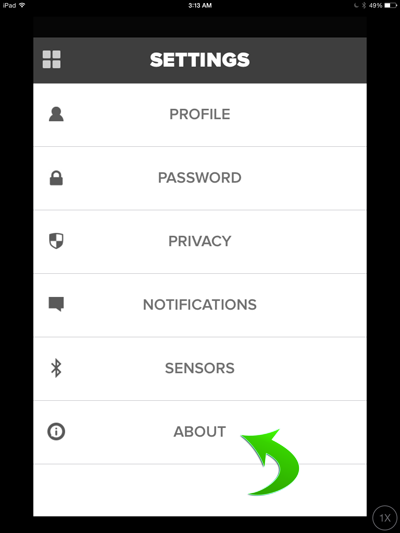
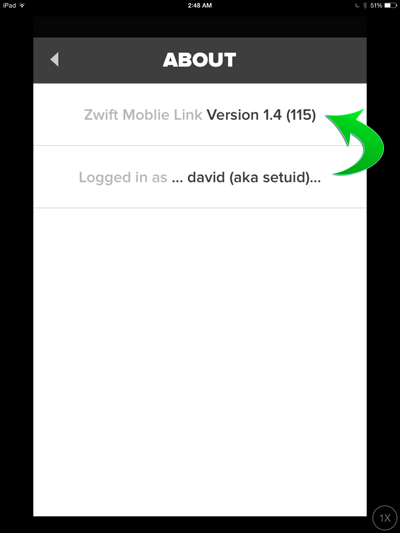
Voila! That's it!
- 905 views
How do I disable mobile chat, but leave desktop Zwift chat on?
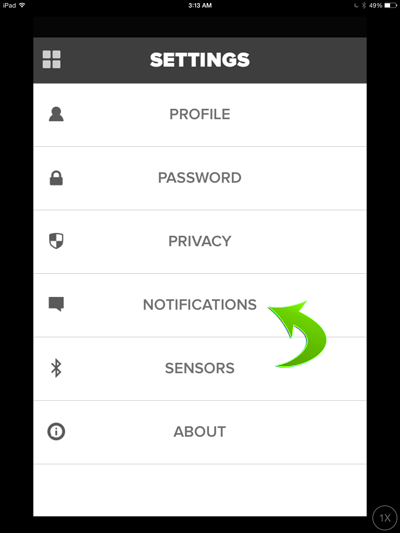
How do I disable mobile chat, but leave desktop Zwift chat on? setuid Wed, 11/22/2017 - 12:01When using the Zwift Mobile Link application during a busy course or race event, it becomes very difficult to use the buttons for turning or for other navigation when the chat messages are flowing in over the top of the Zwift Mobile Link buttons on the screen. Here's how to disable the mobile chat, leaving the desktop application chat enabled:
Launch ZML on your mobile device and tap on the boxes in the upper-left corner of the application screen to open the "Settings" options:
Once open, you want to tap on "Notifications":

Now you can access the various Zwift MAL notifications. Simply disable the "Group Chat" option by tapping on the slider to disable the mobile chat option.
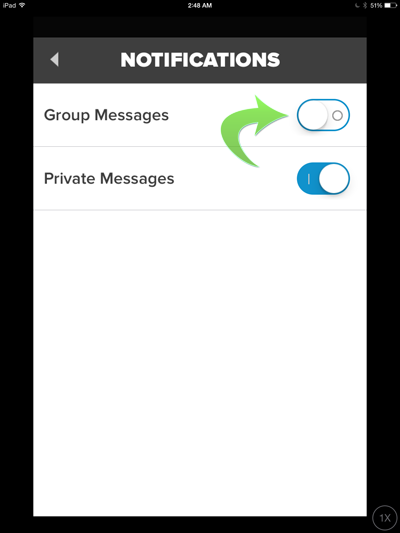
This disables the chat in Zwift MAL, but will allow the chat to continue on the Zwift desktop application to continue.
- 2821 views
How do I enable Bluetooth support in Zwift?
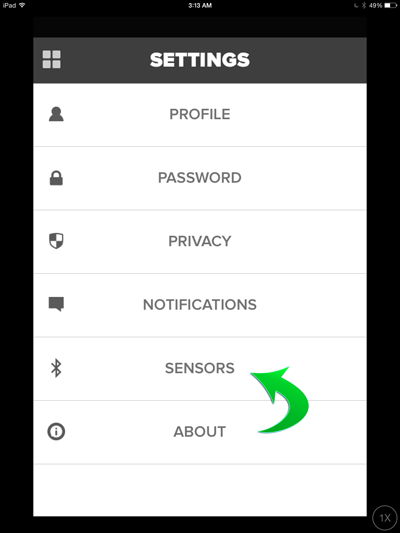
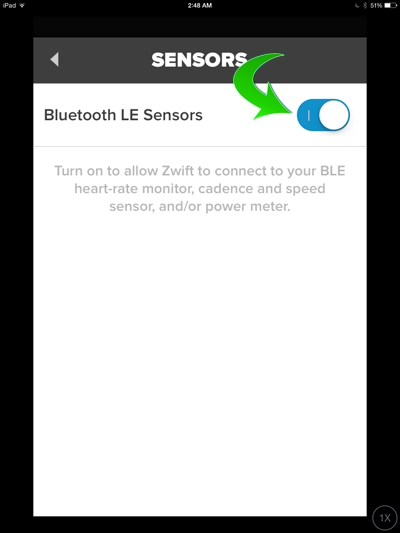
How do I enable Bluetooth support in Zwift? setuid Wed, 11/22/2017 - 12:03On the latest version of the Zwift Mobile Link application, you now have support for BTLE to talk to your Bluetooth-enabled HRM, cadence and other bike sensors. To enable BTLE support for Zwift, follow the following steps:
Load up Zwift MAL, and tap on the 4 boxes in the upper-left corner:

Tap on the Settings icon in the lower-right corner to access Zwift MAL settings:

Now on the Settings screen, you want to tap on the "Sensors" option in the menu:
Now you'll be able to Enable/Disable Bluetooth/BTLE support for your sensors within the Zwift MAL application:
All done!
- 19810 views
How do I execute a u-turn using ZML on Android/iOS?
How do I execute a u-turn using ZML on Android/iOS? setuid Wed, 11/22/2017 - 12:04How do I search for Zwift riders and follow/unfollow them using the Zwift Mobile Link app?
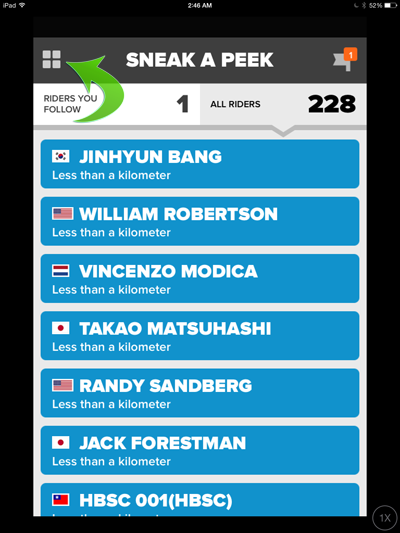
How do I search for Zwift riders and follow/unfollow them using the Zwift Mobile Link app? setuid Sat, 11/25/2017 - 23:23Finding and following others on the Zwift Mobile Link app is very straightforward. Here's how!
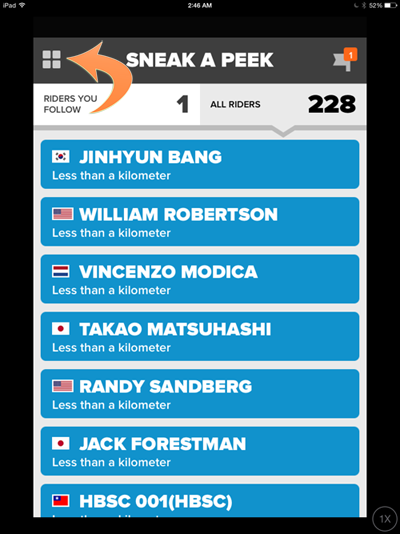
When you load up Zwift Mobile Link on your device, you'll be presented with the main rider screen that looks like this:
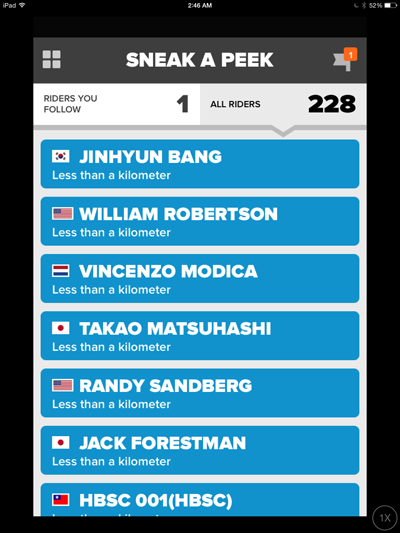
Scroll down the list of riders to find the one you want to follow and tap on their name in the list. You'll be presented with that rider's active details while they're on the course.
Note: The rider has to actively be riding on the course for you to follow them. You will not be able to find them in the rider list or to follow them unless they're logged into Zwift on their end.
Following a rider while you're in "Fan Mode"
With the new version of Zwift Mobile Link, the ability to "Follow" and "Unfollow" a rider has changed. In the upper-right corner of the rider's details screen, is a little icon that you can tap on to follow that rider, as shown here:
Likewise, if you're already following that rider, you can unfollow them by tapping the same location, but the icon will look slightly different, like this:

While you're in there, give them a complimentary RideOn (BIG blue button near the bottom) as well, we all love those!
Following a rider while you're paired and riding
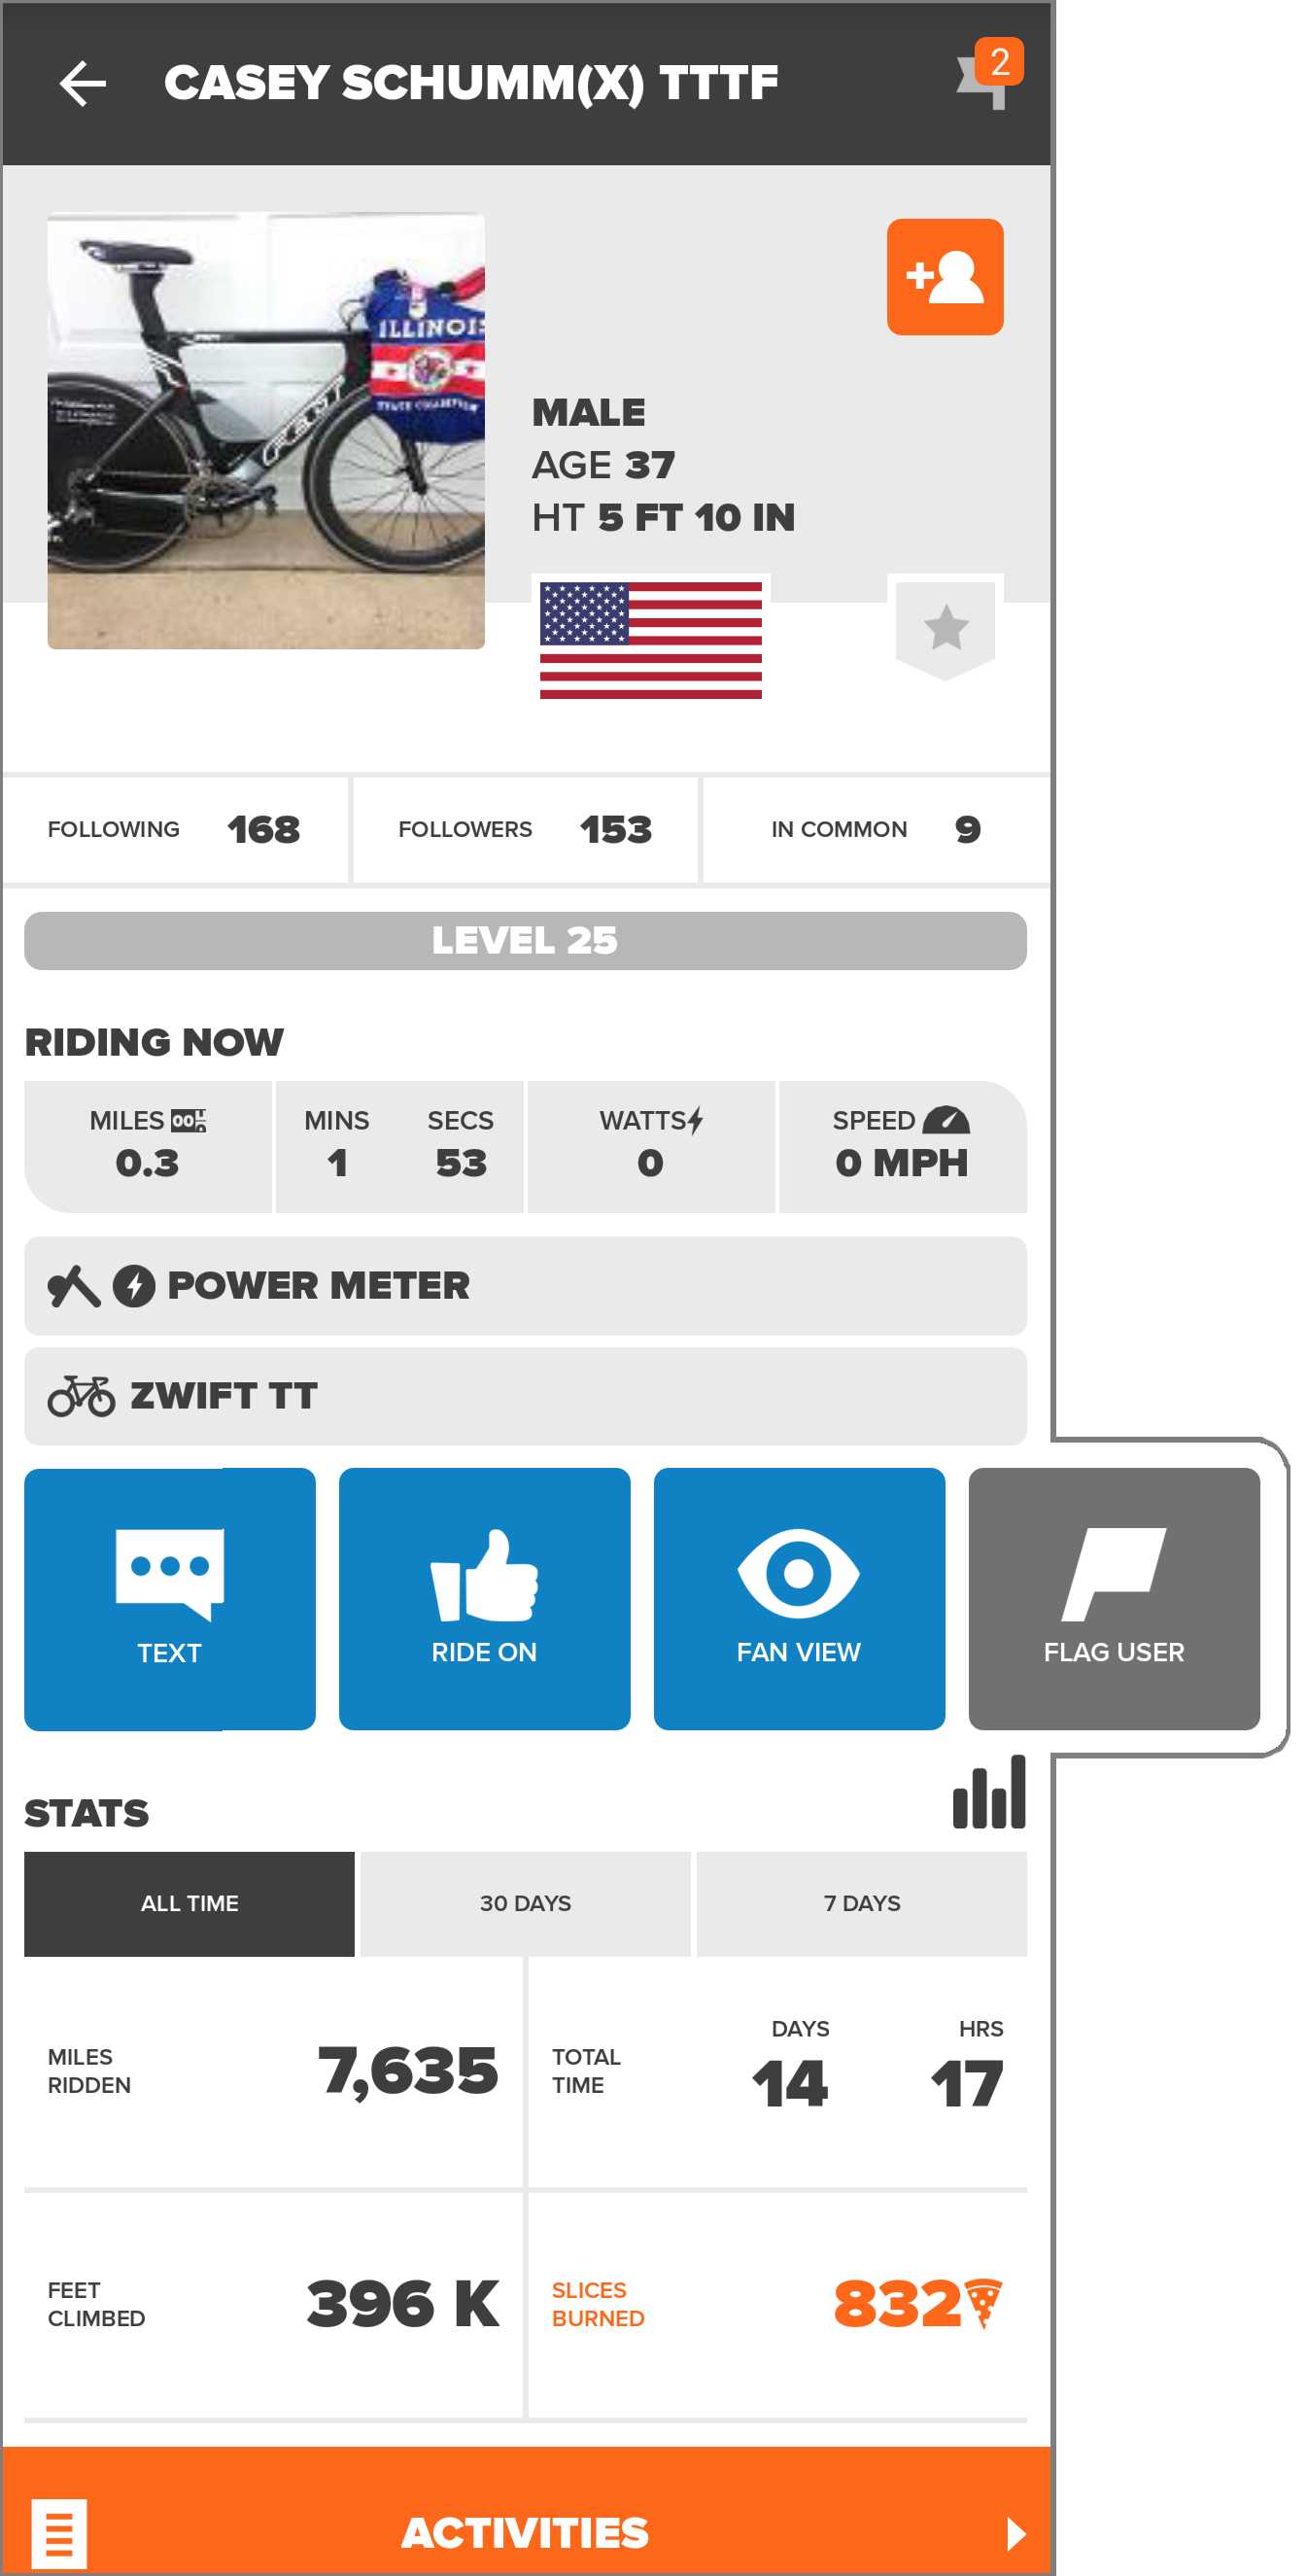
The buttons are slightly different if you're actively riding, with sensors paired up, but Follow/Unfollow are in the same location. Here's what those look like, in case you want to issue them a RideOn as well! (or flag them, if they're misbehaving). See the following KB article on flagging if you're interested in that.
Happy riding!
- 67581 views
My mobile device can't connect to Zwift. How do I fix it?
My mobile device can't connect to Zwift. How do I fix it? setuid Wed, 11/25/2015 - 23:52
This comes up from time to time and there many be a number of reasons for it.
Remember that in order to see your "Rider" options, you must be logged into the Zwift desktop application and have your bike + sensors paired up. Simply logging into Zwift on the desktop in "Fan View" mode is not enough; you must be riding (or paired to ride).
The Zwift Mobile Link (ZML) application talks over your local LAN to the Zwift desktop application. If it doesn't see you riding, it won't give you the rider options.
The most common solutions to a lack of connectivity are:
- Your mobile device is not on the same network as your Zwift PC machine. Make sure your mobile device's wireless LAN support is enabled and that you're on the same side of the LAN as your PC. If your mobile device connects through a router that hands out 192.168.1.x IPs and your Zwfit PC is being given 10.0.1.x, you may see issues if the two subnets aren't routing to each other.
- The account you logged into the Zwift Mobile Link application and the one you used to log into Zwift on your desktop machine are different. Make sure you're using the same account on both machines, and that you haven't changed your Zwift password after logging into one device before the other.
- Check your network firewall for any rules which may filter or block the two devices from talking to each other. Zwift Mobile Link makes a peer-to-peer connection over your network. If the two devices can't talk to each other, you will get a failure to sync up and use ZML to manage your ride.
- ZML can only connect to the desktop if it is the only mobile device connected to that account at the same time. If you have more than one mobile device logged in at the same time (such as your tablet + your phone), choose one, and log out of ZML from the other. It's a 1-to-1 relationship between ZML and your Zwift desktop application.
Hopefully this fixes any issues you might have connecting your mobile device with Zwift. Have fun out there!
- 49856 views
Zwift Desktop Application (ZDA)
Zwift Desktop Application (ZDA) setuid Sat, 11/21/2015 - 17:00This section covers the Zwift Desktop Application (ZDA). This is the software you would install on your Windows PC or your Apple Mac machine, to run Zwift using a USB ANT+ adapter (Windows, Mac) or native Bluetooth support (Mac-only).
- 5876 views
Can I build a Zwift workout without riding or being paired to my bike?
Can I build a Zwift workout without riding or being paired to my bike? setuid Sat, 11/21/2015 - 17:07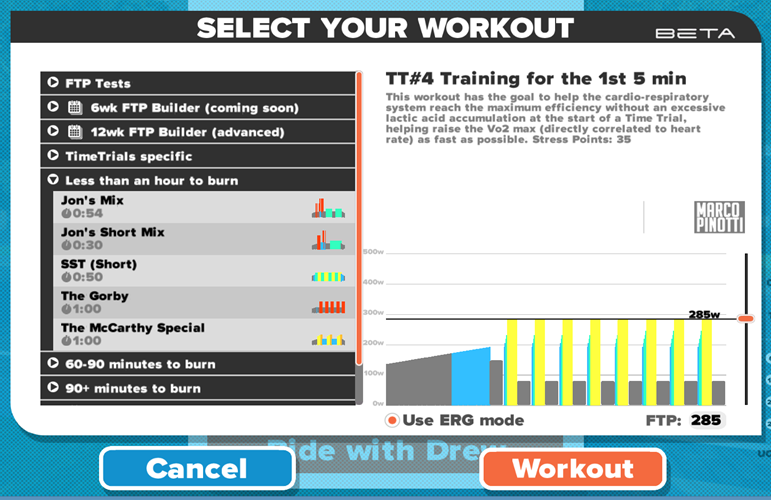
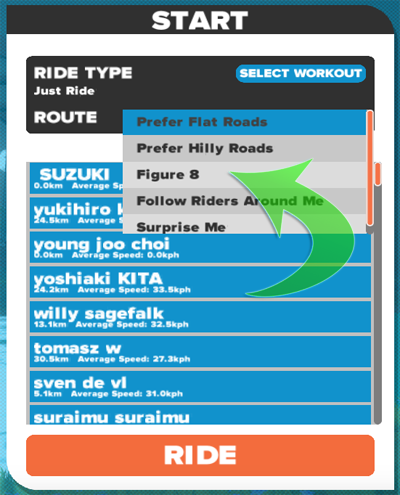
Yes you can! There are a few ways to build workouts without being paired to your bike's sensors or actively "riding" in Zwift.
- The first and easiest, is to log into the Zwift application in "Fan View" (click "Just Watch" at the intro screen instead of pairing up your sensors and clicking "Ride"), then while in that view-only mode, hit the 'E' key on your keyboard to open the Zwift Workout Editor. From there, you can build your own custom workout without actively riding on the course.
- Since these workouts are just simple XML files, you can build them by hand using any text editor. Just go into your Zwift workouts directory and create a new workout there with the file extension .zwo (for Zwift Workout) and the next time you launch Zwift, that workout will be made available to choose from the workout dropdown (or by hitting 'E' while in-game).
If you're not sure where your Zwift Workouts are stored, there is a KB article describing all of the associated Zwift data directories found here:
Here is an example workout in XML format:
<workout_file>
    <author> .MRBaldi Coaching </author>
    <name>The 300</name>
    <description></description>
    <tags>
        <tag name="INTERVALS"/>
    </tags>
    <workout>
        <Warmup Duration="600" PowerLow="0.2545" PowerHigh="0.75449997"/>


        <SteadyState Duration="300" PowerLow="1.0944999" PowerHigh="1.0944999"/>
        <SteadyState Duration="120" PowerLow="0.50449997" PowerHigh="0.50449997"/>
        <SteadyState Duration="300" PowerLow="1.0944999" PowerHigh="1.0944999"/>
        <SteadyState Duration="120" PowerLow="0.50449997" PowerHigh="0.50449997"/>
        <SteadyState Duration="300" PowerLow="1.0944999" PowerHigh="1.0944999"/>
        <SteadyState Duration="120" PowerLow="0.50449997" PowerHigh="0.50449997"/>
        <SteadyState Duration="300" PowerLow="1.0944999" PowerHigh="1.0944999"/>
        <SteadyState Duration="120" PowerLow="0.50449997" PowerHigh="0.50449997"/>
        <SteadyState Duration="300" PowerLow="1.0944999" PowerHigh="1.0944999"/>
        <Cooldown Duration="600" PowerLow="0.75449997" PowerHigh="0.2545"/>
    </workout>
</workout_file>
That's it. Good luck!
- 28143 views
Can I pause a workout after I've already started riding?
Can I pause a workout after I've already started riding? setuid Sat, 11/21/2015 - 17:08Yes, you can absolutely pause (and resume) a workout you've already begun!
You can pause a workout already in progress by using the Zwift Mobile Link (ZML) application on your mobile device. When you want to pause, simply swipe over to the Action buttons page in ZML and hit the 'Pause' button you see there to pause your workout.
Note: this button will not be visible if you are not actively in Workout Mode.
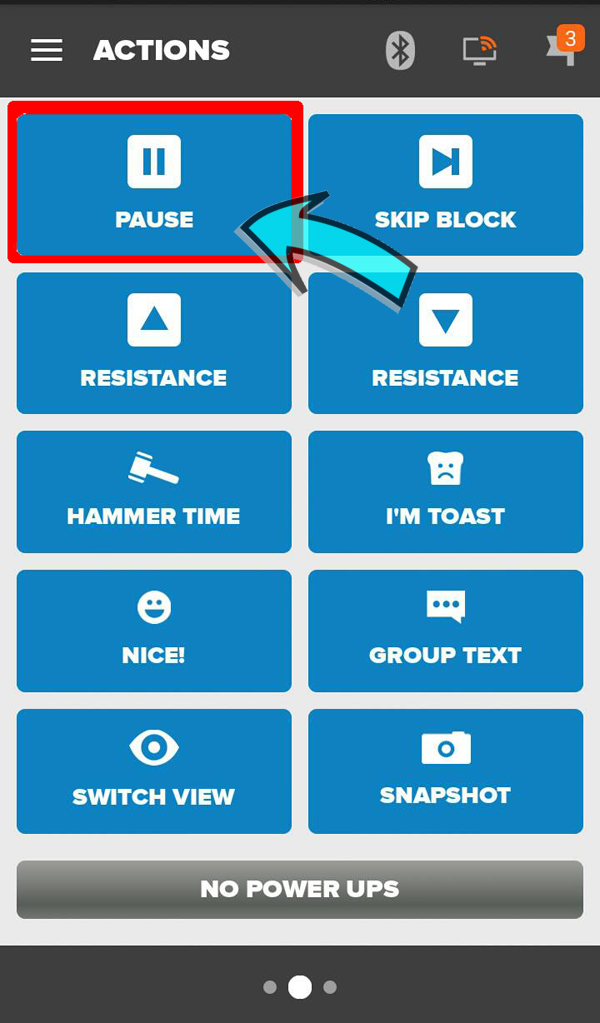
You can use this option to get off the bike for a few moments to stretch, take a stretching break, grab refreshments, dash away for a quick bio break or just recover for a few minutes during a hard set of intervals.
When you're ready to resume your workout, simply hit the 'Resume' button in the application to resume. The Pause button and Resume button are the same button. They will toggle between both modes, depending on whether you've paused your workout, or are actively riding.
You may also notice the two resistance buttons below the "Pause" and "Skip Block" buttons, that looks like this:
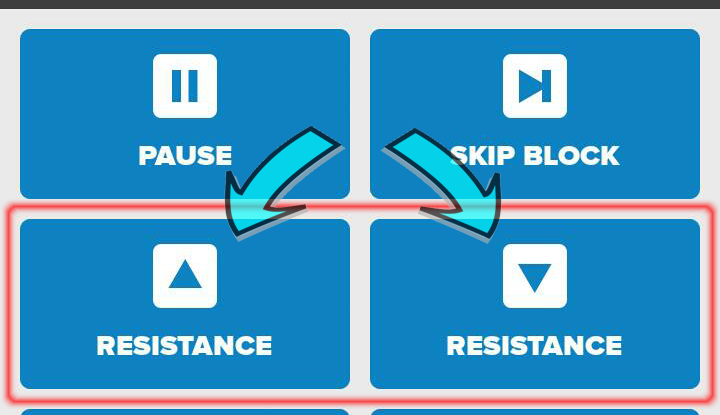
These reistance buttons are only usable when you're in a "Free Ride" section of your workout. You cannot modify or change resistance during a defined portion of your workout. This would change the nature of the workout, making it hard to rely upon for any trustworthy training data.
For example, if you were in the hardest interval of your workout and decided to lower the resistance, making the workout difficulty easier, the resulting workout data would not be usable when compared to other efforts or prior workouts where you did not change that resistance.
Don't forget, there are plenty of challenging workouts already built into Zwift, as well as many third-party workouts that the user community has contributed to Zwift. There's even tools available to convert workouts from Sufferfest and other programs to Zwift workouts. See the following Links & Resources for more workouts, tools and guidance:
- Zwift Community Workouts Repository
- Zwift Workouts Facebook Group
- Zwift Workouts Forum
- Converting Sufferfest Workouts to Zwift Format
Good luck and have a challenging workout!
- 32257 views
Can I ride Zwift in "offline" mode?
Can I ride Zwift in "offline" mode? setuid Fri, 11/20/2015 - 23:57
The short answer is, YES!
But not quite in the way you'd probably prefer at the moment (as of January 2016's Zwift release). Zwift itself does not support an "offline" mode, but there are ways to achieve it, with some workarounds described here.
To ride Zwift offline, all you need to do is log into the Zwift desktop application when you're online (because Zwift needs to authenticate your username and password) and then unplug your network cable (or disable your wireless adapter, in the case of a laptop or WiFi enabled desktop).
That may be a bit cumbersome, especially if you want to watch Netflix or stream Pandora or Spotify while you're riding, or maybe allow your machine to gather mail or back itself up in the background.
But there is a more-elegant way around that to take Zwift offline, leaving the rest of your machine connected and online.
There are some caveats with this mode however:
- Group Chat will not work (probably an obvious one)
- Activity uploads will not work at the end of your ride (unless you reconnect before saving your activity)
- Your course may not have NPCs on it, depending on the day/time you choose to ride
When your activity is over, go into your Zwift data folder and upload the activity that matches the date/time you wish to upload to a service like Strava, to integrate that activity for later analytics. If you're not sure where your Zwift activities are, there's a KB article that goes into that in greater detail:
If you want to upload your activity to Zwift directly, and let Zwift handle the integration with Strava or similar services, you need to reconnect your network before ending your ride and saving your activity at the end of your ride.
If you don't want to physically remove your network cable or disable your network adapter, there's still another way: Firewall the traffic away (this method called "ApocaZwift©" was created by David A. Desrosiers, aka "setuid" in-game). On Windows, you can run the following:
# Turn on the Windows Public firewall, if not already enabled
netsh advfirewall set publicprofile state on

# Set the custom group
netsh advfirewall firewall set rule group="Zwift Administration" new enable=yes

# Set the rules that restrict Zwift from attaching to the WAN (this next bit goes all on one line)
netsh advfirewall firewall add rule name="Single User Zwift" dir=out action=block program="C:\Program Files (x86)\Zwift\ZwiftApp.exe" description="Set Zwift to run in Single User Mode (no network, no public riders)" enable=yes localip=10.0.1.24/0,192.168.1.0/24 remoteip=54.68.115.29 remoteport=3022 protocol=udp
When you're done, just remove the rule with the following command:
# Delete the rule we just created, if needed. You can leave it in place and enable/disable it as you see fit later.
netsh advfirewall firewall delete rule name=SingleUserZwift
(TODO: Add Mac OS X firewall rules and screenshots here)
- 190797 views
Can I run Zwift on my Xbox or Playstation?
Can I run Zwift on my Xbox or Playstation? setuid Sat, 11/21/2015 - 17:30 The short answer is: No.
Zwift is not ported to these platforms, so it will not run natively under them nor will it run in any emulation that these platforms may offer.
The longer answer is: It's not Zwift's fault.
The Xbox and Playstation (2, 3 and 4) consoles do not support Bluetooth Low Energy (otherwise known as BLE or BTLE), nor do they have support for using an USB ANT+ adapter from any vendor or manufacturer.
Licensing restrictions and partner agreements on both platforms currently prevent the Xbox and the Playstation from supporting a broad range of hardware that can physically be attached to the console's USB ports.
Support for USB devices typically will require drivers and an authentication chip of some sort (think HDCP) built into the device to be recognized and work correctly, otherwise it is treated as a "dumb" HID (input) device such as a keyboard.
This means that while the devices each have fast graphics and each console supports USB ports, they will not allow you to plug in the necessary ANT+ adapter to recognize your trainer or bike's sensors, nor do they support a Bluetooth stack with BLE support to handle Bluetooth sensors or trainers that support that protocol.
Also, Zwift is written to take advantage of OpenGL, an open and free graphics specification. The XBox supports a different engine called "DirectX", which it uses for graphics rendering and performance. This is a Microsoft-only graphics engine. It's VERY unlikely that Microsoft would support porting a competing graphics engine to its own platform, and at a level of performance that rivals their own.
If that wasn't possible, Zwift would have to port the application to both DirectX for Microsoft Windows users and maintain a separate version of the code to support the macOS/OS X and Android userbase who can only use OpenGL. It significantly magnifies the resources needed to keep both versions in feature lockstep at each release.
For now, you can continue to run Zwift on your iOS device, Windows PC or Mac without any issues.
References:
- 115318 views
Can I watch other content while I Zwift?
Can I watch other content while I Zwift? setuid Sat, 05/16/2020 - 11:53For those of us who like to do longer, multi-hour rides, it's sometimes necessary to be able to consume other content in addition to Zwift, as well as consume our necessary nutrients on the bike/treadmill.
This content can come in the form of music through Pandora, Spotify, Amazon Music or a dedicated music player, but it can also take the form of video content from Amazon Prime Video, Netflix, Hulu, Vudu and other platforms. I personally consume a mountain of technology training materials while I'm on the bike, in addition to catching up on my favorite movies and TV series'. I find it a great way to force myself to stay distraction-free while I fill my brain with new material.
If you're using a single monitor or projector with Zwift, you have plenty of additional real-estate for displaying multiple types of content simultaneously. I recently wrote another KB article describing how to use "FancyZones" in the Microsoft PowerToys collection to set up quadrants of your screen where apps get launched and resized automagically. There are equivalent solutions for macOS also linked in the article below.
That solution works exceptionally well for the full application itself, but that sometimes includes the application window frames, title bars and other content which eats into your usable area of the screen for your Zwift and shared media sessions.
There's a neat ProTip I stumbled on, almost by accident as I was reaching for my mouse and keyboard on my RAD Cycling desk while riding and it slid forward away from me as I bumped it.
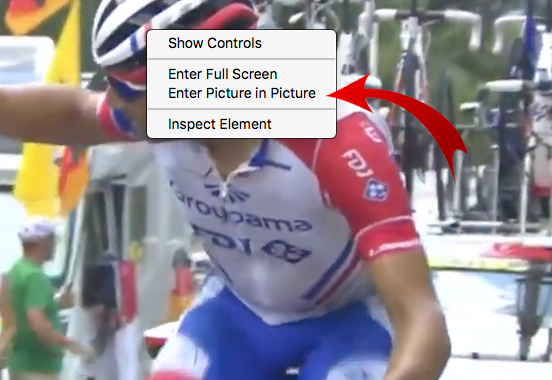
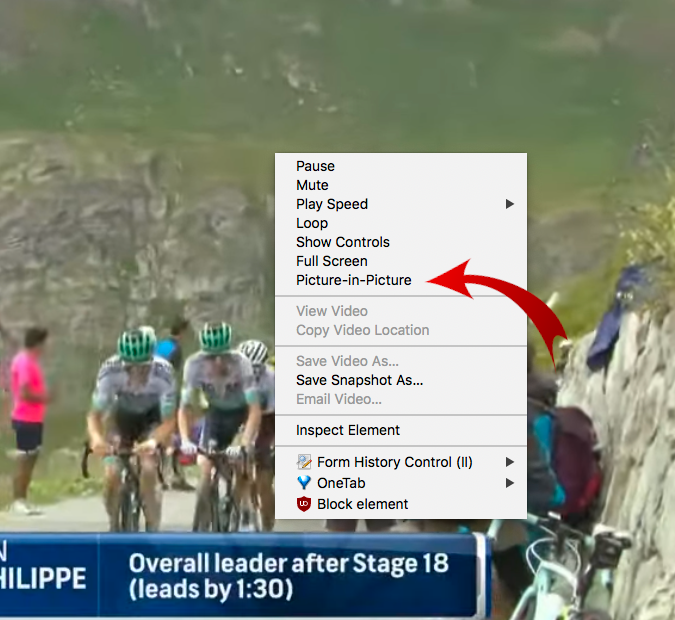
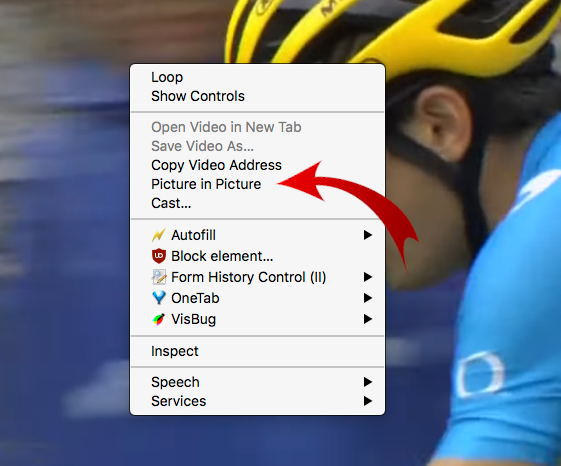
If you're watching a video in YouTube, and this is exclusive to YouTube for the moment (more on this in a moment) and quickly double-right-click on the video window, you'll get a new menu that will pop up. That menu includes "Picture in Picture" as an option. Selecting that will pop out the video, borderless, from your browser.
You can then move/resize and change the video location to fit anywhere on your screen that you want. You can now minimize the browser entirely and keep your interface clutter-free, while the video continues to play in its own window.
I tested this on Firefox, Chrome and Safari on both Windows and macOS, and it works the same on both environments. The catch here, is if you double-right-click too slow, you'll get your browser's own right-click options menu, and not the one you're looking for. Here are 3 small screenshots showing how this works in each browser type:
Safari on macOS
Firefox on macOS, Windows 10
Google Chrome on macOS, Windows
Once you've selected this option from the double-right-click menu, you'll get a pop-out window you can move around and resize. Combining that with the above article describing the use of FancyZones, you should be able to snap that video frame into any space on your desktop that you want.
There's a small catch with using this approach: The controls to move ahead or back in the video (the timeline slider) are still in the original tab you undocked the window from. You can Pause and re-dock the floating window, but you can't move forward or back in the timeline from the PiP window, you have to return to your browser tab to do that.
If you're using macOS, you have two options: "Sidecar" and "Helium".
Sidecar is a relatively new feature in macOS Catalina. With "Sidecar", you can use your iPad as a secondary display to your Mac machine. Follow the instructions here to set that up:
Now with the double-right-click option, you can resize and move that video window over to your iPad and watch the content there. Yes, you could also just launch YouTube natively on your iPad and do the same thing. This gives you additional options, and you can resize it to fit on the iPad screen in ways that the native YouTube app cannot do on that device.
Helium is the second choice and is completely free, and available on the Apple App Store.
Here's a brief video describing how to use it:
There's another option, specific to Windows 7 and Windows 10. If you install "Anvir Task Manager", you'll get some new options available to you via right-click menus, titlebar icons and context menus.
I recommend starting with the Freeware version of Anvir but if you like the utility, please consider paying for it and supporting the author's work.
One of those right-click options gives you the ability to set the transparency of the window, from 0% to 100%.
Here's what that option menu looks like on Windows 10:
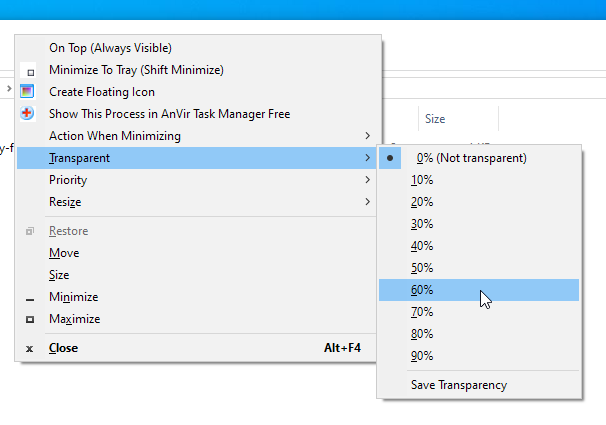
You can right-click the titlebar of your Zwift window, set it to 60% transparency, and run any content you want behind it. If you combine this with a smaller Zwift window, you can shrink that down and play a full-screen movie behind it, with Zwift in front, smaller dimensions, semi-transparent.
Here's a screenshot from when I was playing with this in mid-2016 that shows what you can do:
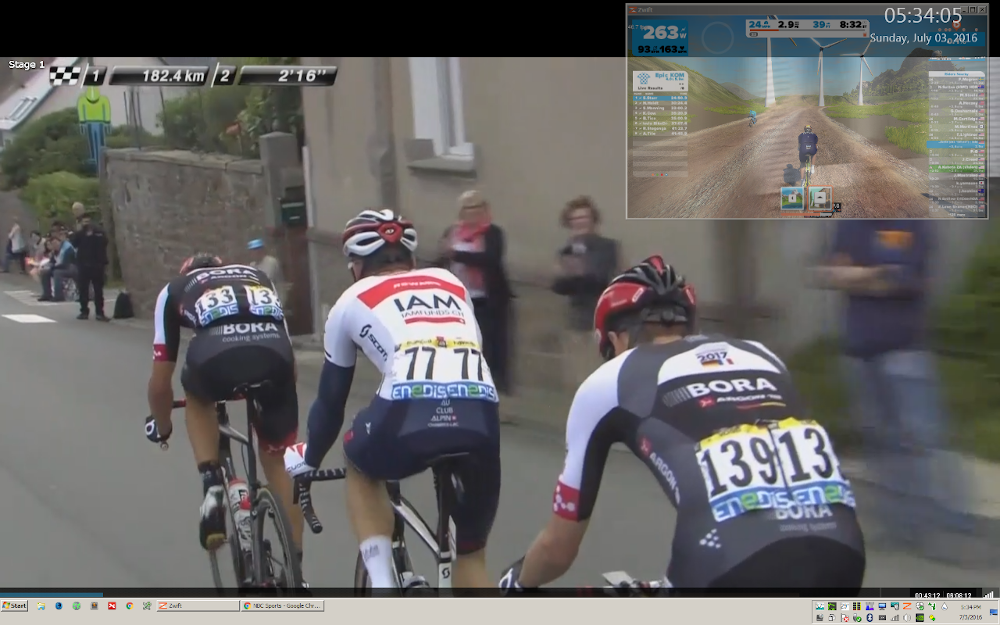
The reason you'd want Zwift in front, is so you can interact with Zwift via the keyboard, since it has primary focus, for those all-important RideOns you'll be giving everyone you ride with!
I hope that gives you more options you can use to consume more than just Zwift while you Zwift. Now get out there and #RideOn!
- 4799 views
Can my spouse/partner ride Zwift without creating their own account?
Can my spouse/partner ride Zwift without creating their own account? setuid Fri, 11/27/2015 - 20:00
The short answer, is no. Each unique Zwift rider needs to log in with their own unique Zwift account to ride in-game.
That being said, unsubscribed users are granted 25 km of free riding per calendar month to try out Zwift, as well as a one time 7-day unlimited mileage trial.
Also, if you're under 13 years old, Zwift will allow you to ride for free. This allows parents who have children who want to ride, to ride together on Zwift. To sign up your child or youth on Zwift, simply read the details in the following KB article:
Good luck and #RideOn!
- 10159 views
How can I synchronize my Zwift data across devices?
How can I synchronize my Zwift data across devices? setuid Sat, 05/16/2020 - 13:56
This comes up from time to time in communities where data analytics, screenshot sharing or when using multiple devices to Zwift with, for example using an iPad on your treadmill but a full-size PC connected to a 4k display in your living room.
You might Zwift on one machine or device, but you want to look at your data on another. How do you get your data into multiple places without copying everything around by hand?
- Why would I want to sync data to the cloud?
- What data can you sync?
- Where can I sync my Zwift data?
- What else is there?
Why would I want to sync data to the cloud?
This is a really good question, and one that isn’t always immediately obvious, especially if you only use one machine or device to Zwift. But there’s quite a few benefits to synchronizing your Zwift data into “The Cloud(tm)”.
An obvious one from the top, is the ability to create workouts in a desktop or tablet browser, and synchronize them with Zwift’s cloud services, so they’re available to your mobile device, such as Zwift running on an iPhone or Android handheld.
You can create your workouts in a tool like “ZWO Factory”, and drop them into your Zwift Workouts folder, where they’ll be synchronized the next time you launch Zwift, and immediately posted and available to your iOS/Android device.
Another common use of the cloud storage, is sharing workouts between teams or with your personal coach. With the right cloud storage configuration I’m going to describe in this KB, you can have new workouts pushed to you by your team, friends or coach, which will be automatically integrated into your Zwift client the next time you launch it.
This is great for “distance coaching”, where you and your coach work remotely on your training plans. Sometimes that means over video conferencing, talking through your fitness, your goals and your overall training plan. With the global SARS-CoV-2 (coronavirus) pandemic upon us and travel/social gatherings being further restricted, leveraging these tools to help you keep your training a top priority is still possible.
There are plenty of distance coaches taking on clients and helping dozens to hundreds of Zwift riders every day, including those that use Zwift exclusively to help push their clients to greater and greater power and endurance goals. Coach David Lipscomb of CIS Training Systems has been doing this for the last few years with great success.
The last and still important component, is having a backup of your data, in case your main Zwift machine is inaccessible, broken or lost. The next time you log into Zwift on any machine with your account, your workouts and training plans will instantly become available to you again.
It is “cloud” after all, so the sky is the limit, right? Well, mostly. Many cloud services offer a free tier, but to store greater amounts of data, you may need to upgrade your ‘free’ account to one of the various paid tiers. There’s plenty of space for your Zwift data to fit in almost every cloud service provider’s free tier, unless you’re storing mountains of other data in there as well.
When talking exclusively about Zwift, you can store any of the following data into the cloud:
- Workouts (.zwo files)
- Activity Logs (.txt files)
- Activity data (.fit files)
- Screenshots from your activities
Zwift offers their own back-end cloud sync for your Activities and Workouts, but they don’t allow you to access it directly “out of band” as a standard storage service, like your would with something like Microsoft OneDrive or Google Drive or Dropbox (how to use each of these will be described in detail below). The cloud service is accessible via the Zwift API, but that will not be described here.
Where can I sync my Zwift data?
There are a number of places you can sync your Zwift data. Zwift has their own “Zwift Cloud", which will sync your log files and Workouts as objects in their backend cloud services. The data once stored there, is not generally user-accessible, other than through the Zwift client itself. For the developers, this list of files synchronized to the Zwift cloud can be found in the /api/zfiles API endpoint.
You can also synchronize your Zwift data to Google Drive, if you choose. This requires installing the “Google Backup and Sync” application for Windows or macOS. Installing and configuring that is very straightforward. Once installed, you can add custom folders to the default sync folders, and synchronize that data to any other machines where you’ve installed “Backup and Sync”.
In the example below, I’ve chosen to synchronize my Workouts. Activities and Logs folders to Google Drive:

Synchronizing your Zwift data to and through Dropbox is even easier! You can leave your existing Dropbox configuration and setup just the way it is, and just create a new directory inside Dropbox to hold your Zwift data. From there, you can create a symlink on macOS and Linux or use a “Junction” on Windows to link your \Documents\Zwift data into \Dropbox\Zwift.
In my case, I only ever want screenshots I take to get synchronized with Dropbox, so I can touch them up and upload them directly into my Strava activity after my ride is over. To do that, I use the following:
On macOS and Linux:
ln -s ~/Dropbox/Screenshots/Zwift ~/Pictures/Zwift
ln -s ~/Documents/Zwift/Workouts ~/Dropbox/Zwift/Workouts
On Windows:
mklink /J "%USERPROFILE%\Pictures\Zwift" "%USERPROFILE%\Dropbox\Screenshots\Zwift”

Note: The operation of ‘mklink’ is exactly the opposite syntax from the way symlinks are created on Linux and macOS. With the ‘ln’ command, the thing-you-have comes first, and the thing-you-want is second. With mklink, the thing you want comes first, and the thing you have comes second.
If you don't want to use the commandline and prefer something graphical and menu-driven, there's another tool called the "Link Shell Extension" that puts these options inside your right-click menu.
HowToGeek has a great tutorial describing both methods, so I don't have to duplicate that material here.
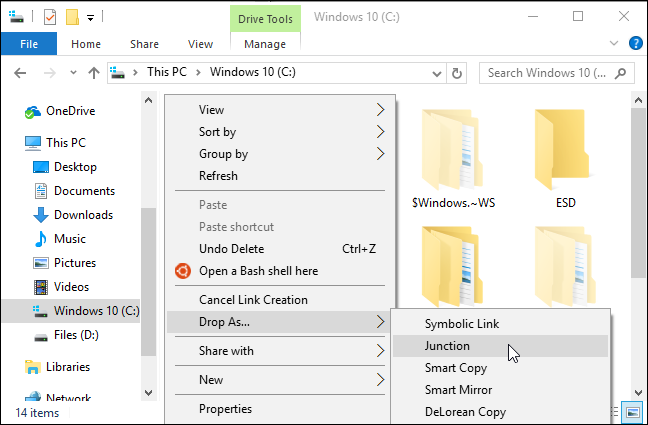
if you already have a “Zwift” folder inside your “Pictures” folder, rename it to something else before you run the above commands, or you’ll end up with \Pictures\Zwift\Zwift\ which may not be what you want. For screenshots, this puts the primary Zwift folder inside Dropbox, and creates a link outside Dropbox for the reference to it, not the reverse.
Once you’ve done this, any data that is created inside \Pictures\Zwift (such as when taking a screenshot in-game) will automatically get synchronized to all of the machines and devices that are connected to the same Dropbox account.
You can do the same for your \Documents\Zwift\Activities, \Documents\Zwift\Logs and \Documents\Zwift\Workouts folder, to synchronize those to any other devices which may need access to the same data.
For your normal Zwift data, you can reverse that operation if you choose, so the primary is on the local disk, and the symlink/junction exists inside Dropbox, for example:
On Windows:
mklink /J "%USERPROFILE%\Dropbox\Zwift\Workouts" "%USERPROFILE%\Documents\Zwift\Workouts"
In this case, I've created a top-level directory called 'Zwift' inside my Dropbox folder, and then used 'mklink' to create a 'Workouts' junction inside that folder that points back to my "real" \Documents\Zwift\Workouts folder.

Note: synchronization is bi-directional, so any data created in these folders within Dropbox on your other machines, will land on the machine you’re running Zwift on at the moment.
You can use the exact same syntax as described above for creating junctions inside Dropbox to the Zwift folders outside Dropbox, for your OneDrive folder, as shown here:

The beauty of this configuration is that you can have multiple junctions in each cloud service, and the data will be synchronized to each of them at the same time. If you take screenshots in Zwift and are a Dropbox and OneDrive user, those screenshots will be replicated to both services. This is great for resiliency, but also for sharing with different people who may not have access to one or the other services.
OneDrive isn't limited to just Windows any longer. You can also get a OneDrive client for macOS on the App Store. Configuration is relatively the same, with the exception of using symlinks ("man ln" for help) instead of junctions ("mklink /?" for help).
If you use a Mac for Zwift, connect your OneDrive account using the above client and symlinks, you can get all of your Zwift data replicated to your Windows machines where it can be accessed there in real-time.
On Linux:
This is one of the places where Linux isn't left out of the party. There's a client for Linux that works with both Google Drive and Microsoft OneDrive, called "InSync", and you can use that on your Linux machine to have the data replicated there as well.
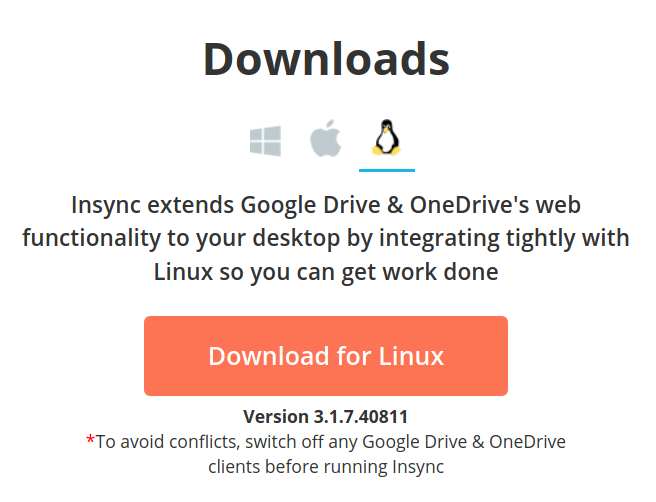
If your main data analytics platform is Linux, or you want to use Gimp to touch up those screenshots or create workouts natively on Linux, this is a great way to get that data over from your Mac or Windows environments. Since Zwift doesn't yet have a native Linux client application, it's left doing the post-activity analysis and post-processing.
There are some other great tools to use with your Zwift activities which can further enhance the usefulness of that data. One popular service is called "IFTTT", which stands for "If This Then That".
IFTTT takes an incoming object and sends it to another outgoing service or object. For example, receiving an email, and storing the attachments from that email into Dropbox. Or receiving a screenshot and attaching it to a Trello card. There are thousands of combinations and hundreds of services it supports.
In the case of Zwift and the use of cloud storage and services, you could create an IFTTT recipe that detects when a new workout lands in your shared Zwift Workouts folder from your coach, and automatically sends you an SMS alert or generates a Google Calendar entry to begin that workout.
If a new screenshot is created in one of your Google Drive, Dropbox, OneDrive folders, you could have that automatically posted to Instagram in real time. There are so many possibilities for this, and IFTTT's usefulness extends well outside the world of Zwift.
I use this in my day job hundreds of times per-week for various roles and workflows and for some home automation tasks to turn on various IoT devices in my home through my Amazon Echo device's voice inputs ("Alexa, turn heat up to 65F")
There's one last tool that gets a good mention, "FreeFileSync", which works across all platforms. This tool is a cloud-neutral tool which can synchronize data from any sources to any sources on a single machine. If one of those sources was local, and the other was a cloud service for example, you could synchronize that local folder to your cloud folder and let the cloud service sync agent do the work of replicating that data up to the cloud for you.
Here's a great, quick tutorial/intro video on FreeFileSync on YouTube:
Well that should get you started. Remember that you get to choose where your data goes, how it gets there and how you sync it.
Good luck, and #RideOn!
- 1177 views
How can I synchronize my weight data with Zwift?
How can I synchronize my weight data with Zwift? setuid Wed, 05/27/2020 - 12:58
There's been a lot of discussion over the years about how to sync weight to Zwift, to make sure the data generated by your fitness devices and sensors is accurate.
Because this information is entered by hand by a human, and is used by Zwift to calculate performance, this data has been intentionally manipulated thousands of times in the past to "weight dope" and win podium placement, because it's entered by the user directly in their profile, as shown here:

"Weight doping is the artificial manipulation of your avatar's in-game weight, used to gain an advantage, whether it be to increase the rider's weight (and thus manipulate the effective w/kg calculation) or the reverse, to make your in-game avatar lighter than reality, to gain advantages while climbing."
But many of use are honest riders, and just want to see honest data from our efforts, so we can develop our training or improve our fitness and see those gains in performance (or losses, if weight loss is one of your fitness goals).
- Synchronize your weight to Zwift from a supported Smart Scale
- Synchronize your weight to Zwift from an unsupported Smart Scale
- Zwift How-To: Understanding Watts/kg
There's been a very long-standing request to track weight changes on Strava, but they currently do not support that as a feature. If/when they add this as an option, other services like Zwift, Withings, Fitbit and Garmin Connect can begin synchronization of weight and body composition values to Strava. But not yet...
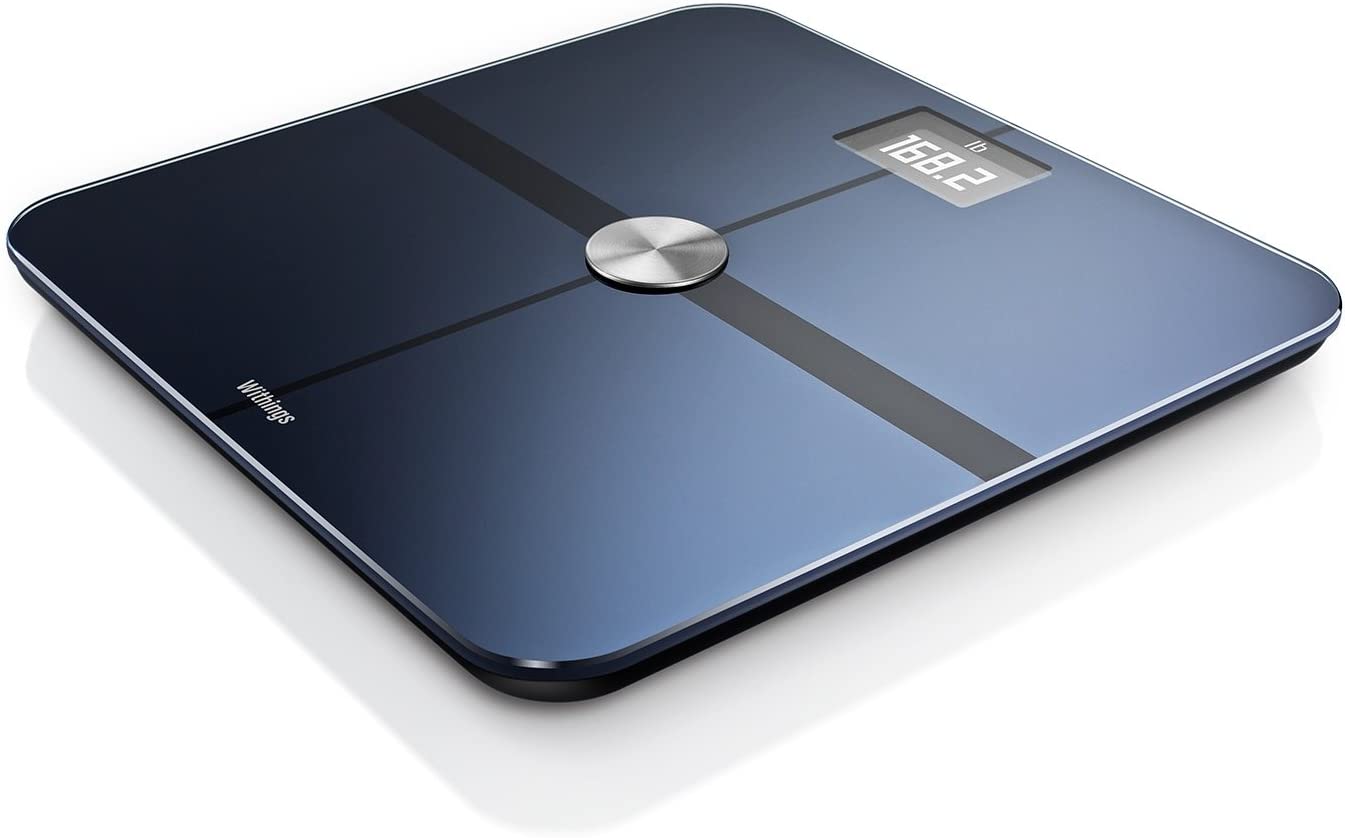
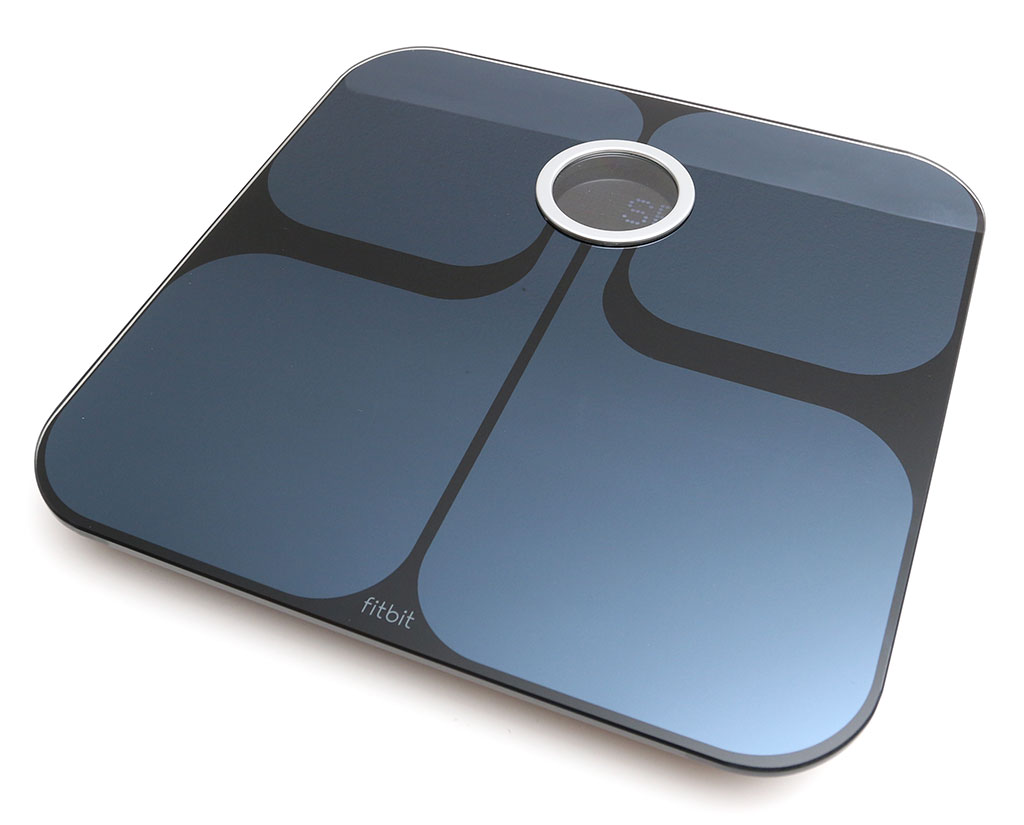
Zwift allows you to synchronize your weight automatically from your Withings or Fitbit smart scale. Note: You can sync your weight from other unsupported devices too, more on that in a moment...
Synchronize your weight to Zwift from a supported Smart Scale
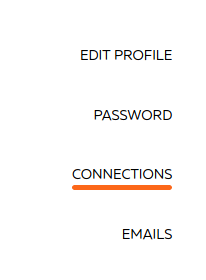
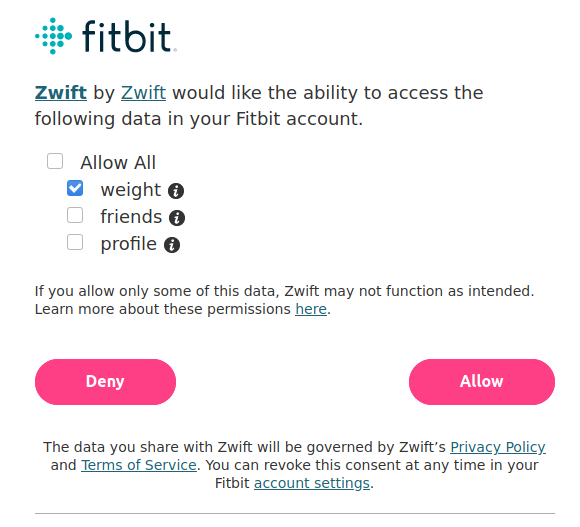
To connect your Withings or Fitbit smart scale to Zwift, simply log into https://my.zwift.com/, then click the profile icon in the upper-right corner, go to My Profile and then Connections on the left side.
If you scroll down a bit on the page, you'll see two links there for Withings and Fitbit.
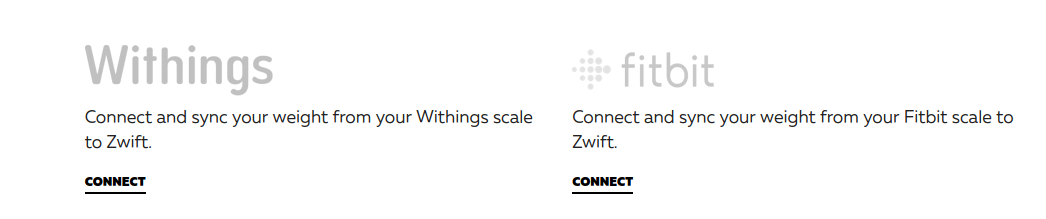
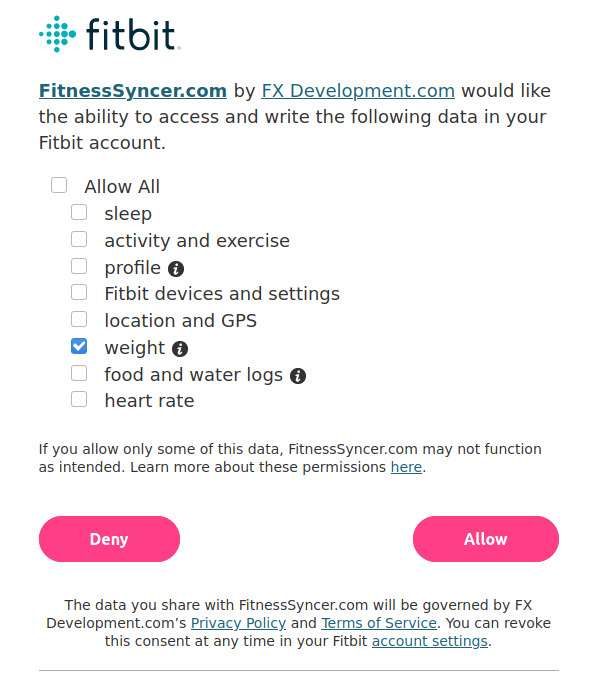
If you have either of those scales, you can authorize Zwift to query the data from your scale's upload into those partner fitness portals, to your Zwift profile. Just click "Connect" next to the appropriate one and Zwift will begin pulling that weight data from their portal to your Zwift account.
When you click "Fitbit" for example, you have the option of what data you'd like to share with Zwift. In this case, you're only interested in the "Weight", so I've selected that here:

Synchronize your weight to Zwift from an unsupported Smart Scale
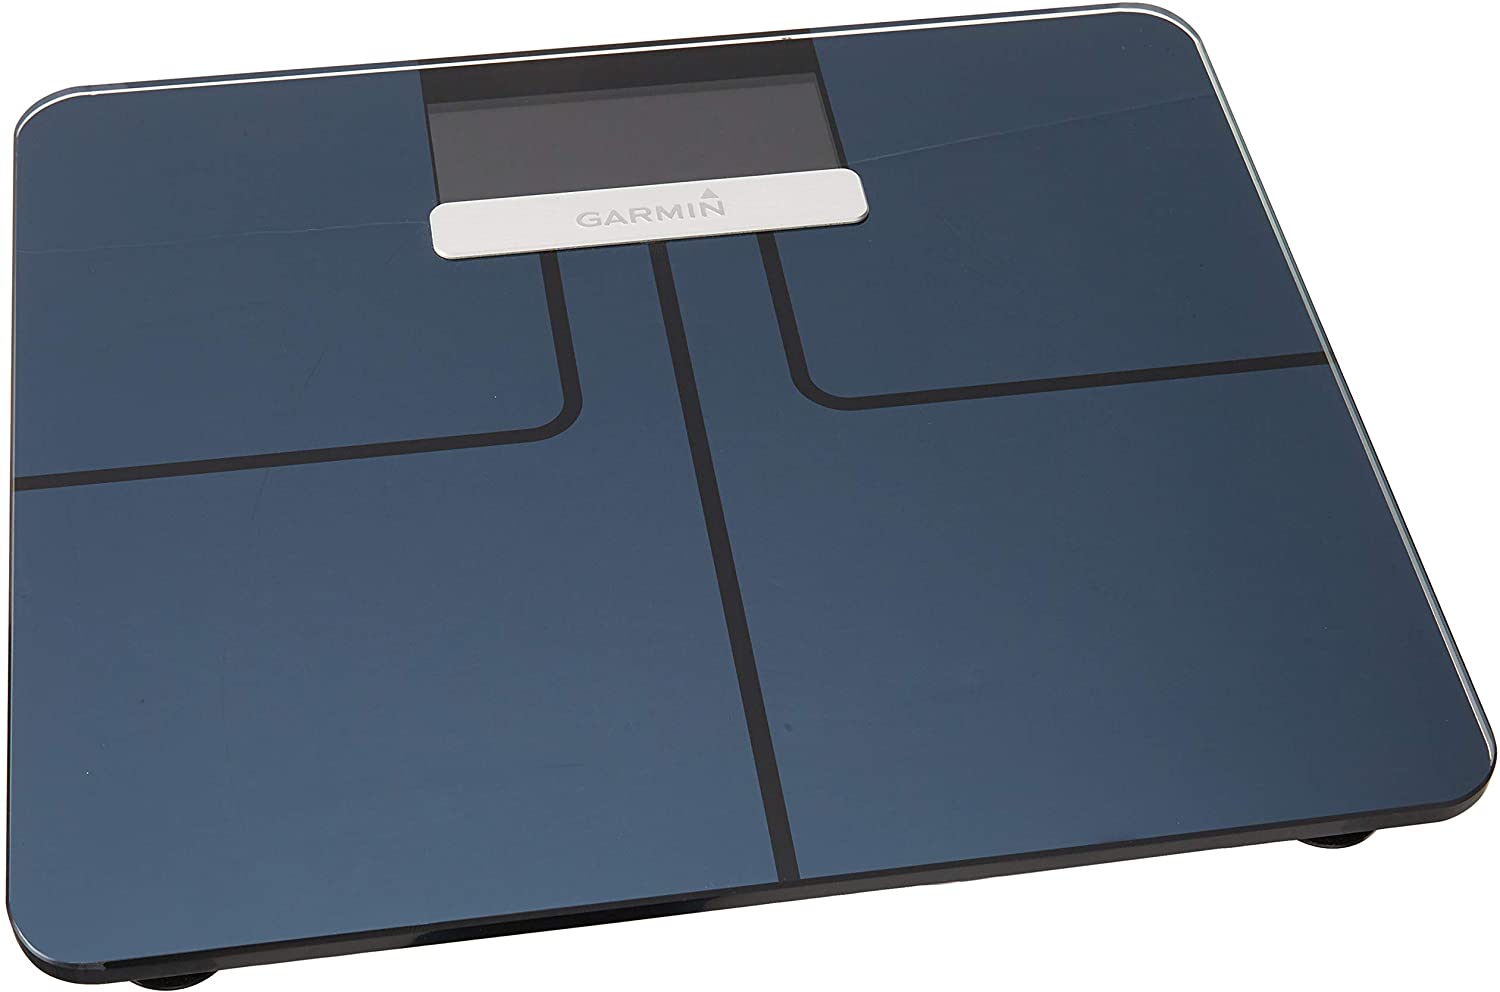
If you don't own either of those two scales, but have another smart scale or device which captures your weight (a Garmin Smart Scale for example), you can still sync that weight with Zwift.
Here's how:
Visit FitnessSyncer in your browser and sign up for a free account. It only takes a moment to create an account.
Once you're logged in, you have the option of pairing services together to synchronize the data between them, using a "Source" and "Destination" sync pair.
Create your first "Source" pair by choosing the activity type from the top dropdown. For weight data, you'll want to choose "Body Composition" from the list:
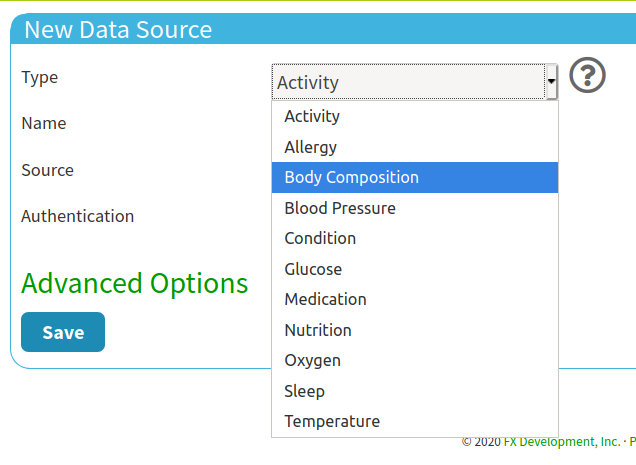
Give your source sync pair a name, so you'll know what it is when you look at your dashboard. I chose "Garmin Weight" to make it easy to remember as I build many more sync pairs later.
You'll then want to choose "Garmin Connect (Wellness)" from the second dropdown and select the appropriate "Grant" options, depending on your needs. When you're done, it should look something like this:
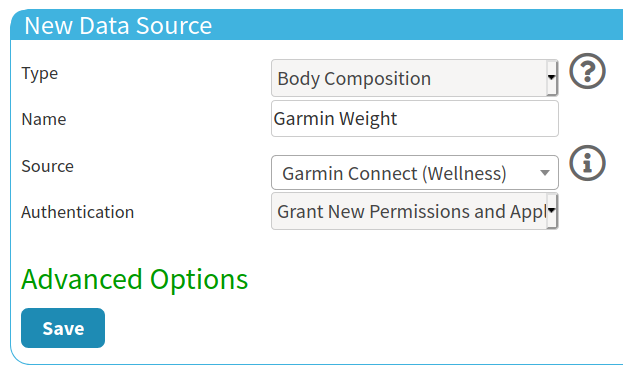
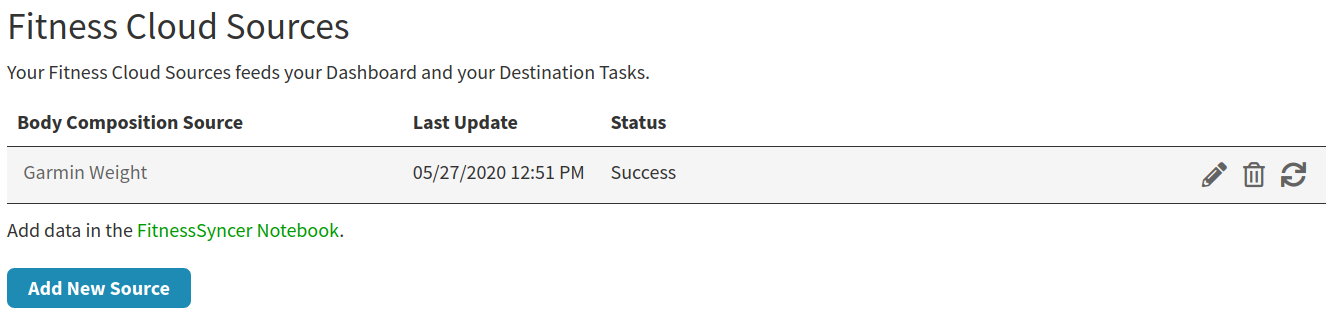
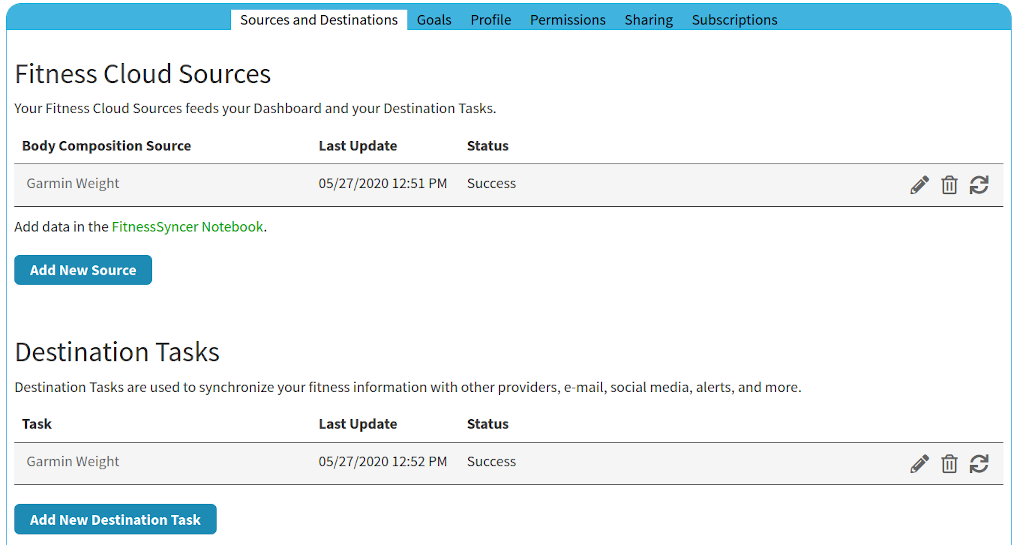
Click "Save" there to save that sync source. You should now see something that looks like this, on your dashboard:
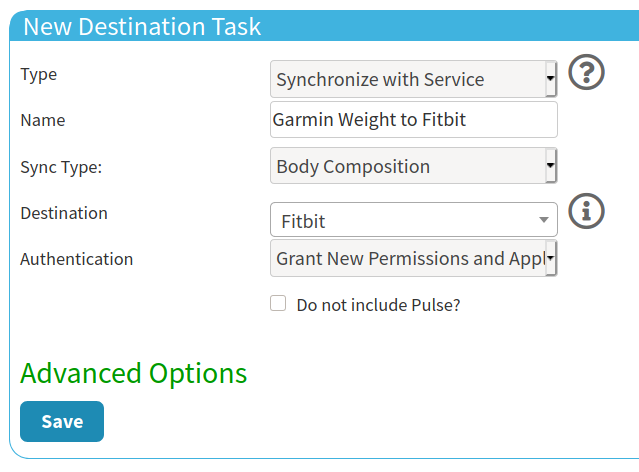
Next, we need to create a "Destination" (a place to send that weight data from Garmin). Click "Add New Destination Task" and go through the same steps, except this time you're going to point to "Fitbit" as the destination. When you're done with those settings, it should look something like this:
When you click "Save" here, you'll be brought to your Fitbit to authorize the data to be sent from FitnessSyncer to Fitbit. You'll want to choose the fields that are appropriate for your needs (maybe just weight?), and authorize FitnessSycner to send that data there.
If you don't already have a Fitbit account, you can create one from the same page. It only takes a second to create a Fitbit account.
Now when you return to your FitnessSyncer dashboard, you should see something that looks like this:
You're almost done!
Now with a free FitnessSyncer account, the sync happens nightly, once per-day, or manually when you click the little 'sync' arrows on the right side. For now, just click the sync arrows one at a time, starting with the Source (Garmin Connect) side and then the Destination (Fitbit) side. If you see "Success" here, then your data is synchronized between both services.
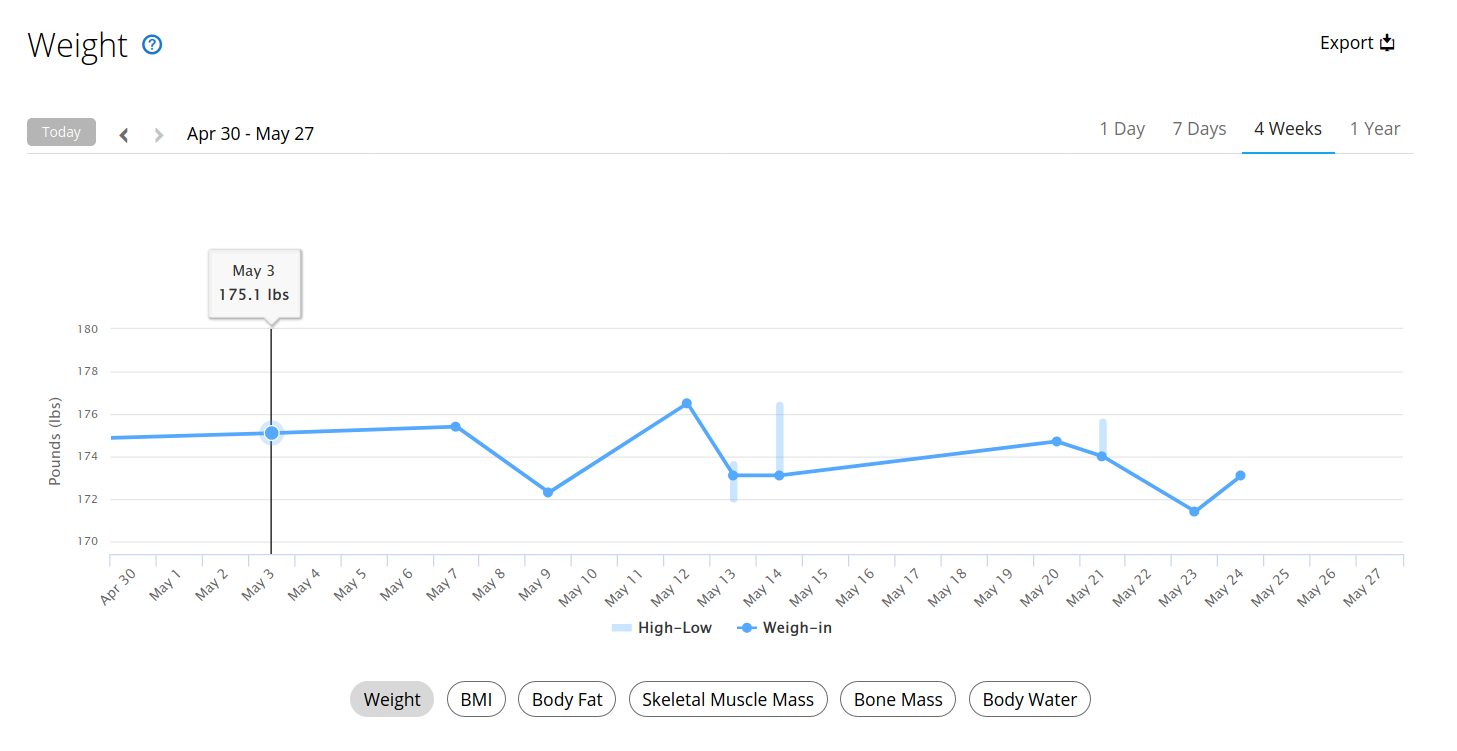
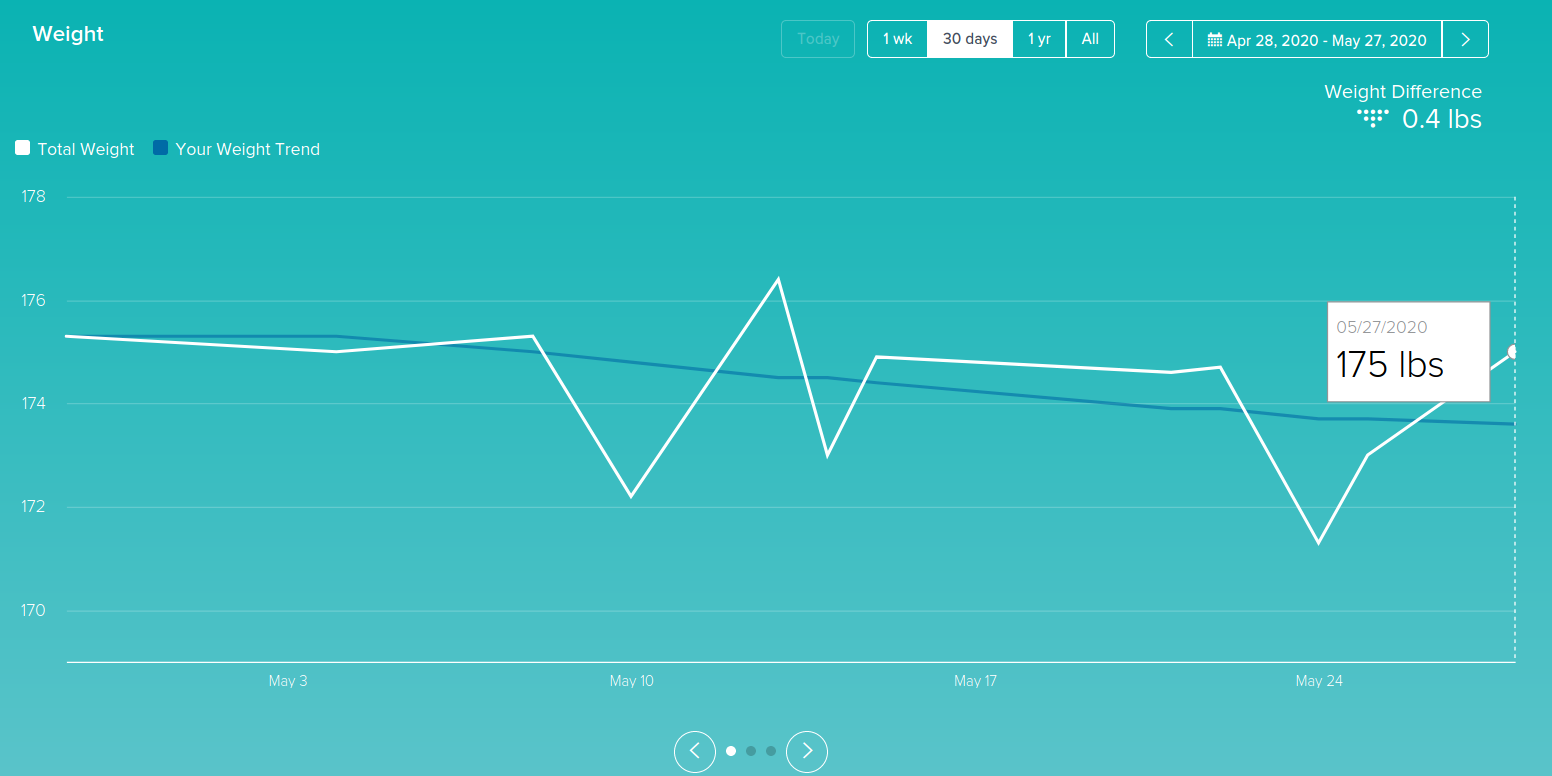
You should be able to confirm this by logging into both services directly, and comparing their weight applets. Here's an example form my (erratic) weight over the last 30 days, in both Garmin and the data FitnessSyncer pushed from Garmin over to my new Fitbit account:
Garmin Weight data from Garmin Connect
Fitbit Weight data from FitnessSyncer
Now just go back to your Zwift dashboard, go to "Connections", click "Fitbit" and authorize Zwift to pull the weight data from Fitbit to your Zwift account:
Now your weight should be synchronized from your Garmin Smart Scale to your Zwift account. It got there by going through the following steps:
Garmin Smart Scale → Garmin Connect → FitnessSyncer → Fitbit → Zwift
Remember, with the free version of their account, synchronization is not automatic, you either have to wait until the next day when your weight will be sync'd daily, or you have to log in and click the little "Sync" arrows on each sync pair to push the data where you need it.
If you want this to happen on-demand, automatically, you'll have to Go Pro. It's only $3.99/month or $39.99/year, so well within the range of a coffee per-month. Their pro features offer some other advantages as well. I'm not affiliated with their service at all, I'm just a happy consumer of what they've created.
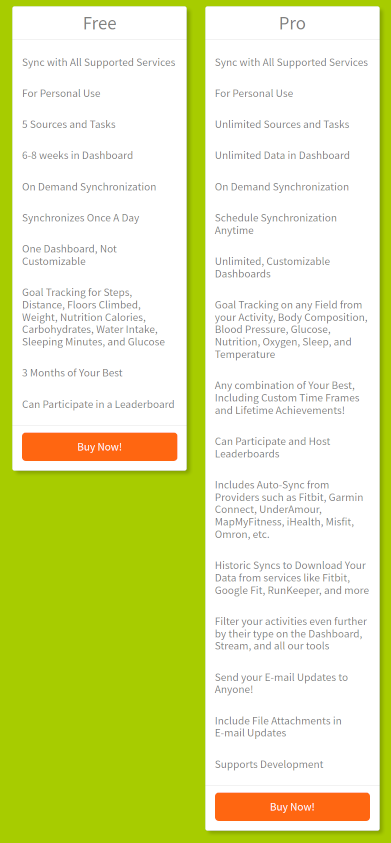
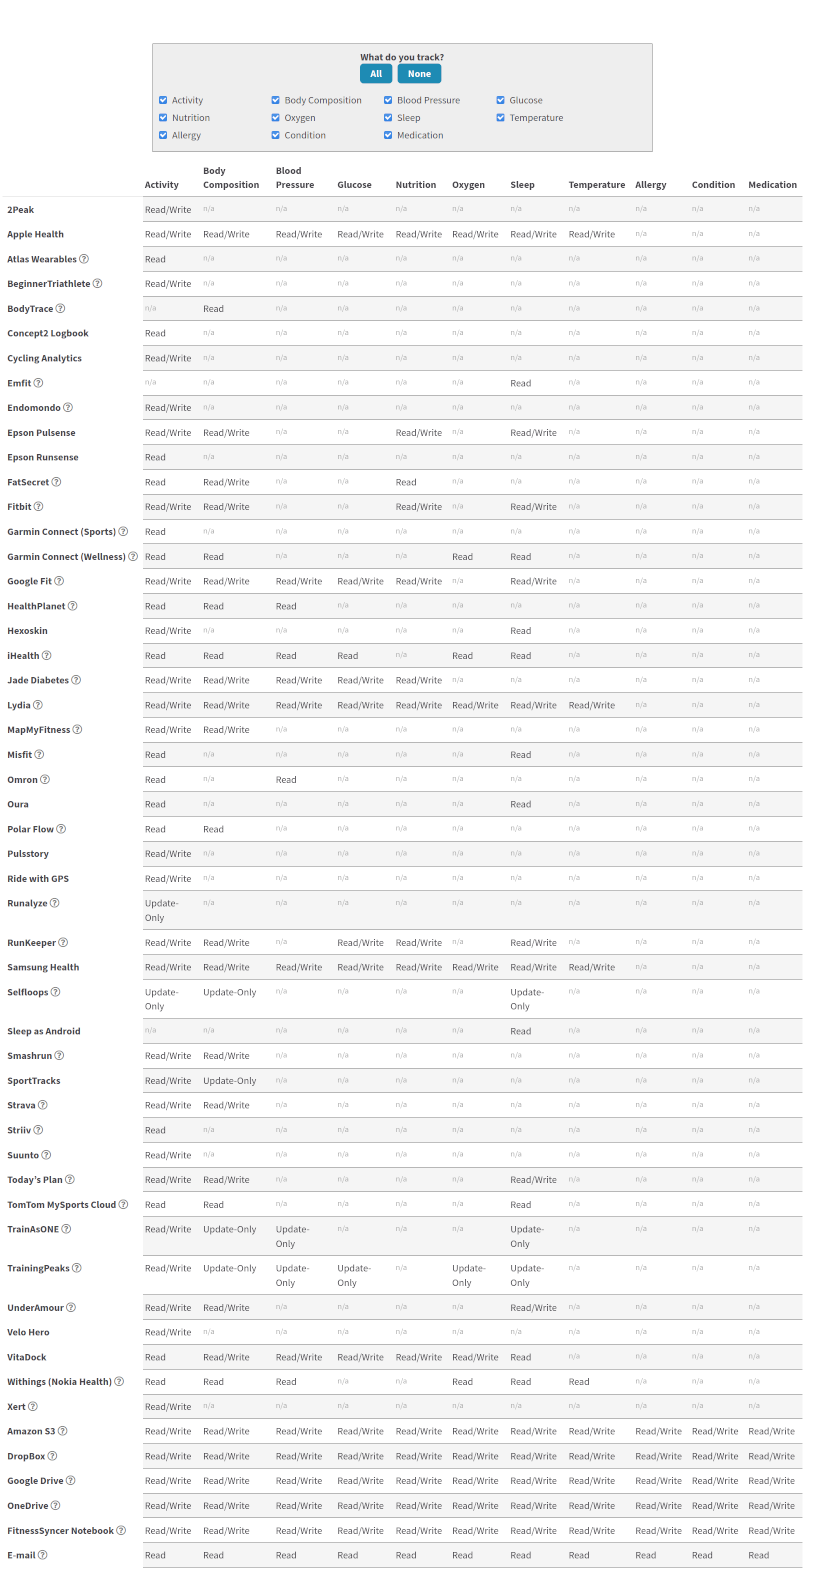
For a full (and very comprehensive) list of supported apps and services that FitnessSyncer supports, visit their "Supported Apps and Services" page for all the details. It's quite comprehensive! For any other questions, visit their FAQ.
I hope that gives you some options to get that data synchronized across. Good luck!
- 2325 views
How can I turn off or filter the in-game chat messages?
How can I turn off or filter the in-game chat messages? setuid Wed, 11/22/2017 - 11:19In-game chat is a great way to link up with other Zwift riders, or direct a group of riders in a race or group event.
However when it gets busy, those chat messages can become overwhelming (and in some cases, offensive).
But you can filter them and turn them off!
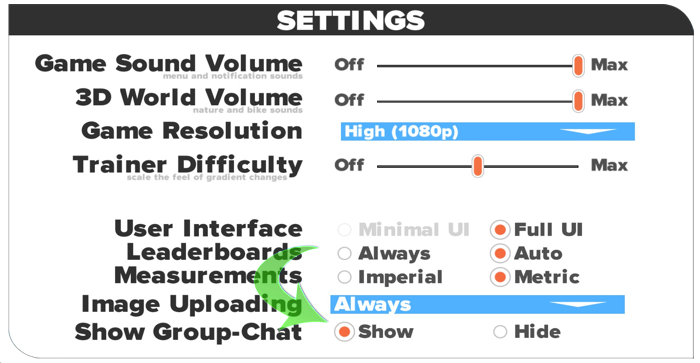
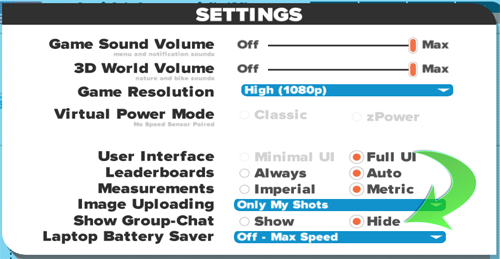
Log into the Zwift desktop application and go to your "Settings". At the very bottom of the Settings screen, you'll see an option to Show or Hide Group Chat. Choose whichever option you wish, to filter off the chat.
You can also disable this in the Zwift Mobile Application Link (MAL) app on your mobile device, if you wish to keep the chat running on the desktop but disable it on the mobile, or vice versa, or disable on both.
Go to the Settings in Zwift Mobile Link (ZML) and choose "Notifications", then enable or disable as you see fit for your situation:

Hope that helps! #RideOn!
- 24530 views
How do I attach more than one Zwift screenshot to my Strava activity?
How do I attach more than one Zwift screenshot to my Strava activity? setuid Wed, 11/22/2017 - 11:22When you are riding on Zwift and take a screenshot with your keyboard or Zwift Mobile Link (ZML), it may end up becoming visible in your Strava activity.
If you don't know how to take a screenshot using the keyboard or ZML, that's covered in another KB article:
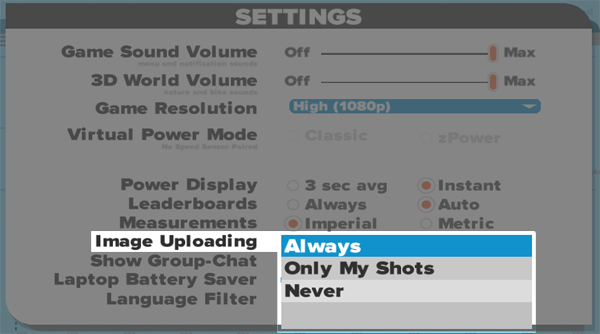
Depending on your particular Zwift settings, Zwift can be permitted to take its own screenshots, or you can take them yourself, overriding the 'automatic' screenshots Zwift may take. You can also disable them altogether:
Your screenshots will be saved in your \Pictures\Zwift folder on your Zwift machine, whether it be a PC, Mac and in your Camera Roll on your iOS device. These "clean" screenshots will have a _clean postfix in the filename, such as: 2015-04-29_1947440_clean.jpg.
The first screenshot taken by Zwift itself is taken without any "HUD" (Heads-Up Display) panels on the screen, so it will appear clean and bare, like the example shown here:

When you look at your uploaded Strava activity, you'll see this one, single screenshot there in your event.
But you may want to take more screenshots, or take those perfectly-timed screenshots when you cross the line first in a race event, and include those in your public Strava profile. Those screenshots will contain your ride data, times, laps, leaderboards, rider list and other on-screen elements.
There's a limitation of how this works with Strava, and many have complained they want this expanded to include support for attaching images from a desktop web browser. So far, Strava has been resistant to add this capability into the core Strava feature set. For now, you can only attach supplemental photos and screenshots to your Strava activity from the Strava app on your mobile device.
To add more screenshots, you'll need to put them somewhere that your mobile device can get to them, using a tool like Dropbox, Google Drive, Box or another tool. Once those images are accessible via your mobile device, load up Strava and select your specific ride activity.
Once there, you should have a menu option or button to edit your Strava activity. Here's how it looks on my Android device:
On an iOS device such as an iPad, the "Edit" button is located in the upper-right corner of the screen.
When you choose "Edit activity" the activity, you'll be presented with a different screen, where you can then tap the [+] button to add additional images. On your mobile device, browse to where your custom screenshots or images are and choose them one at a time.
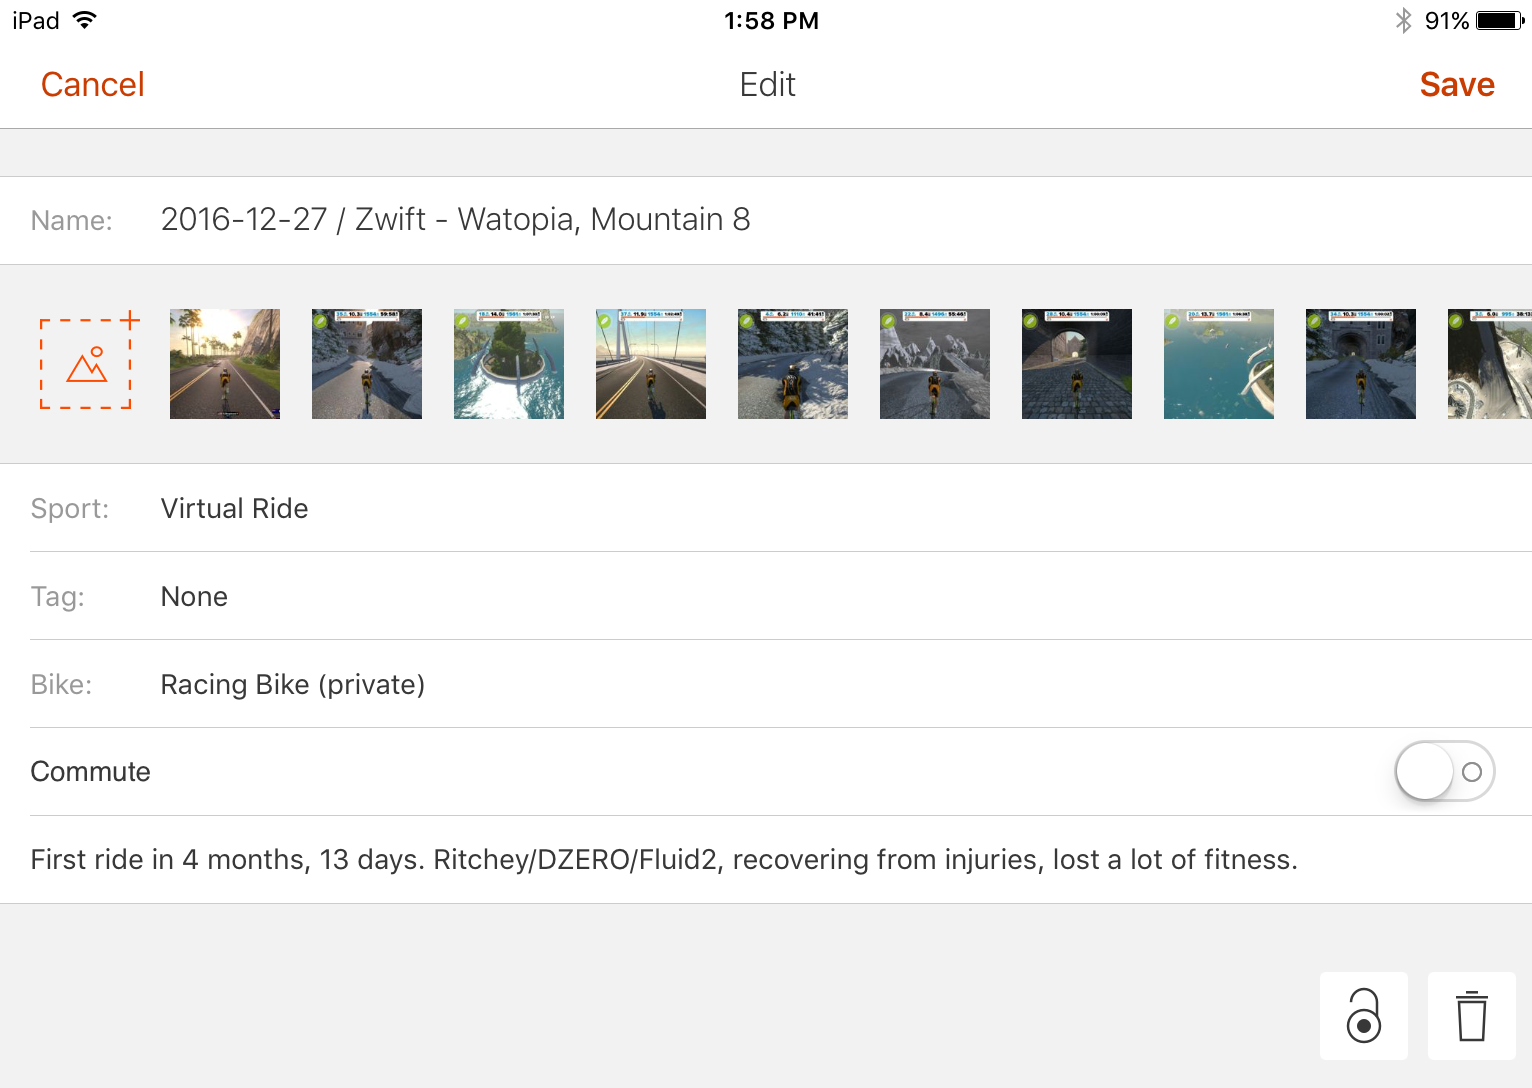
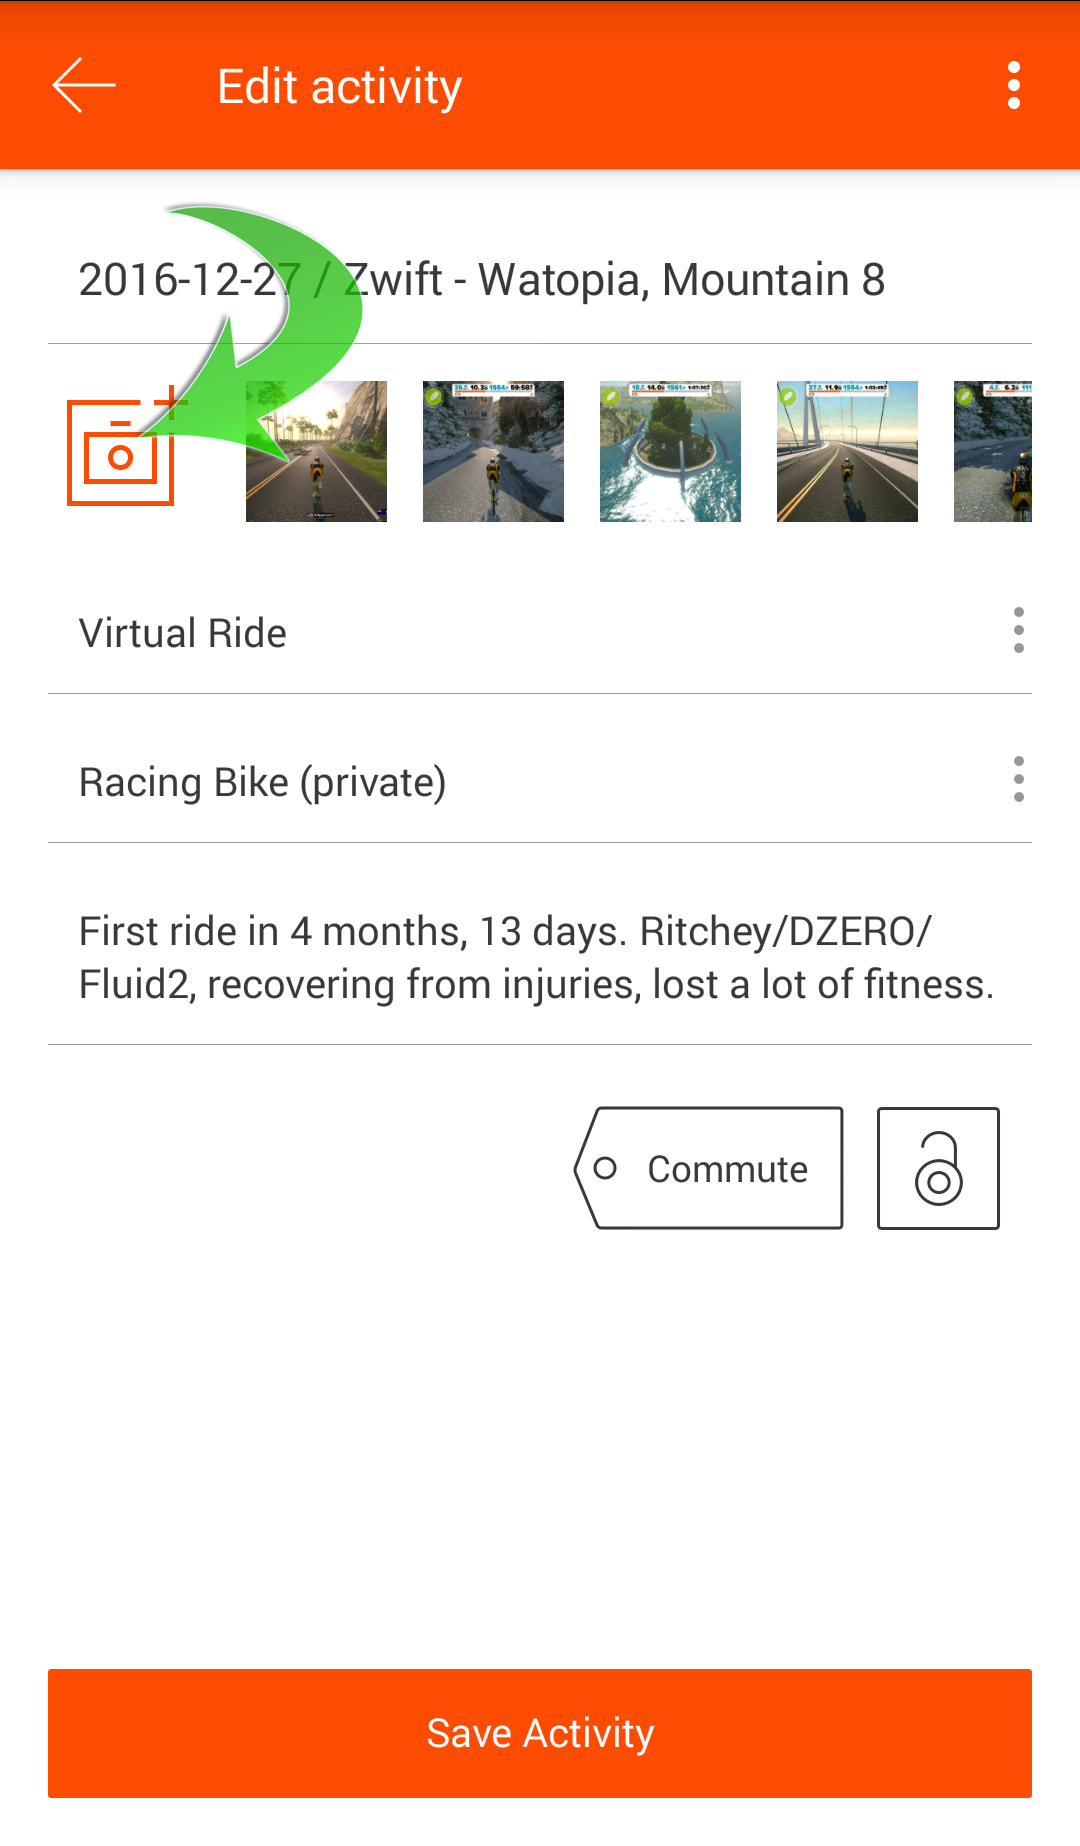
Selecting one of the existing images your Strava activity will allow you to add a custom image caption, remove or replace that image.
At the bottom, when you select "Save Activity", those images will then be posted to your profile and saved within your Strava activity.
That's all there is to it! Now get out there, ride and showcase those amazing screenshots with the rest of the world!
- 35328 views
How do I choose a segment to ride on Zwift?
How do I choose a segment to ride on Zwift? setuid Wed, 11/22/2017 - 11:36If you're looking for a way to choose a different course on Zwift, there is a different article for that. This article is specific to choosing a different segment (ex: Hilly vs. Flat) of the default course you're riding, not choosing an alternate course (ex: Watopia vs. Richmond).
To choose a different course, read the following KB article:
If you prefer to ride solo on the same course that other riders are on (riding solo on Watopia while the default course of the day is already Watopia), you'll want to read the following KB article describing my solution to do that:
The New Zwift Courses and Segments
- Watopia Course (11 segments, 3 NEW Volcano routes!)
- Richmond Course (5 segments)
- London Course (5 segments)
With the new Ocean Boulevard and Mountain Route extensions recently released on Watopia Island, you have some options to choose a Hilly, Flat, Figure-8 or Random course layout. The choices will move you along the new routes, depending on your preferences.
Watopia Course (6 segments, elevation calculated from Strava)
- NEW! Volcano Circuit (2.8 mi/4 km, elevation: 56'/17m)
- The Pretzel (44.9 mi/72.25 km, total elevation: 4375’/1333m)
- Hilly Route (5.7 mi/9.17 km, total elevation: 329'/100m)
- Mountain Route (18.3 mi/29.5 km, elevation: 2201'/671m)
- Mountain 8 (19.9 mi/32.02 km, elevation: 2221'/671m)
- Figure 8 (18.4 mi /29.8 km, elevation: 770'/234m)
- Flat Route (6.4 mi/10.29 km, elevation: 177'/54m)
- NEW! Volcano Circuit (same as normal Volcano Circuit, but anti-clockwise)
- NEW! Volcano Flat (7.7 mi/12.3 km, elevation: 151'/46m)
- Group Riders Nearby
- Surprise Me
- Volcano Circuit is a new 2.8mi/4.2km lap around, and inside of, the new Watopia volcano. This one has a built-in lap counter to count the laps as you complete them. In an organized lap-based event that uses this course the lap counter will count down to the finish.
- The Pretzel is similar to the Mountain 8 route, with the exception that your ride takes you even higher, up to the high-altitude radio tower at the very top of the mountain and back down through the back side of Watopia, for a very tough ride that for many, takes over an hour to complete without any redundant loops.
- Hilly Route is the "classic" Watopia Island we've always had since Day 1
- Mountain Route
- Mountain-8 is a new set of turns that will loop you through the new (as of Zwift v1.0.10738, released on 3/17) Mountain Route, through the Swiss village, up through the snow and back down in a Figure-8/butterfly pattern to maximize your training for a sub-1-hour loop (thanks Eric Min for this one!)
- Figure 8
- Flat Route follows the Ocean Boulevard extension which takes you under water, through a richly-rendered aquatic expansion of Watopia Island and around a few winding, but mostly-flat roads that reconnect to the classic Watopia route at the end.
- Volcano Circuit CCW is the same as the "Volcano Circuit" route above, but will run a 2.8mi/4.2km lap in the opposite (anti-clockwise) direction.
- Volcano Flat is roughly 8mi/12.5km across a flat loop through the new volcano, which includes most of the "Prefer Flat Roads" route minus 'The Esses'
- Group Riders Nearby allows you to stay with the pack or group you're riding with, regardless of which twists or turns they make. When they go left, you go left. If they decide to go straight, you go straight.
- Random or "Surprise Me" is exactly that. It will choose the route and turns for you at random, to make your ride very unique each time you ride it. No ride is ever the same!
Richmond Course (5 segments, elevation calculated from Strava)
- Prefer Flat Roads (3.1 mi/4.98 km, elevation: 38'/11m)
- Prefer Hilly Roads (5.6 mi/9.01 km, elevation: 414'/134m)
- 2015 UCI World's Course (10.1 mi/16.25 km, elevation: 467'/142m)
- Follow Riders Around Me
- Surprise Me
- Prefer Flat Roads strives to keep you as flat as possible, with very little climbing around Richmond. This is a modifier version of the 2015 UCI World's course that avoids the Libby Hill and 23rd Street climbs for a relatively easy, flat ride.
- Prefer Hilly Roads takes you through and around the Richmond UCI World's course and includes the steep descent and dual climbs up Libby Hill and 23rd Street. Good on the legs!
- 2015 UCI World's Course is brick-for-brick identical to the real-world, 2015 UCI course that the Pro peloton rode, although you get to decide if you want to do the full 16 laps on that course or not. Bring plenty of gels and water if you do!
London Course (5 segments, elevation calculated from Strava)
- London Loop (9.2 mi/14.80 km, elevation: 499'/152m)
- Classique (3.2 mi/5.14 km, elevation: 62'/19m)
- London 8 (12.6 mi/20.27 km, elevation: 780'/238m)
- PRL Full (107.8 mi/173km, elevation: 8189'/2496m)
- PRL Half (42.9 mi/69km, elevation: 3130'/945m)
- London Loop is a 9.2 mile loop that takes you through the city of London before dipping under the Thames River to head out to Surrey Hills for some fresh air and steeper climbing. It bypasses the Classique course entirely.
- Classique will take you through a brief warmup ride from the starting area to the cours before bringing you through the remainder of the 5.5km loop for as many laps as you can handle.
- London 8 is the whole enchilada (but not the Burrito, no pun intended!) and includes all 12 miles of tarmac on the London course. Take this for the longest ride and best tour of the course.
- PRL Full is a 160km (100+ mile) route that does many "London Loops", followed by an iconic finish going through the Prudential Ride London finish arch on The Mall.
- PRL Half is a shorter, 64km (40+ mile) version of the PRL Full course. Mini-Me, if you prefer.
When you log into Zwift, after pairing up your bike sensors and HRM, you'll be presented with the following drop-in menu of options, where you can choose to ride along with a friend by clicking on their name, or by choosing a specific route from the dropdown menu, to pick one of the above routes.
Good luck, and #RideOn!
- 83693 views
How do I convert a Sufferfest workout to Zwift workout format?
How do I convert a Sufferfest workout to Zwift workout format? setuid Sat, 11/21/2015 - 17:09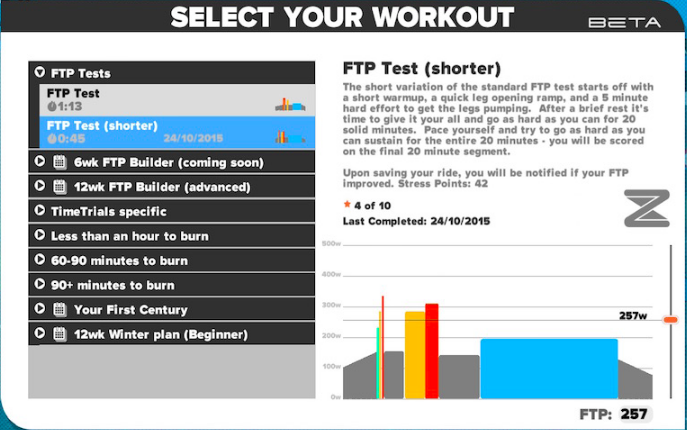
Many cyclsits who were used to using the Sufferfest videos and workouts to do workouts prior to Zwift's own workout features being added, have asked how to repurpose or convert those workouts into a format that can be used directly with Zwift.
The community responded swiftly by creating a few discussion groups, forum posts and tools to help! Here are a few:
Here's how to convert your existing Sufferfest workouts to Zwift format:
- Download and install Python 2.7 onto your PC (for Windows) (for Mac)
- Download and extract the zerg.py script from Christian Wiedmann's Github project page.
- Download the Sufferfest ERG/MRC spreadsheet from Google Sheets and save it to your local machine as an Excel file.
- Modify the power setup worksheet to suit your personal preferences. The default is 55% of your FTP for RPE3 and 140% for RPE10.
- For each Sufferfest video you wish to convert, copy and paste the text for the MRC file section in the appropropriate worksheet of the spreadsheet into a plain text file with a ".mrc" extension using Notepad or a similar text editor.
- To make it easier to edit later, save the .mrc file into the same folder as the zerg.py script was extracted to. The file will begin with the line "[COURSE HEADER]" and end with"[END COURSE DATA]".
Here's an example of the "Revolver" Sufferfest workout:
[COURSE HEADER]

VERSION = 2

UNITS = ENGLISH

DESCRIPTION = SUFFERFEST - REVOLVER

FILE NAME = REVOLVER.MRC

MINUTES  PERCENT

[END COURSE HEADER]

[COURSE DATA]

0.00    55

2.57    55

2.57    65

6.60    65

6.60    75
....[snipped for KB article brevity]
43.28 140
43.28 55
49.15 55
[END COURSE DATA]
- From a command prompt or shell prompt, change to the directory you saved your .mrc files along with the zerg.py script and run the python script with the .mrc files as parameters. For example:
zerg.py revolver.mrcor
zerg.py workout1.mrc workout2.mrc - This will output Zwift-compatible ".zwo" files into the current directory. If you want to put them in a separate folder, for example: ""%USERDATA%\Documents\Zwift\Workouts\Custom" you specify the -D option to zerg.py to point to a different save location by running:
zerg.py -D "%USERDATA%\Documents\Zwift\Workouts\Custom" workout1.mrc workout2.mrcYou may then edit the zwo files to add a proper description and other custom metadata as you see fit to recognize them when you load them back up into Zwift.
Add these files to your Zwift Workout directory in Zwift's data directories so Zwift will then see them when you launch the Zwift desktop application.
That's it!
If you want to learn how to load up a custom workout in Zwfit, there's another KB article describing that in detail:
Good luck out there, and Suffer Hard!
(Credits to cyclist Stephen Dag for helping develop the content to this article.
- 116155 views
How do I determine my Frames Per Second (FPS) in Zwift?
How do I determine my Frames Per Second (FPS) in Zwift? setuid Wed, 11/22/2017 - 11:59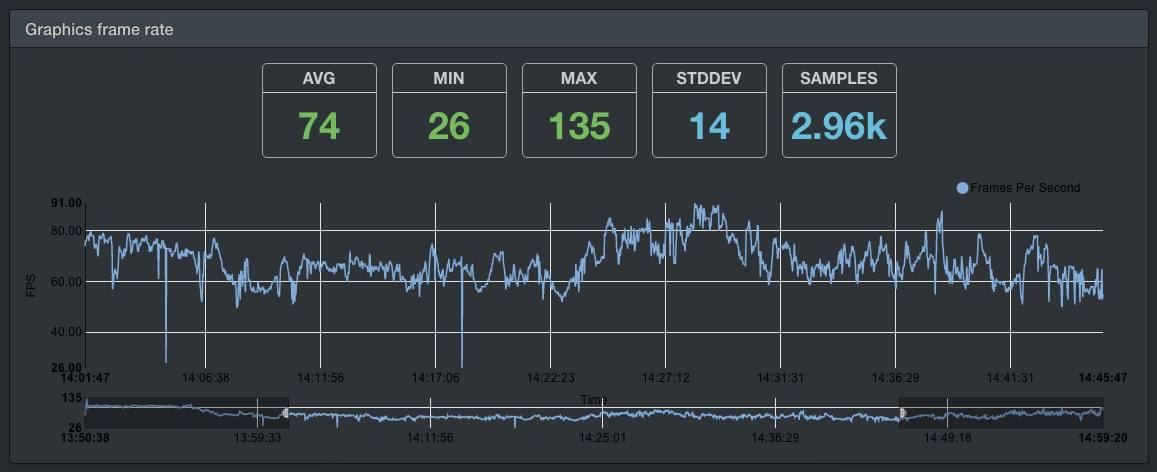
Many riders want to know what their FPS is in Zwift, so they can tune their game to maximum performance and efficiency.
As of the 1/19 update of the Zwift Desktop application, you can push your graphics to 4k UHD (2160p) mode for higher-end GPUs.
The easiest way to check your Zwift FPS is to take your Zwift log file and drop it onto the Zwift Logfile Analyzer, to produce a graph that looks like the one at the top of this article.
You can also make a 1-line change to your Zwift profile configuration file to show the FPS on-screen, so you don't have to rely on third-party apps like "FRAPS" or "Open Broadcaster Software" (aka "OBS") to show it for you. Check your Zwift Log.txt file for an entry near the top that specifies which profile you're using. That should look like this:
[21:26:35] Using ultra graphics profile
Then go into your Zwift data directory and edit that profile's configuration file to add this line:
set gShowFPS=1
When you start up Zwift again, you should see something that looks like this:
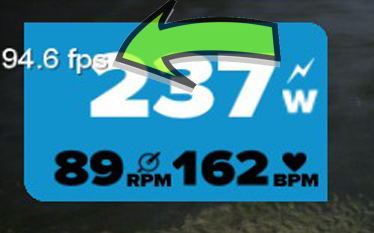
If you're not sure where to find your Zwift log files, there's another KB article that describes where each relevant piece of Zwift data resides on your system:
Below are two additional methods you can use to calculate your FPS for both Windows and Mac platforms. Use whichever one works best for you:
Using Windows PowerShell (Windows Only)
This PowerShell snipped was contributed by Nicholas Rodie
$input_path = $env:USERPROFILE + ‘\Documents\Zwift\Logs\Log.txt’
Get-Content  $input_path -wait | where { $_ -match "fps"} | % {$_ -Replace ",(.*)", ""}
Using Perl (Mac or Cygwin on Windows)
This Perl snippet was written by David A. Desrosiers (aka "setuid" in-game)
use strict;
use warnings;

use Env qw(PATH HOME);
my $zwiftlog = "$HOME/Documents/Zwift/Logs/Log.txt";

open(my $in, '<', $zwiftlog) or die "$!";

my ($total, $count) = (0,0);

while (my $line = <$in>) {
    if ($line =~ m/FPS\s+?\d+/) {
        my ($fps) = (split(/\s+/, $line))[2];
        $fps =~ s/,//;
        $total += $fps;
        $count += 1;
        }
}

my $average = $total / $count;
my $rounded = sprintf("%.2f", $average);

printf "Average FPS (%s samples) is: %f\n", $count, $rounded;
- 43995 views
How do I earn the "Tron" bike?
How do I earn the "Tron" bike? setuid Wed, 11/22/2017 - 12:02- 16558 views
How do I flag an invalid Zwift Segment or Activity on Strava?
How do I flag an invalid Zwift Segment or Activity on Strava? setuid Sat, 11/21/2015 - 17:04With the popularity of Zwift growing, there have been a number of new "segments" showing up on Strava. There used to be a handful per-course, then dozens, and now there are hundreds. Some of them are segments as small as 200 feet or even less! Many people create these so they can be the 'first' to KOM their own little 400 foot piece of random road.
It can be frustrating when you're trying to compare your own fitness gains or measure yourself against a training plan, when a single section of the course has dozens of little segments all knotted together in 200m lengths.
But there's a solution: Flag them! But there's a caveat! If you want to flag a rider for having some super-human abiltites on a segment, you have to flag the rider's effort first, before you flag the segment.
Once you flag the segment, you will no longer be able to see other rider's efforts on that segment, and won't be able to flag them. Keep that in mind. I'll show you both options below:
Flagging an Invalid Activity:
- Find the segment you're interested in comparing, by opening up the "Segment Details" view, which should look something like this:
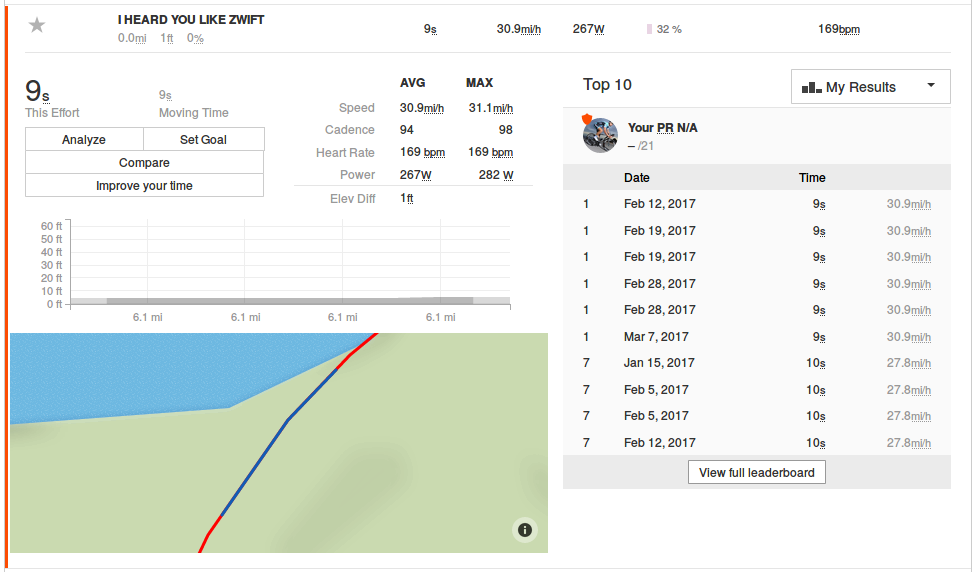
-
Click on "View full leaderboard" on the bottom right of that details view. On the next page, click the orange "Compare Efforts" button on the right side. You'll be brought to an additional details page that shows the effort compared to the leaders who have done the same segment.
-
Here you can see that the rider was doing 138.9mph on that segment. I'm skeptical. So let's flag him for this effort.
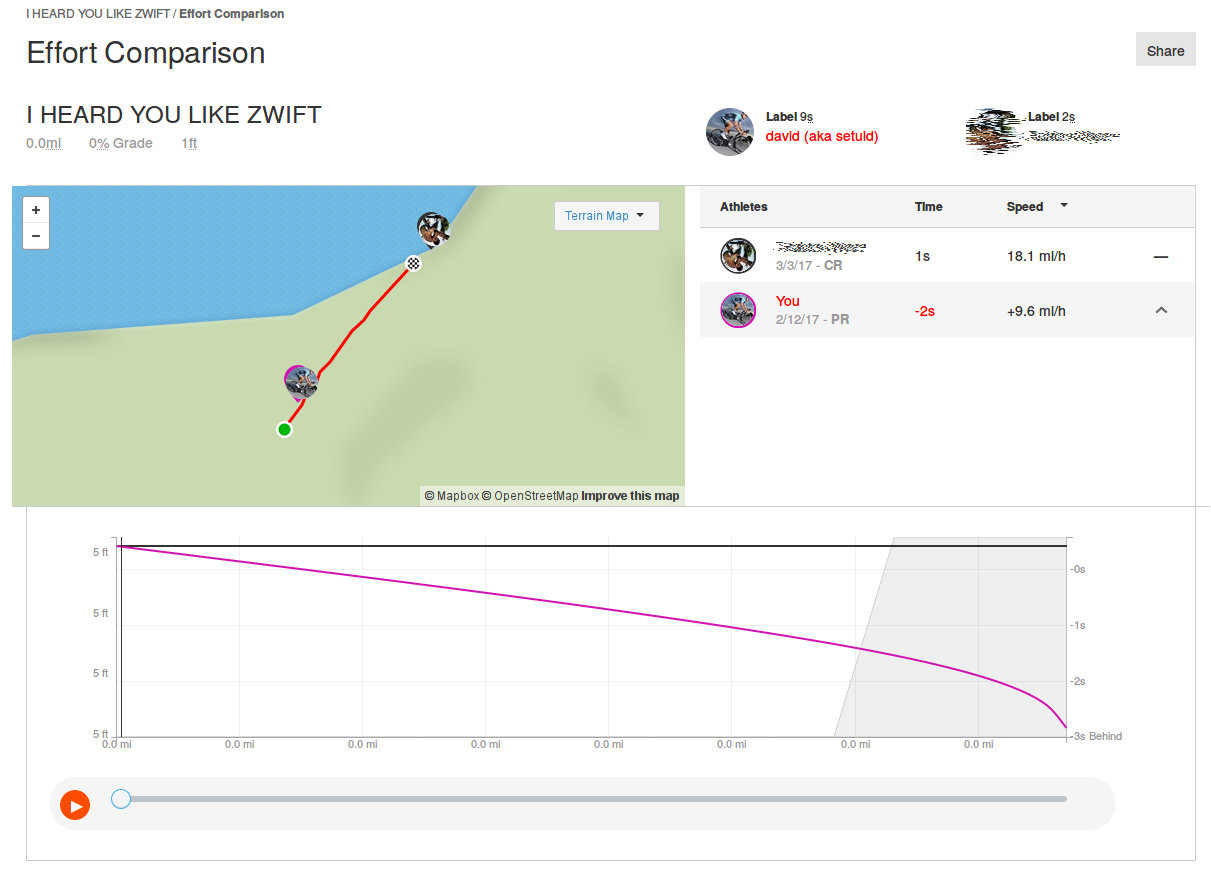
-
Once you find a rider who has an invalid time on an activity, go back to the previous page (using the "Back" button in your browser), and then click on the date right next to their unreal time on that segment. Here, I'll be clicking on "Mar 3, 2017":
-
This will bring me to the rider's submitted ride for that day, which includes this superhuman segment effort. On the upper-left of his activity page, will be a little "wrench" icon. Click that, and choose "Flag" from the menu:
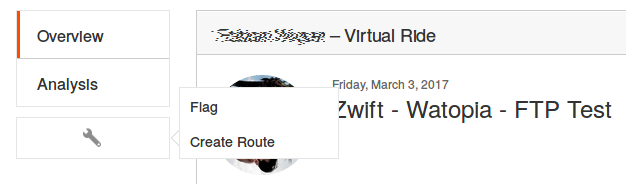
-
Now you'll need to choose a reason and an explanation of why you think this specific activity should be flagged. Something like the following should suffice:
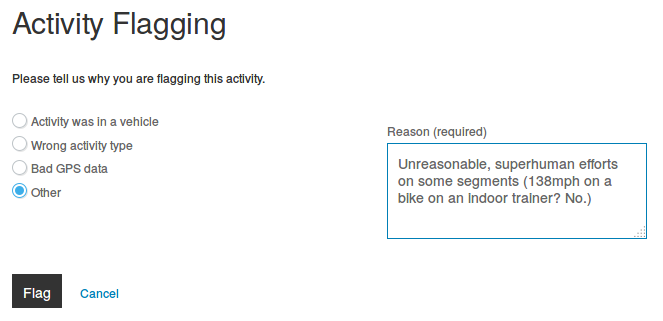
-
After you've added your reason, click "Flag" and your report will be submitted for review by Zwift's staff. That's it!
Flagging an Invalid Segment:
- Log into your Strava account and open an Activity that has the segments you believe to be fake, bogus or just plain annoying.
- Click on the segment you're interested in seeing the details for, and possibly flagging it as invalid. Here's an example segment from one of my recent rides, a 9-second segment in a piece of roadway:

-
On the right side of the segment details, you'll see a 'View full leaderboard' button. Click that.
-
From here you can click "Compare Efforts", and see how others who have beat you in that segment have done. Here's an example from that specific segment. Yes, you read that right.. LC was doing 99mph on that segment, while I was pushing 33.1mph. Super-human, to be sure. So let's flag it!
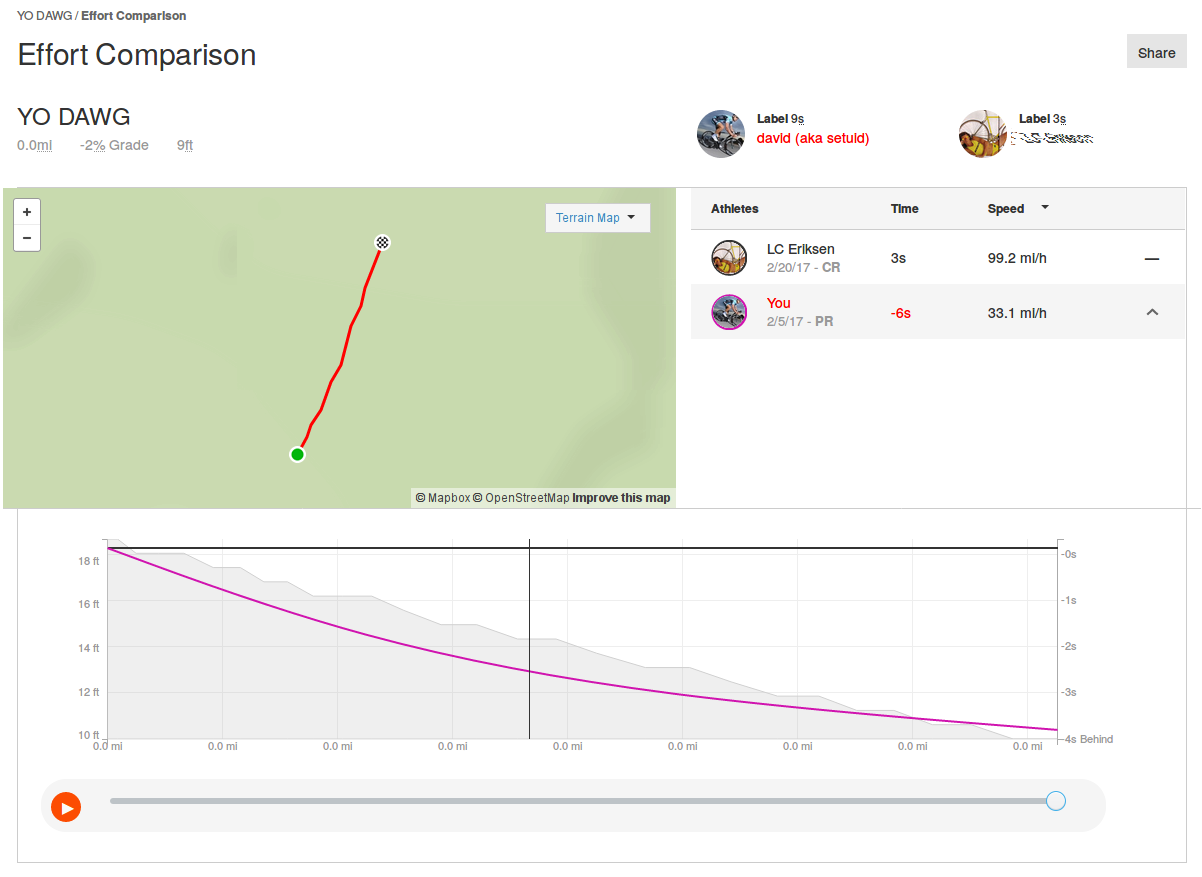
- On the previous page (click your browser's "Back" button), you'll see two options on the right side, above the segment, labeled "Embed on Blog" and "Actions". We're interested in the "Actions" dropdown. Click that.
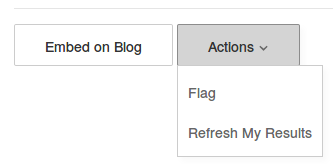
-
Select "Flag" from that dropdown menu. You'll now get a page with a list of "Reasons" why you think that segment should be flagged.You'll need to fill out a reason in the "Additional detail:" box at the bottom. This is to prevent automated flagging of segments across their activities. A simple "Nonsense segment..." is enough here.
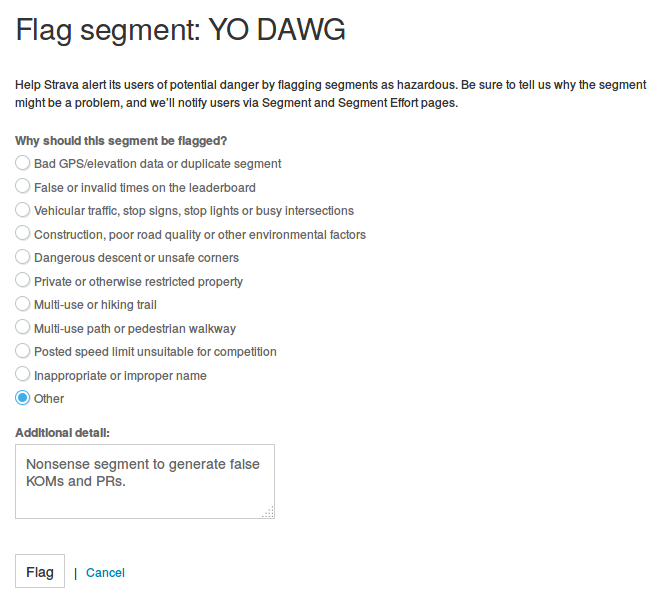
-
Click the "Flag" button at the bottom when you're done and confirm it on the next page.
That's it! Now that segment is kicked back to Strava for review by their staff, and they'll remove the time, or the segment as appropriate.
- 6116 views
How do I get to the group ride/race start from elsewhere on the course?
How do I get to the group ride/race start from elsewhere on the course? setuid Wed, 11/22/2017 - 12:10Often, you'll be riding on the Zwift course while another scheduled ride or race is starting on Zwift. You might want to stop your recreational or social ride and join up with the scheduled race or ride about to begin. With the large number of rides happening on Zwift at the same time, it's easy to overlap some other scheduled event with your own fitness activity.
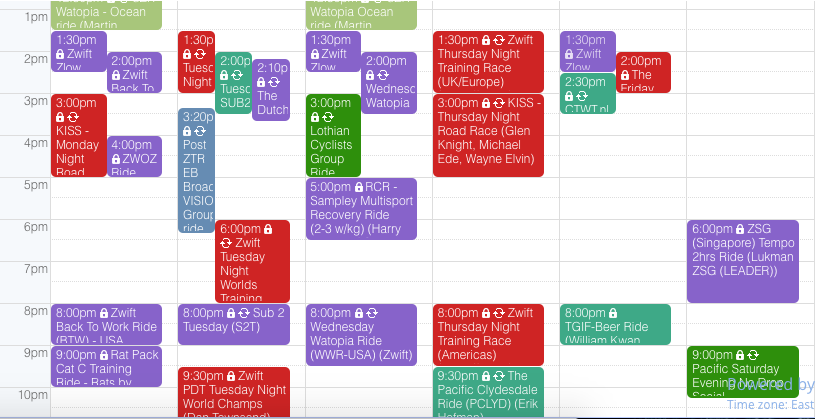
If you're half-way across Watopia Island or across the course, you can't easily speed up to meet the ride in time at the starting line, so how do you do it?
There's a few ways to accomplish this:
- Turn Around: If you're relatively close to the starting line, a mile or two ahead of the race start on the course, you can turn around, circle back and meet the ride at their starting line. Many times this will work, as long as you have enough legs left to end your ride early and hook on with the scheduled ride.
- Burn Matches: If you're a few miles behind the starting line for a scheduled event, you can do your best to ride hard or sprint to meet up with the riders at the starting line. Sometimes calling ahead in Group Chat to hold the race until you get there can help, or just ride hard if you miss the start and push through the ride's neutral start to catch up.
- Take a Breather: If you're half-way across the course, you have the option of missing the start and waiting for the group to come close to where you are, then hook on when they surge past you. You'll miss any possible podium placements if it's a race, but the social aspect of the group ride or race is more than enough to make up for that!
- Transport to the Other Side: This next on is a bit tricky (and one of my own design). If you're riding on the course and too far away to turn around or sprint ahead to catch up, you can come to a complete stop on the course, go to the "Pair" option on your Settings screen, unpair one of your sensors (HRM is a good one, it comes back fast), then re-pair that sensor. Once you pair back up, you'll get the standard drop-in dialog you get when you initially log into Zwift. On that dialog, choose one of the riders you know is already at the starting line of the ride you want, select their name and choose "Ride With". You'll re-drop in close to that rider and from there, you can begin starting the ride as you would normally, just like you logged in clean.
- Exit, Restart: The last option, and one of last resort, is to stop your current ride, exit (and Save + Strava, if you want to keep your data), then re-launch Zwift and drop-in as normal, by choosing another rider you know will be riding the ride you want to be in, and drop in next to them by selecting their name from the list and choosing "Ride With". If you want to stitch your previous ride data together with the ride data from the group ride so you don't lose continuity with the efforts, you can use "Fit File Tools" and glue the two activities together.
Hopefully these ideas will help!
#RideOn
- 50959 views
How do I launch Zwift in a specific part of my display?
How do I launch Zwift in a specific part of my display? setuid Sun, 05/10/2020 - 23:20For many of us with larger displays we use with Zwift, including a projector or large-screen, 4k display, running Zwift in a windowed session alongside your favorite movie, YouTube video, Tour de France replay, Google Meet/Zoom meeting or other content can help the sessions go by faster, as we multitask during our rides.
On Windows 10, there are very few good tools to do this, most of them are non-free. With the current pandemic and many people out of work, it's harder and harder to justify spending on small desktop utilities. But you don't have to!
Note: If you're running macOS, there are several alternatives for that platform. I'll write a separate article and create a HOWTO video describing how I use each of these:
In this article, I'll describe how to set up and configure one of the free tools from Microsoft's own "PowerToys" collection and how to use it to auto-launch Zwift in a specific part of your screen, at the size and dimensions you need.
First, you'll need to download and install PowerToys from the link above. It's a free download, and installs quickly. You can use all of the defaults when installing it.
Next, we're going to launch PowerToys, and configure it to support the "Zones" we want to use to display our apps. For now, we'll just create a single zone for Zwift, but you can create multiple different zones to launch your various apps within, for example launching ZwiftPower in a standalone app in another zone while you ride or race.
With PowerToys open, we're going to want to enable the toggle to "Move newly created windows to their last-known zone". This means when an app is placed within a zone, it will remember that placement, so the next time the app is launched, it will correctly place itself within that zone.
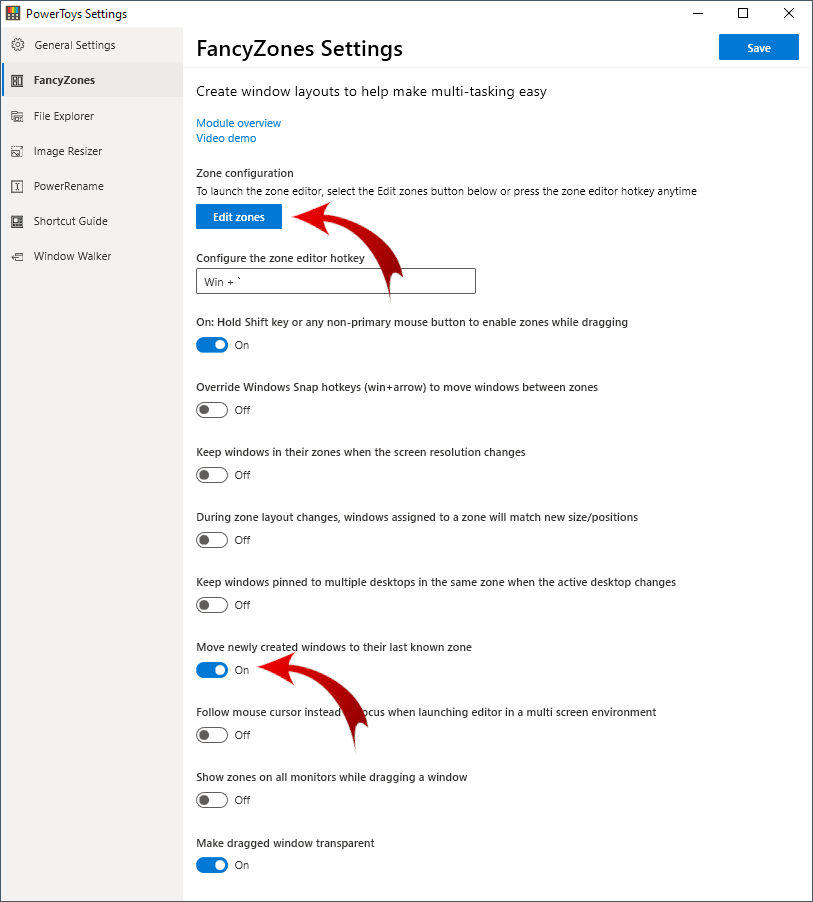
Don't forget to save these settings, by clicking the [Save] button in the upper-right corner of the FancyZones GUI!
At the top of the interface, you're going to click "Edit Zones" to create some regions of your screen to hold the applications you want to contain within those regions.
When you click "Edit zones", you'll have the ability to add (+) any number of zones you want on your desktop. Here's a single zone I've added called "Zwift (small)", and placed it in the lower-right corner of my Windows 10 desktop:
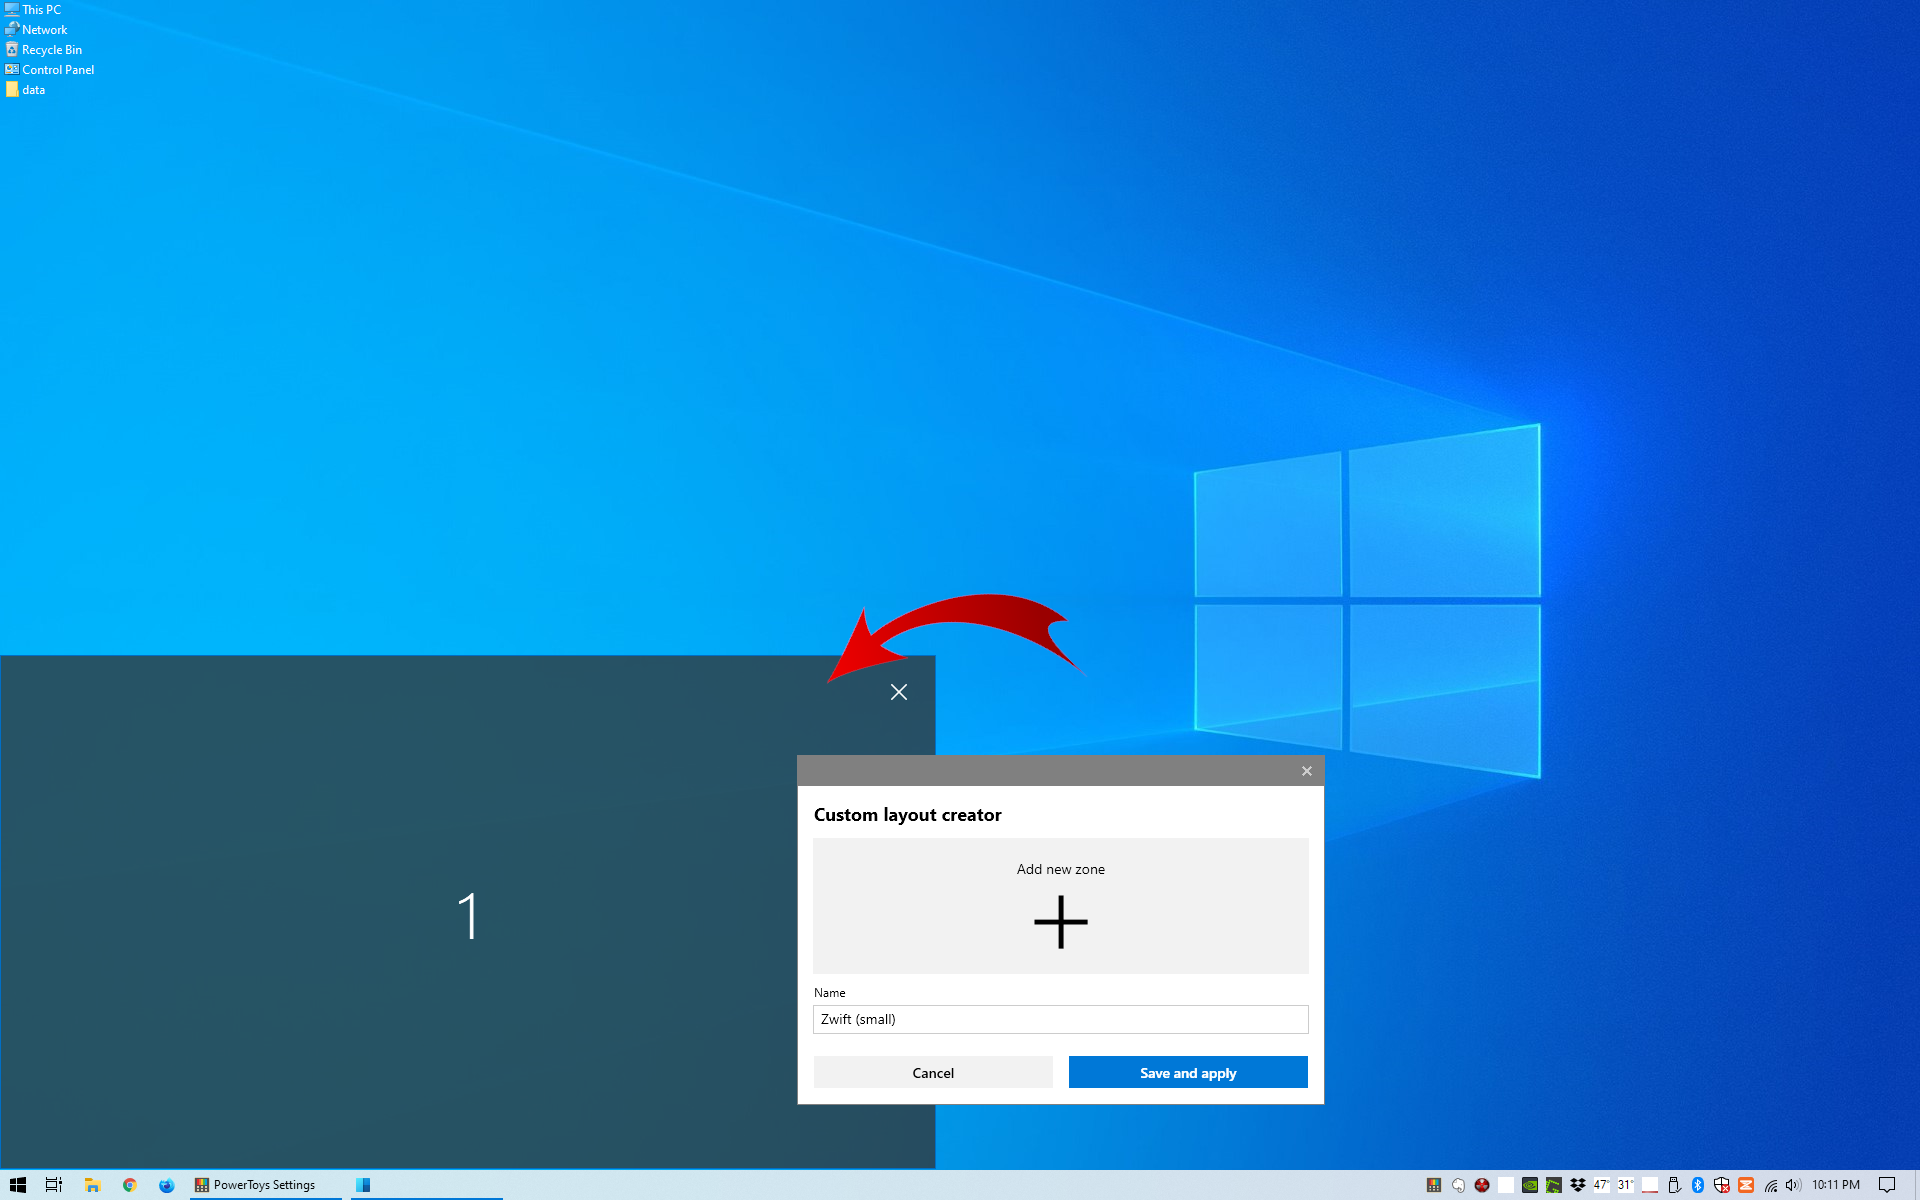
Once I've saved this placement, I'm going to launch Zwift one time, and place it into this zone.
First, we want to make sure your setting within Zwift is set to "Windowed" mode, and not "Full Screen" under Settings → Screen Mode, as shown here:

Once that's been set and you've re-launched Zwift, hold [Shift] on your keyboard, and drag the Zwift window into this new zone you've created. When you do, you'll see the transparency will change, and the Zwift window will "snap" into place within the dimensions of this new zone. Now you can close out Zwift, and re-launch it again, and it should automatically jump into this zone when it starts.
If you want to create additional zones for your browser window, media player, eBook reader or other applications, you can do that using the same method. Just create new zones for each new region or application you want to snap into its own region, launch them and drag them into the zones, and you're done!
Here's a quick video showing this working in real-time, on my Windows 10 machine:
Good luck, and #RideOn!
- 1352 views
How do I load a custom workout into Zwift?
How do I load a custom workout into Zwift? setuid Sat, 11/21/2015 - 17:12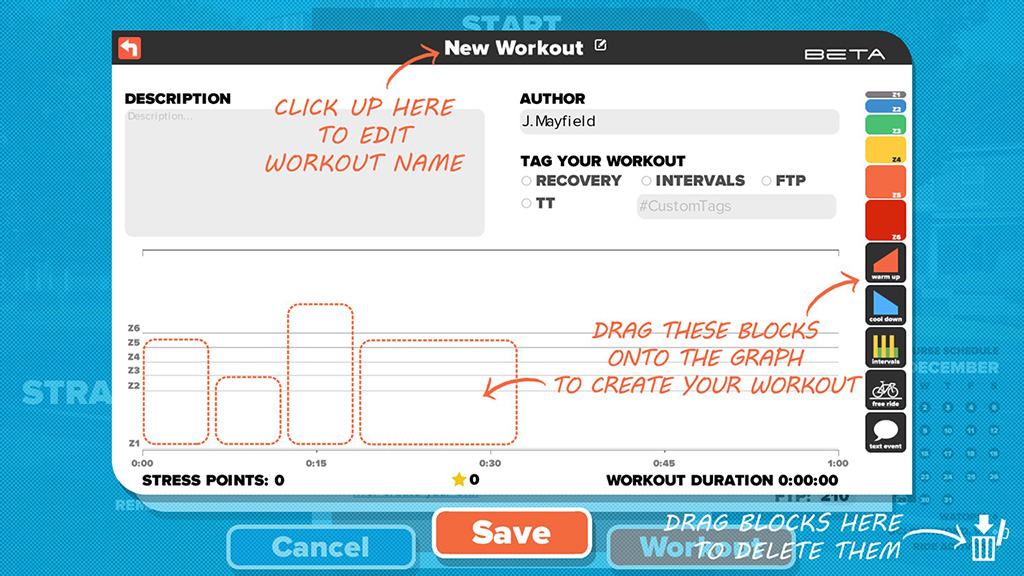 Shortly before Christmas in 2015, the Zwift communty received a big, earlypresent from Santa (aka Jon Mayfield) in the form of the Zwift Workout Editor. This allows you to drag-and-drop blocks onto a form to create a custom workout that meets your needs.
Within hours, the Zwift Community began pouring over the editor, poking at its every pixel, parsing the created XML files and even creating communitywebsites and Facebook groups to share custom workouts!
The support from Zwift and the community's swift adoption are really a positive testament to how well Zwift is listening to its userbase and creating features the continue to mature and evolve the product.
Such widespread adoption naturally leads to questions!
How do you take a custom workout you've created and share it with others?
How do you take workouts from others and use them yourself?
Read on, fellow Zwifter, all shall be revealed!
Let's start with the easy; taking a workout created by someone else and incorporating it into your Zwift application. If you load up Zwift with its normal configuration, you have the option to select a workout.
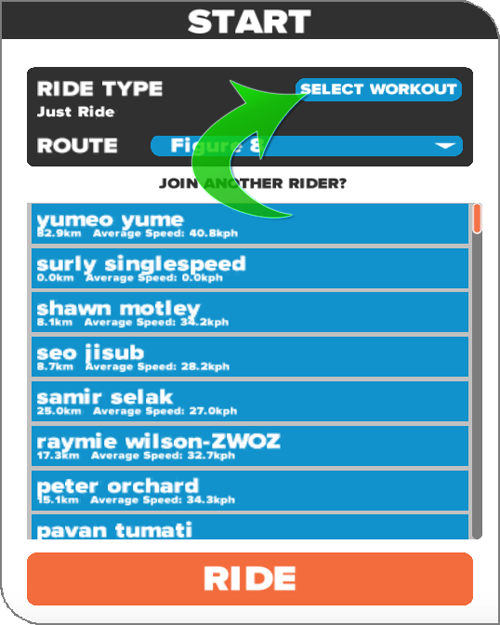
If you choose that option, you can pick any one of dozens of the built-in, canned workouts Zwift has created, or you can build your own custom workout.
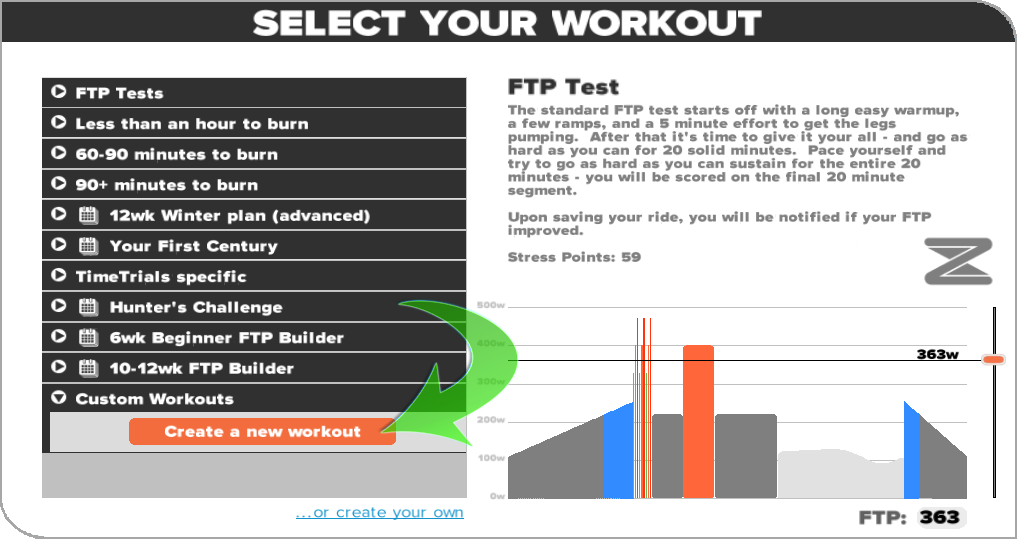
The workouts you create in Zwift are put into .zwo (Zwift Workout) files that reside in your "\Documents\Zwift\Workouts\" directory on both Windows and Mac operating systems. Workouts that you create in Zwift are storedin this directory and are stored in XML format. You can open these with a text editor and see how they're built.
You can find out more about Zwift Workout Mode by reading thevery detailedarticle in James Gill's "Unofficial" (but official" Zwift Community Manual. There's so much more to this feature in Zwift than I can cover here.
But let's talk about how you load acustomworkout into Zwift. First, make sure the Zwift application is closed.
Grab any workout filefrom the Zwift Workouts site and copy it into the Zwift workouts directory ("\Documents\Zwift\Workouts\") using any filename that you want to use. If you intend to use a lot of workouts suplied or shared by others, you may want to pick names that are meaningful when you look at them in the directory while browsing. This is so you don't edit or delete the wrong file by accident, outside of Zwift.
The files you put in here will be parsed and recognized by Zwift. It will also inherit whatever directory structure you create here to organize your files and present that in the Workout Editor UI for you. I created a temporary structure here to display what it looks like for some sample Sufferfest workouts in subdirectories "Hard", "Medium" and "Easy":
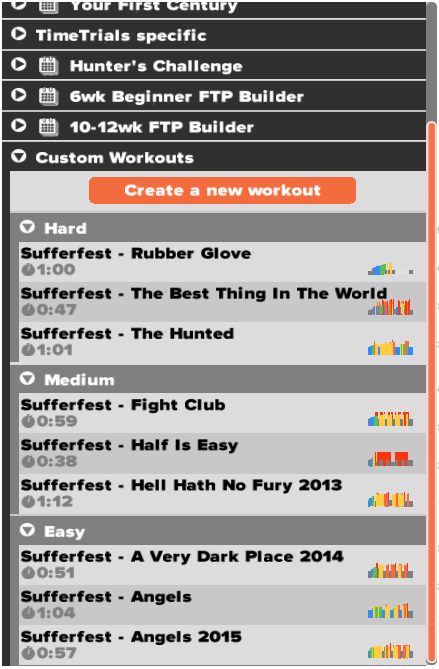
Then I exited Zwift and moved those 3 directories under a directory called "Sufferfest" and created a second directory called "Community" for contributed community workouts. I restarted Zwift, and they showed up as expected under their own heirarchy.
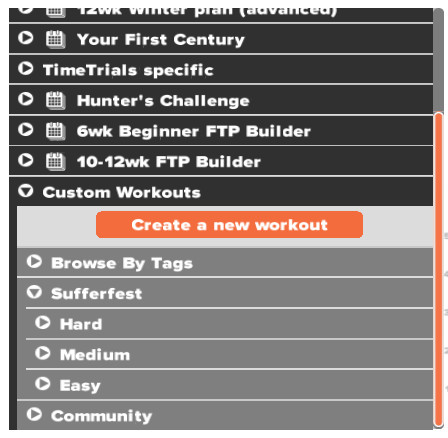
Now that I had a number of workout files stored in the directory, Zwift was able to detect the tags associated with each of those workouts, parsed those and presented that in the view as well. Now it looks like this in the editor:

So as long as you're using properly-formatted Zwift workout files of your own design or from the community, and store them in the correct directory, you'll be able to choose them from the Zwift workout interface and ride them.
#RideOn
- 724596 views
How do I make sure my version of Zwift is updated?
How do I make sure my version of Zwift is updated? setuid Wed, 11/22/2017 - 12:12Making sure your Zwift desktop application is updated and current ensures you're always taking advantage of the best features (and bug fixes!) each new update offers.
To make sure you're always running the latest version, you have to follow these steps:
Go to the main Zwift website and download the appropriate version for your operating system (currently PC and Mac):
Install Zwift cleanly from the ZwiftSetup file you just downloaded (ZwiftSetup.exe for Windows, ZwiftSetup.dmg for Mac).
On Windows, when you launch Zwift from the default icon, it will place the ZwiftLaunch applet icon in the System Tray. Right-clicking on that icon in the System Tray will open a menu of options.
Make sure your options have the "Auto Update" selected as shown here. If that option is not selected, your version of Zwift will not automatically update for you when you launch it.
![]()
On the Mac, there is no ZwiftLauncher applet, so launching Zwift from Zwift.app will check for updates automatically, keeping you current.

That's all you need to do!
- 164355 views
How do I ride completely solo on Zwift?
How do I ride completely solo on Zwift? setuid Wed, 11/22/2017 - 12:26
This article is specifically about riding on Zwift 100% solo, even when the default course of the day is full of riders, for example riding on Watopia solo, while 600 other riders are also riding on Watopia.
If you just want to choose a different course to ride, for example riding on Watopia while the default course is Richmond, read the following KB article:
The above article describes how to ride on the "other" (non-default) course, which may not be what you want.
If you want to ride Richmond solo and it's a Richmond day, that workaround won't work, so that's why I came up with the "ApocaZwift©" solution that does give you this capability and doesn't require changing your Zwift configuration or messing with your PC clock date (and all the downstream impacts that brings)
Use ApocaZwift (© David A. Desrosiers, 2015-2020)
The quick-and-dirty way to set up ApocaZwift© is to set up some firewall rules to block (filter) traffic on port 3022 coming to and from Zwift. This lets you ride, create a .fit file and keep the course fast and responsive with no other riders on it. Here's how:
Microsoft Windows:
- Turn on the firewall from an elevated command prompt (if you don't know how to open an elevated command prompt, please Google that, as that is out of the scope of this KB article):
netsh advfirewall set publicprofile state on
- Set the rules that restrict Zwift from attaching to the WAN. Make sure these are all entered on the same line. I've wrapped them here for readibility:
netsh advfirewall firewall add rule name="Single User Zwift"
  dir=out action=block
  program="C:\Program Files (x86)\Zwift\ZwiftApp.exe"
  description="Run Zwiftin Single-User Mode (no riders or NPCs)"
  enable=yes localip=10.0.1.24/0,192.168.1.0/24
  remoteip=54.68.115.29 remoteport=3022 protocol=udp
Now you can ride on Zwift with no other riders at all.
- To delete the rule we just created, if needed. You can either choose to leave it in place and enable/disable it as you see fit later, or just remove it by using the following syntax:
netsh advfirewall firewall delete rule name=SingleUserZwift
Apple OS X
- Set the rule to drop all incoming rider data:
# These next 3 lines are all one single command, but wrapped here for clarity
(sudo pfctl -sr 2>/dev/null; echo "block drop quick on en0 \
proto udp from 54.68.115.29 to 10.0.1.0/24 port = 3022") \
| sudo pfctl -f - 2>/dev/null
- Validate that the rule is in the list of rules to be executed:
$ sudo pfctl -s rules -v
No ALTQ support in kernel
ALTQ related functions disabled
block drop quick on en0 inet proto udp from 54.68.115.29 to 10.0.1.0/24 port = 3022
  [ Evaluations: 1480      Packets: 0         Bytes: 0           States: 0     ]
  [ Inserted: uid 0 pid 80892 ]
- Enable the rule we just created:
$ sudo pfctl -e
No ALTQ support in kernel
ALTQ related functions disabled
pf enabled
- Removing the rule we just created, to restore our configuration:
$ sudo pfctl -vF rules
No ALTQ support in kernel
ALTQ related functions disabled
rules cleared
- 74017 views
How do I setup a Group Ride or Race Event on Zwift?
How do I setup a Group Ride or Race Event on Zwift? setuid Sat, 11/25/2017 - 23:25If you're setting up a Group Ride or Race on Zwift, you want to be sure you advertise that on the TeamUp calendar.
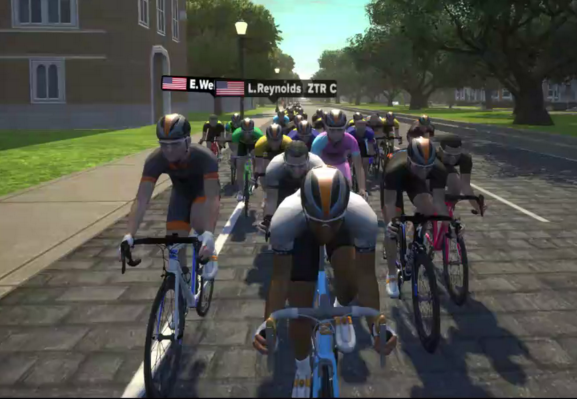
There are specific instructions on how to set up Races or Rides so others can find them, synchronize and attend your event on-time and with the correct rules followed.
See the following article describing how to add your event to the calendar that others use to find their rides:
Skye Nott has written a really great article over on Staminist on setting up a Group Ride on Zwift. The article allows commenting, so leave your input or questions if you want to contribute to the discussion.
Eric Schlange has also written a very detailed blog post specific to Race events on his Zwift blog:
The above articles should provide you with all the details you need on joining a Group Ride or Race as a participant, or setting one up as a ride leader.
Have fun on your ride!
- 282579 views
How do I stop my rider from flying off into the sky/trees/water?
How do I stop my rider from flying off into the sky/trees/water? setuid Sat, 11/25/2017 - 23:26Often, you'll see a rider flying straight into the trees, over the water, rapidly making circles on the course or just disappearing altogether during your rides.
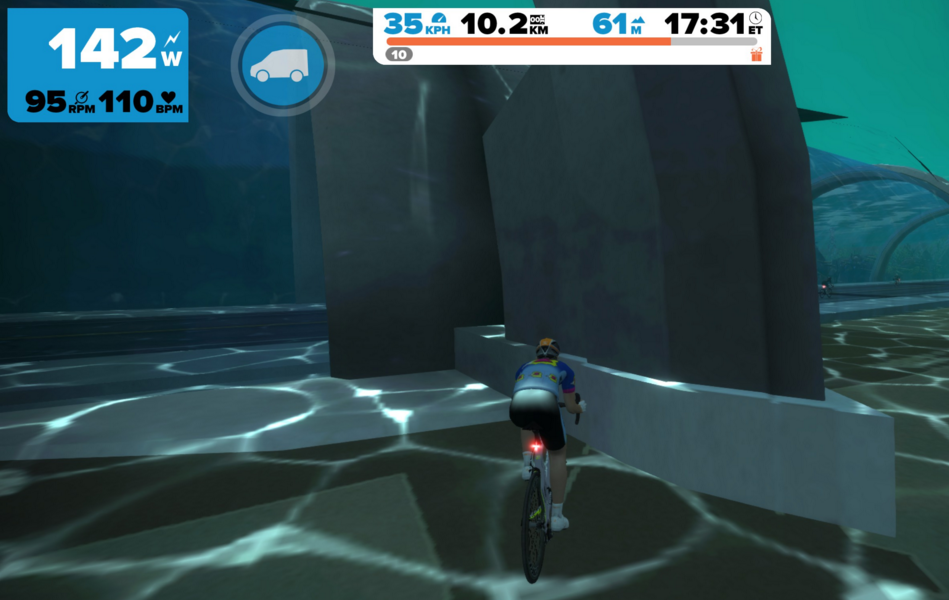
The reasons for this can vary greatly depending on a number of factors, and Zwift has put some code in place in the latest releases to try to mitigate the problem, but for many it still occurs.
As with many online games, tracking "location" is crucially important. You're either close enough for your sword to strike the dragon, or you're not. You either jump your car just before the edge of the cliff, or you speed over the edge and crash at the bottom.
Zwift is no different, and there's a constant need to communicate your location and predicted path back to the servers so it can update your location and plot your next set of turns or movements.
If you have lag of any sort during your game, you will be more susceptible to having this happen to you. Let's break it into smaller pieces:
Zwift itself actually sends very little data back upstream, mostly because the actual visual rendering is handled locally by your Zwift client app so you can send small amounts of data and just handle the interpretation of the data client side.
It's similar to being told to draw a triangle over the phone rather than having to actually send a picture of a triangle through the mail to the other person. Also, many online games use data interpolation along with other techniques to hide the effects of delay or lag to the end user.
Interpolation is when you have a dataset and you generate new data points that fit in with the existing data, such as an acceleration of speed on the Zwift course. You use this in Zwift to make things look smooth because in reality the Internet isn't.
There's always delay (lag) when dealing with online gaming because issues like packet loss and data arriving out of order (packet 2 arrives before packet 1) can impact your overall experience.
If you tried to code a 1 to 1 experience then everyone would be teleporting around the screen all the time because by the time one movement confirmation is received it's already out of date and you're really dealing with past information.
You also need interpolation because games don't update instantly the game logic is only updated in certain certain time steps (frame rate) and data is only sent out over the Internet in certain time steps (tickrate).
For example, say in the previous update we know that a rider was at the orgin (0, 0, 0) but in the next update that same rider is reported as being at (0, 10, 0).
We dont want to just move that player to (0, 10, 0) because it's gonna look like he teleported so we use interpolation to virtually pedal him smoothly to this new location.
The end user sees something more like this: (0, 0, 0) to (0, 2, 0) to (0, 4, 0) until finally he arrives at (0, 10, 0) and now it actually looks like the rider pedaled more naturally to that location.
There are other code-level techniques as well that can help, for example, "Straight Lag Compensation". Interpolation makes things look smooth but they also need to feel smooth so you have to code the game so that it takes into account the lag that is happening and still provides as close to a 1 to 1 experience as possible.
Many online games use "Movement Prediction" to try to hide lag happening upstream. You'll notice this when you're riding and yourself or other players are lagging or disconnects and their rider keeps pedaling off into a wall or the trees. Sound familiar? That's generally the symptom of why that happens.
Some other games use "Rollback Techniques" as well that can work well in smaller use cases. In Zwift, this will look like a rider who was originally in front of you, now transporting behind you, or a rider that is making very tight circles on the course in front of you (obviously not using the 'turn around' option in Zwift).
If push the rollback algorithm too far, you will get "Snap-back" or "Rubberband" issues that make the game a lot more erratic feeling to the client.
So make sure your connection is solid, and that other things aren't happening at the same time as you're playing that could impact the steady stream of bandwidth to your computer. Some of these could include:
- iCloud Synchronization on your Mac
- Backup jobs running on your PC/Windows machine
- Scheduled anti-virus scans running in the background
- Background Windows or App Store updates being downloaded to your machine
- Windows creating an automatic "Restore Point"
- Windows Search Indexing
- ...or any other processes which will impact both the CPU and network of your machine
Check your connection with any number of the tools available online, such as:
Good luck!
- 8091 views
How do I turn around on the Richmond course?
How do I turn around on the Richmond course? setuid Sat, 11/25/2017 - 23:32 The short answer: You can't.
Richmond is a one-way course and although it does double-back on itself at certain points, there is no way to turn around on Richmond.
If you want, you can point a mirror at the screen to "ride Richmond backwards", or you can wait until it's a Watopia Island day to ride a different and changeable set of routes where you can turn around, or you can try a few other methods to ride the other course.
Lastly, if that doesn't work, you can just ride solo, with nobody else on the course.
Enjoy the ride!

- 1953 views
How do I turn left, right or reverse on the Zwift courses?
How do I turn left, right or reverse on the Zwift courses? setuid Sat, 11/21/2015 - 17:42
The ability to 'turn' on the Zwift application is a relatively new feature (January 2016) and was introduced when the new Ocean Boulevard beach expansion was added to the Watopia course. There are several ways to turn to add variety to your workout and several baked-in routes that you can choose to maximize your riding experience, from Flat to Hilly to Figure-8 to Random.
You can choose to turn from the drop-in menu options, from the mobile app or from the desktop via your keyboard. I'll describe all three methods here:
- From the Drop-in Screen (before you start riding)
- From Zwift Mobile Link (ZML)
- From the Zwift Application (during a ride)
- TL;DR, Go straight to the video
From the Drop-in Screen (before you start riding)
When you first launch the Zwift desktop application and pair up your bike's sensors, you'll be presented with a drop-in screen where several ride options will be shown. You can choose to ride with someone else already on the course, you can choose to ride one of the canned or custom workouts or you can choose to ride one of the pre-set routes within Zwift.

If you choose one of those routes, it will present you with an option to turn in different directions when you come up upon an intersection in Zwift. For example, if you choose to ride the "Hilly" route (which is "Classic Watopia"), you would normally go straight, passing the new Ocean Boulevard waterfront expansion.
But now you have the option to go left, and turn down Ocean Boulevard, to ride that segment instead of straight up the first KOM of the Hilly route.
From Zwift Mobile Link (ZML)
When you're riding on Watopia Island (and most-recently, on the new Richmond course with turns), you may see several signs at the approaching intersections ahead indicating the option to turn.
As you near those intersections, your Zwift Mobile Link app's button screen will change briefly to add two additional buttons (shown in the below screenshot).
These buttons allow you to either "Turn Left", "Go Straight" or "Turn Right" on th course as appropriate for the intersection you're approaching. Tapping and holding down on the respective button will move your avatar in that direction as you come into the intersection.
Note: Tapping is not enough to activate the turn, you must tap and hold the button in a persistent way, to activate the turn. Once you've made the turn, you can release the button on the app.
Once you've turned into the intersection, those buttons will disappear, and be replaced by the standard top two buttons on the button screen of ZML.
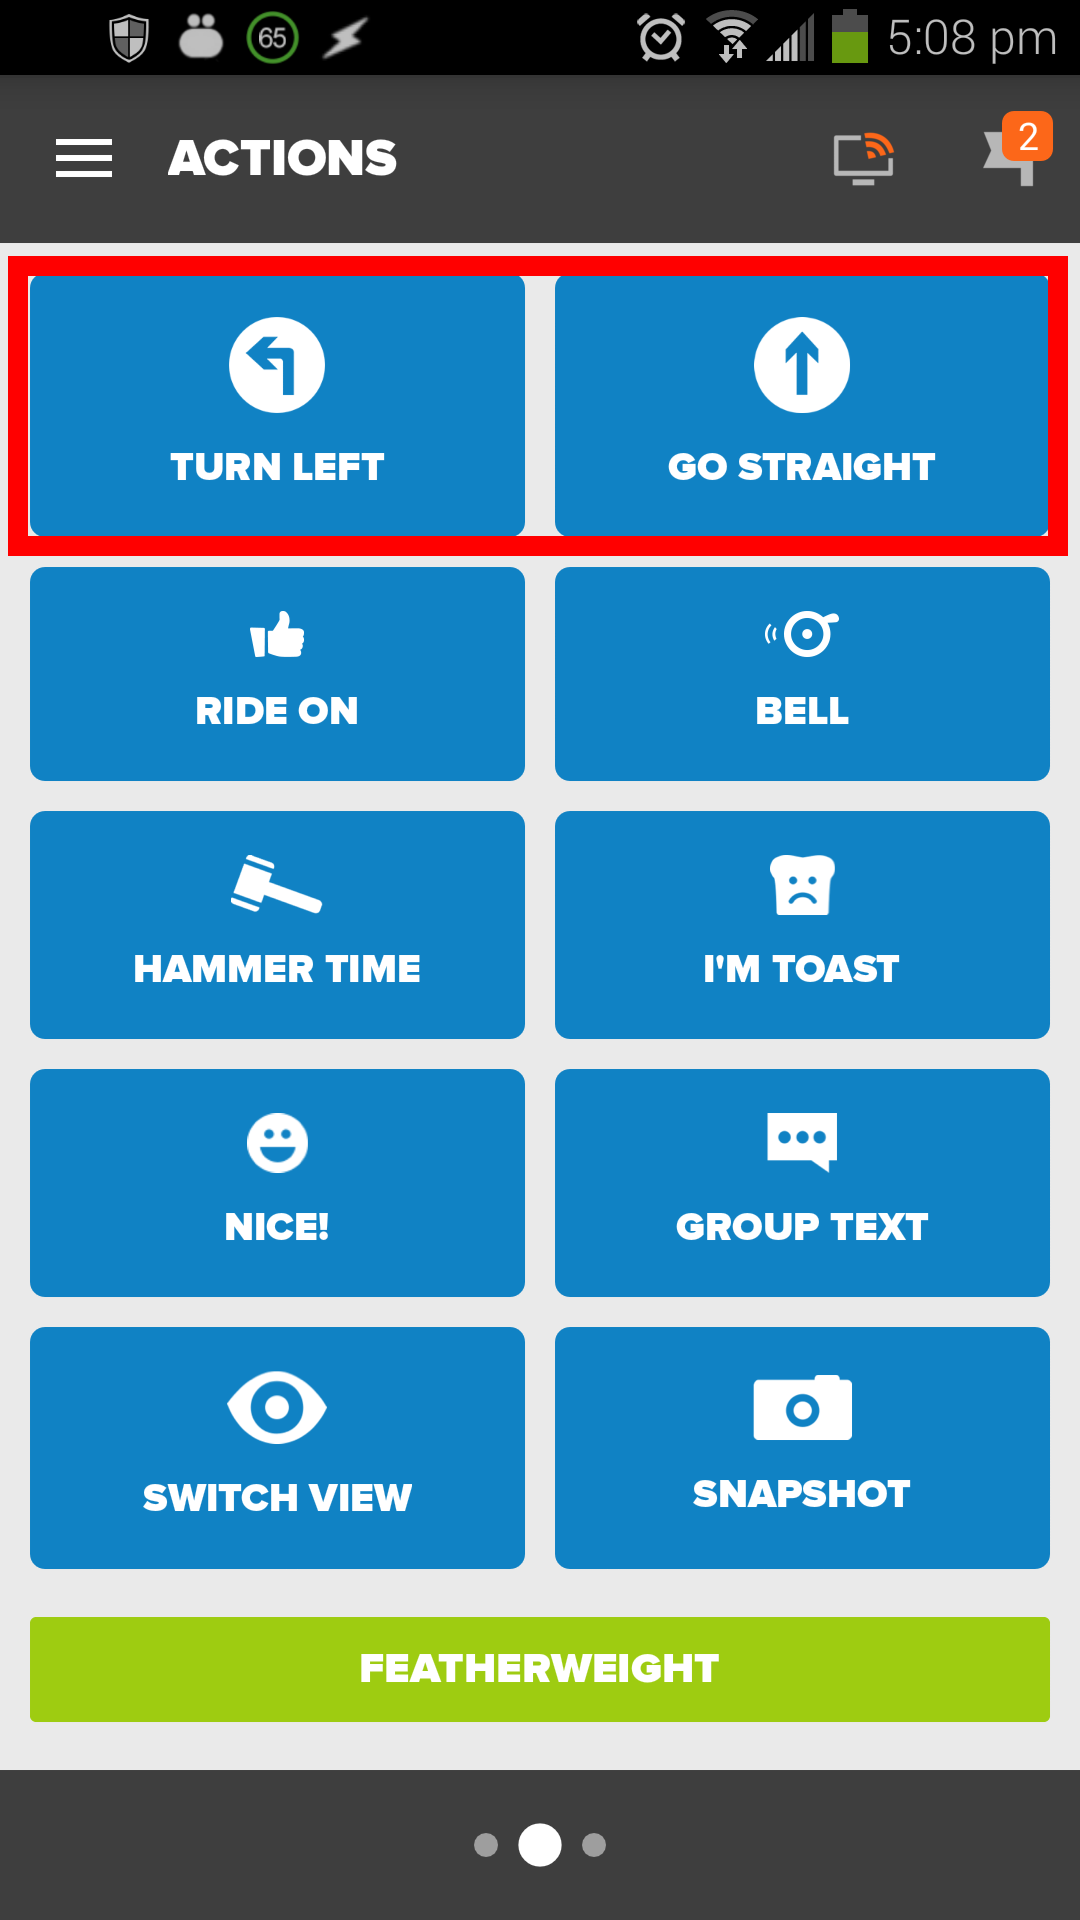
From the Zwift Application (during a ride)
You can also turn while riding in the Zwift desktop application, if you have a keyboard handy. When you're approaching an intersection, you'll see a blinking sign on the side of the road indicating the direction of the next turn. It will look something like this:
![]()
At the bottom of your screen (in all views), you'll see some new indicator icons, which will offer options for turning or maintaining the pre-selected route you chose at the drop-in screen..
When approaching an intersection, your in-game avatar will also change slightly to show some glowing arrows visible just under the rear of the saddle, indicating the default direction you will take if you don't use any keys on the keyboard to override that choice.
For example, if you picked the Hilly course ("Classic Watopia"), when you approach Ocean Boulevard's left-hand turn, your "butt-arrows" will show you going straight, but give you the option to hit the left-arrow key on your keyboard (or your mobile application's "Turn Left" button as above) to override that.
If you do nothing, you'll go straight. If you hit the left arrow key on your keyboard, you'll turn left onto Ocean Boulevard and ride that segment instead, as shown here
Simply leave the keyboard alone to continue to ride the pre-selected route, or override those turns by using your keyboard arrows or the "Turn Left" or "Turn Right" buttons on the Zwift Mobile Link app to move around the various turns on your route.
If you want to turn around, you can use the 'down' arrow on the keyboard. With the number of ways you can ride Watopia Island forward, reverse and now with the addition of the Ocean Boulevard waterfront option, you have a larger number of option to vary your ride.
TL;DR, Go straight to the video
Good luck, and have fun out there!
- 64967 views
I've reached Level 25 but my mileage bar has stopped moving. Is that normal?
I've reached Level 25 but my mileage bar has stopped moving. Is that normal? setuid Wed, 11/25/2015 - 23:42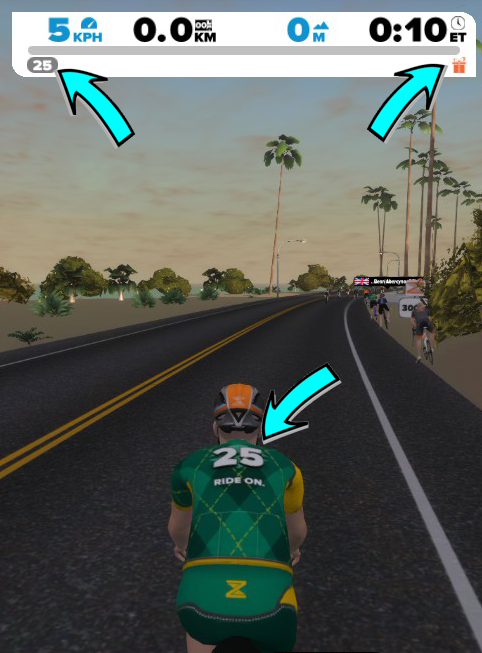
When you reach Level 25 in Zwift, you've reached the last and final level that Zwift currently supports (as of 04/2016).
There will most-likely be additional levels, achievements and jerseys added beyond Level 25, but for now, that's the last level, as the Zwift development team focuses on adding new features and capabilities to the product.
There's nothing wrong, nothing broken, and Zwift is still tracking your additional mileage towards your Mt. Everest, California and Italy Challenges, but it's just not showing up in your heads-up display (HUD) in Zwift.
Keep on riding!
(Credit goes to Mendelea Ma for the above screenshot)
- 49860 views
What do the letters/symbols beside rider's names mean?
What do the letters/symbols beside rider's names mean? setuid Sat, 11/21/2015 - 17:16While riding in-game, you may notice a number of different types of symbols or icons next to a rider's name in the Rider Listing on the right-side of your screen. Depending on the icon, these can mean different things.
Here's a quick summary with more detail, but read on below for the specifics:
![]()
- Country Flags
- Zwift Staff and Employees
- Zwift Professional Riders and Racers
- The "Cone of Shame"
- Rider in Workout Mode
- Rider connected to Zwift Mobile Link
- Rider connected to Strava Premium
- Rider using a Power Meter
Country Flags
Riders in Zwift come from all parts of the world, from different ethnic and cultural backgrounds and countries.
When they create their Zwift account, they can identify where they're from and in-game that will be represented by a mini-flag next to their name. Each rider's name will have their own unique country icon showcasing their place of origin.
Except if your Klingon (not yap wa' Hol)
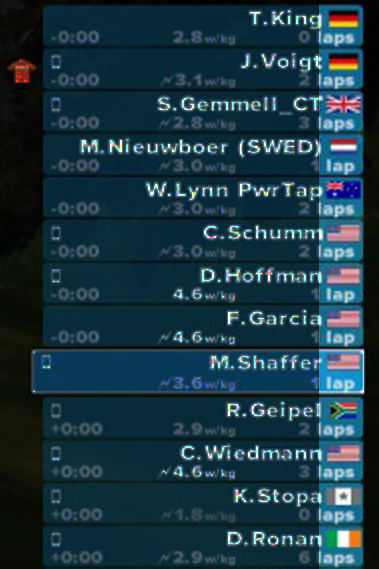
Zwift Staff and Employees
Often you'll see a slightly different icon next to a rider's name on the left side, which looks like a little orange 'Z'. This is unique and custom for Zwift HQ employees such as Eric Min, Jonathan Mayfield, G.Master or any number of staffers.
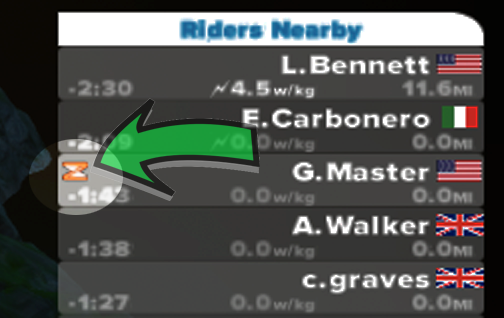
Zwift Professional Riders and Racers
There's also a slightly different flag/jersey present when there are "Pro" or publically recognized riders on the course. You'll often see this for Ted King, Jens Voight or any riders on Pro teams.
Ted King, now retired, is one of the honorary Zwift Embassadors. He's often found leading rides on Zwift for other groups and events. Don't forget to visit Ted's new venture, "Untapped", a company that makes gels and energy bars from 100% natural Maple Syrup.
![]()
Edvald Boasson Hagen, a current Pro rider is sometimes on Zwift doing workouts or training. Don't try to chase him down, he's fast!
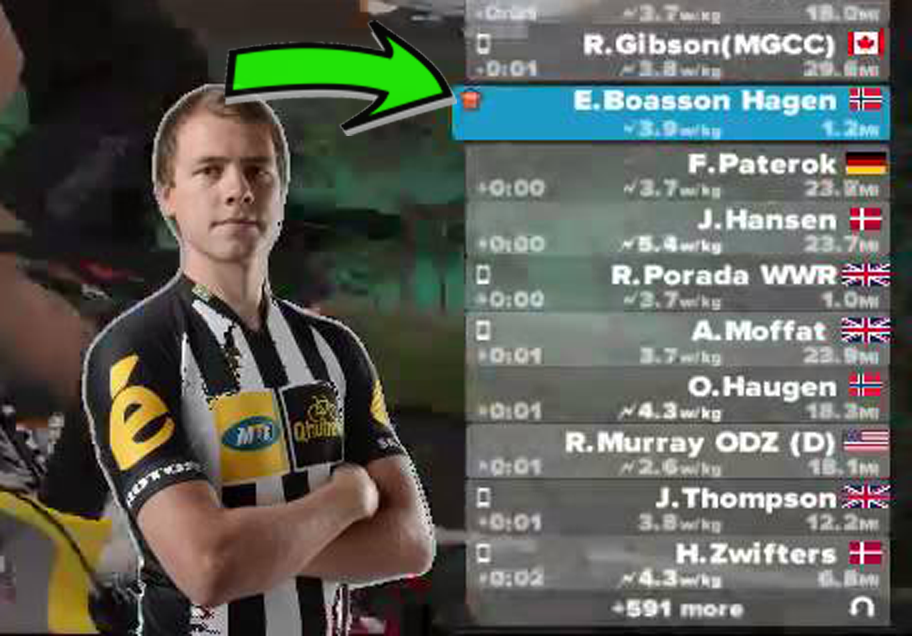
The Cone of Shame
Any rider who is "flying" or riding excessively fast, or is flagged for any reason, gets the "Cone of Shame". like Doug in the movie Up, but this one is more penalizing.
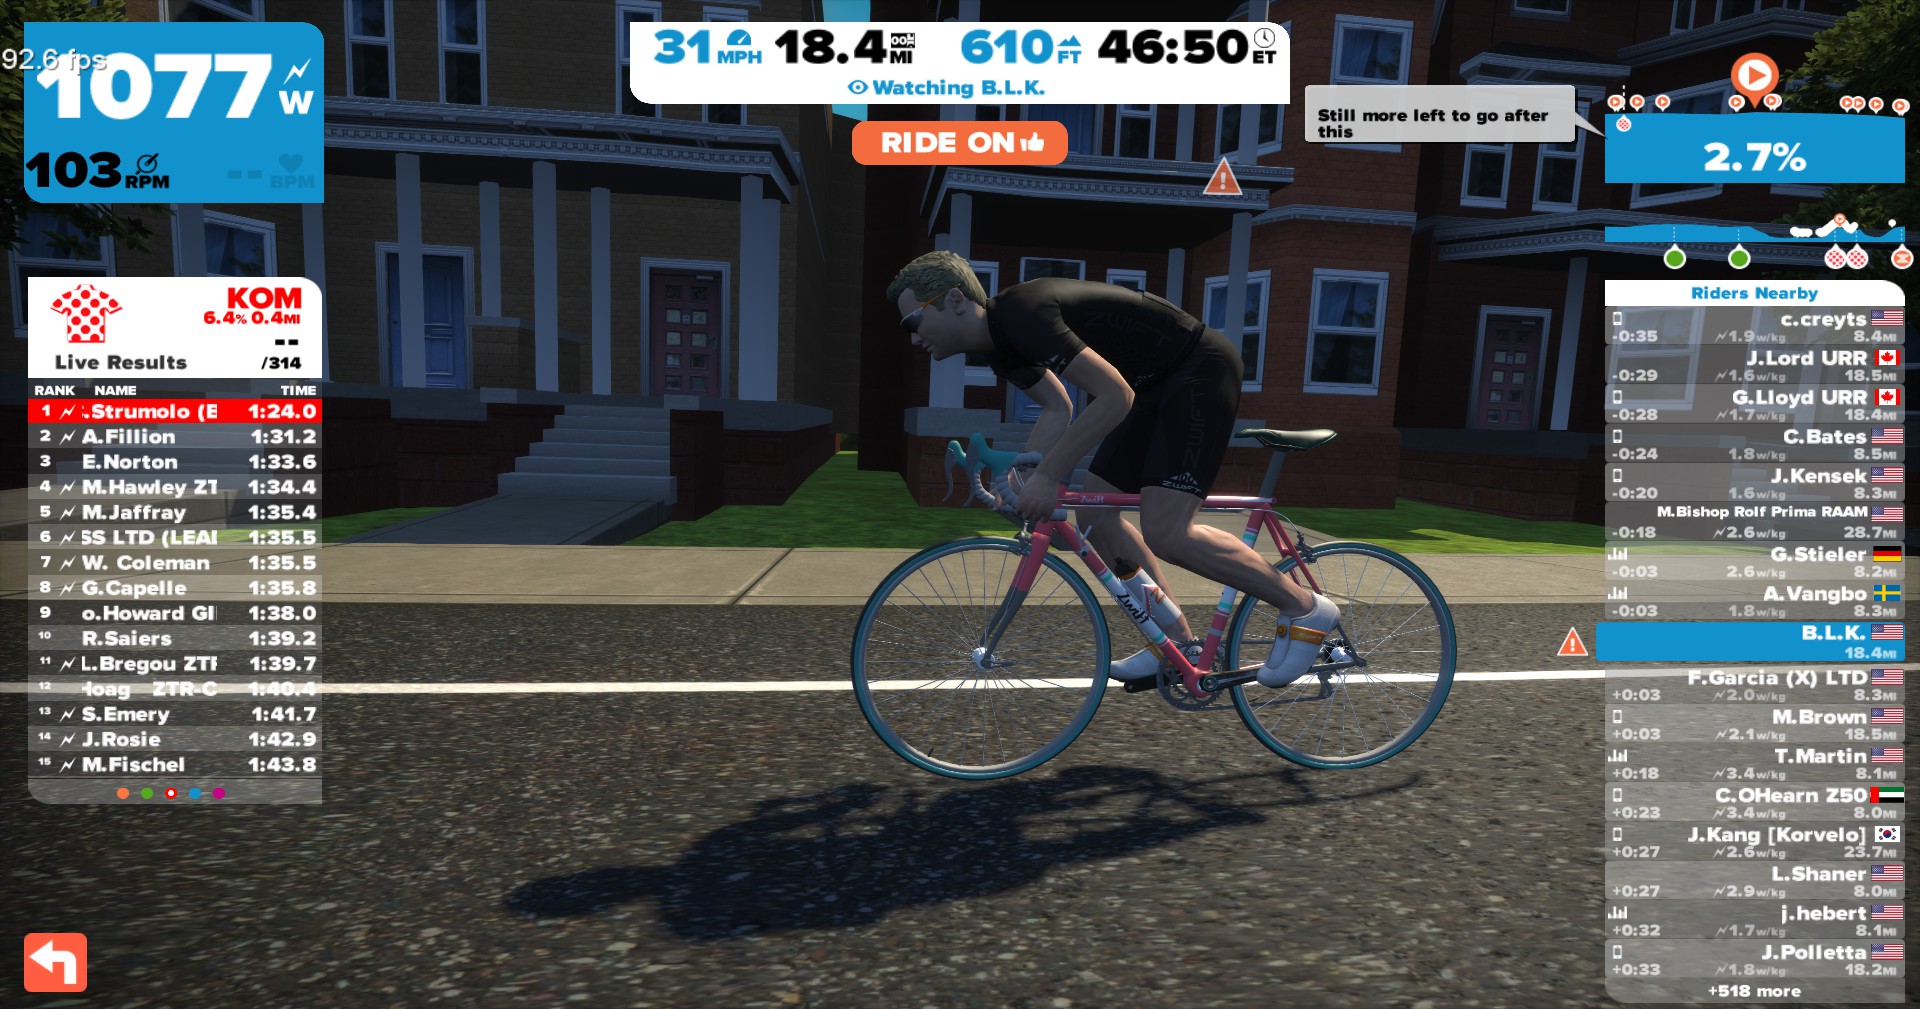
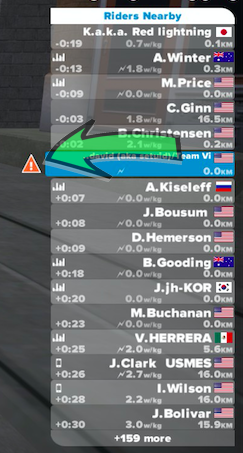
If you get this flag, you won't be able to win any KOMs or PRs, and you won't have your time counted towards any jerseys in those segments. If you get the Cone of Shame, you'll also get a warning on your screen to correct your setup:
Rider in Workout Mode
Many riders also ride in "Workout Mode" in Zwift, and you'll see that they're in that mode by the little 'meters' icon next to their name:
Riders connected to Zwift Mobile Link
When a Zwift Rider connects their mobile device to the Zwift desktop application, an icon that looks like a phone/tablet will appear next to their name indicating that they're using their mobile device and Action Buttons to control Zwift "remotely":
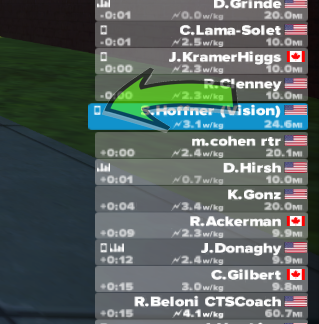
Rider connected to Strava Premium
Some users have chosen to connect their accounts to their "Strava Premium" accounts to sync, share, display and compare their data with others.
Connecting your Zwift account to Strava also grants you a free 2 months (60 days) of Zwift, each year when you keep your Strava account renewed and current.
Sadly, the promotion for 2 free months of Zwift when you connect to Strava Premium, has ended on December 31, 2016.
When you're near or passing riders who have their accounts connected to Strava, you'll see a Strava icon in their nameplate over their name that looks like this:
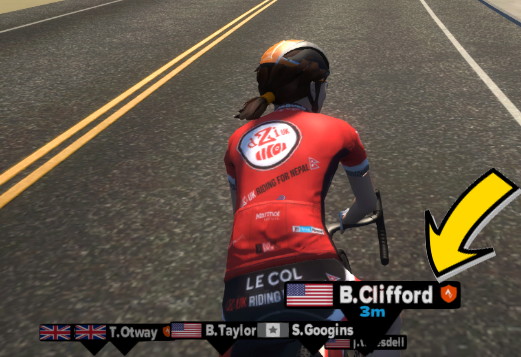
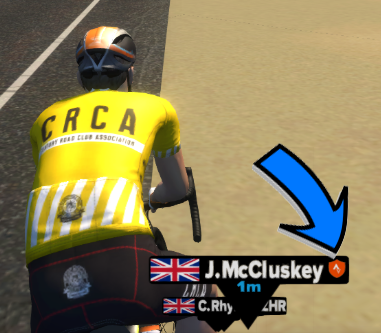
If you see them on course, give them a RideOn and show your support!
Rider with a Power Meter
You may also notice that some riders have a little lightning bolt next to their usernames in Zwift, to the left of their power output values. This lightning bolt indicates that the user is connected to Zwift with a power meter or a smart trainer that transmits their power directly to Zwift.
If you see a user without this lightning bolt next to their name, this means they're using zPower, or an estimated power value, usually indicating they are not using a power meter, and/or are using a "dumb" trainer that cannot be programmatically controlled by the PC or Zwift.
Those are all the flags and icons that you'll see in the Rider List. Hopefully this helps you determine who is riding, how they're connected and what devices they're using while they're riding.
Good luck and have fun out there!
- 321326 views
What do these power-ups in Zwift mean? A burrito?
What do these power-ups in Zwift mean? A burrito? setuid Tue, 04/21/2015 - 08:39Zwift is a massive, multiplayer, online fitness game/experience (MMOFG, or MMOFE) and that means it has achievements you can gain by riding, as well as through reaching milestones in-game. Some of these achievements will give you a boost or slow your 'opponents' down, so you can beat them to the line.
When you're riding and pass through the various arches on the courses, you'll hear a unique 'roulette' sound that indicates Zwift is randomizing through the various power-ups to select one for you.
The current Power-Ups available as earned achievements in Zwift are:
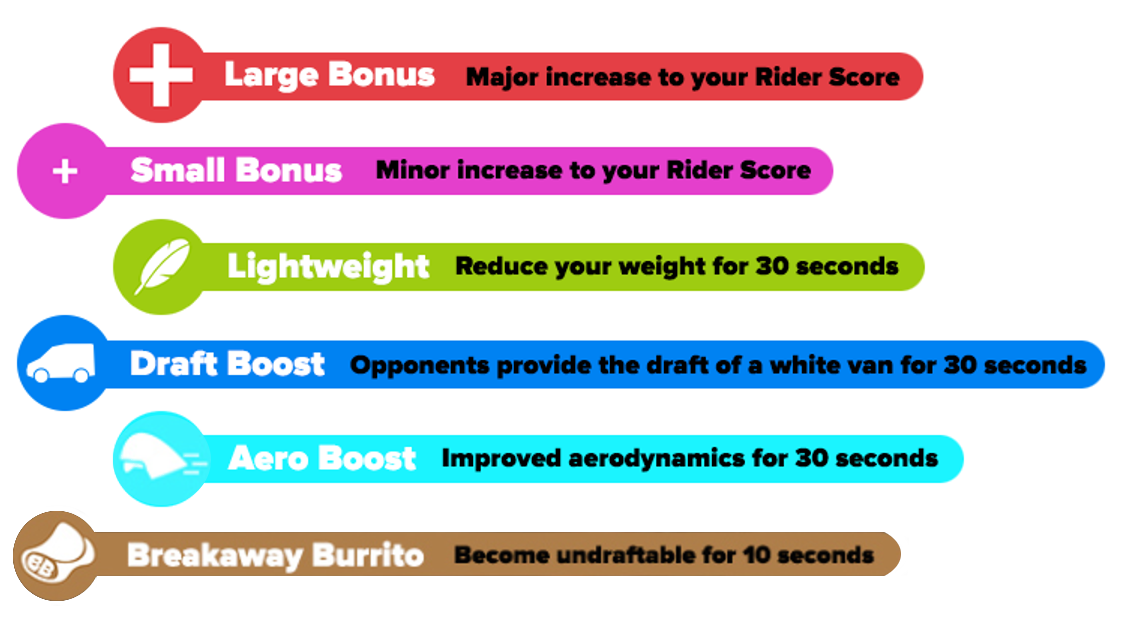
- Large Bonus
- If you get the "Large Bonus" power-up, you'll earn 250 XP, which is the same as you'd earn for riding about 8 miles of road in-game.
- It's a great way to leap forward to earning some new bikes or other kit without having to ride all of the miles that others ride to achieve them.
- Small Bonus
- The "Small Bonus" is similar to the "Large Bonus", except you only get a +10 XP gain. This is the equivalent of riding about 1/3 of a mile on any of the courses.
- Lightweight
- Using the "Lightweight" power-up will visibly 'narrow' your avatar in-game, changing your frontal profile and reduces your weight by 15 pounds for 15 seconds of riding time.
- This can be a great power-up to use when sprinting up a hill for example when that extra weight matters most, where others without the power-up have to slog their entire weight up the hill for the same duration.
- Draft Boost (moving truck)
- If you're already in the draft of another rider, this will magnify the effects of that draft by 50% for the duration of the power up (30 seconds).
- It is timed, so use carefully! Remember too, the rider you're drafting (the "front" rider) also receives a slight draft benefit when you're behind them drafting.
- Aero Boost (TT helmet)
- This used to be a 'jet', but was changed to the TT helmet to reduce confusion.
- This power-up will make you more aerodynamic, which has the effect of basically reducing your CdA by 25% for the duration of the power-up. If you use the "Aero Boost" power-up, it just means you'd have the aerodynamics of a rider in the drops with his elbows bent for 30 seconds or so.
- This is mostly useful for unlocking some of the high speed achievements on the big descents in Zwift. You could plan a Peter Sagan style full-tuck escape from the peloton with it, for example.
- The best time to use the "Aero Boost" power-up is when you're going as fast as you can down a hill, so you're maximzing your aerodynamic efficiency, and then layer in the 25% boost on top of that.
- CyclingPowerLab has a great article describing the science behind CdA and why it matters.
- Breakaway Burrito (deprecated on 2015-03-12)
- The Burrito power-up was designed to shake a drafting opponent/opponents from behind you as it makes you completely undraftable (much like the TT bikes are today), but most riders who recieved it would just burn it in order to get rid of it quickly, rather than tactically use it to their advantage.
- It is rumored that it may make its appearance again in power-up enabled race events and it's a good way to drop an opponent at a key time, but as Jon Mayfield says: "I wouldn't hold my breath...", so to speak.
Power-ups do come with some rules, however. If you receive a power-up through one arch and don't use it when you pass through the next arch, you won't receive a new one. You'll continue to hold onto the power-up you already have for the duration of your ride, or until you use it.
- 5438 views
What does "FTP" mean and how can I use it on Zwift?
What does "FTP" mean and how can I use it on Zwift? setuid Sat, 11/25/2017 - 23:06The term 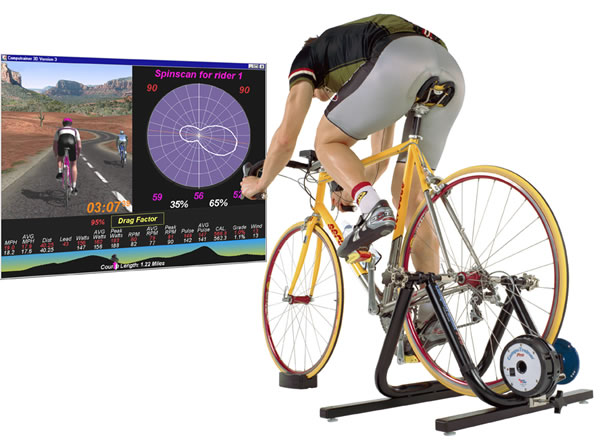 FTP, which stands for "Functional Threshold Power" and represents your ability to reach and hold the highest possible power output over 20, 45 and up to 60 minutes (depending on the test).
Your results will vary depending on whether you're a trained athlete or just a recreational cyclist.
Your FTP value is calculated by taking 95% of the 20 minute average power and using that to determine your FTP.
The FTP value is the best way to compare your results to that of others who ride or race. It's hard to determine the fit-ness of a rider based solely on their age, weight or wattage output. The FTP value is the best way to determine the overall fit and performance capabilities of any given rider.
To see or edit your FTP, click the little pencil-shaped icon next to your username on the Settings screen:
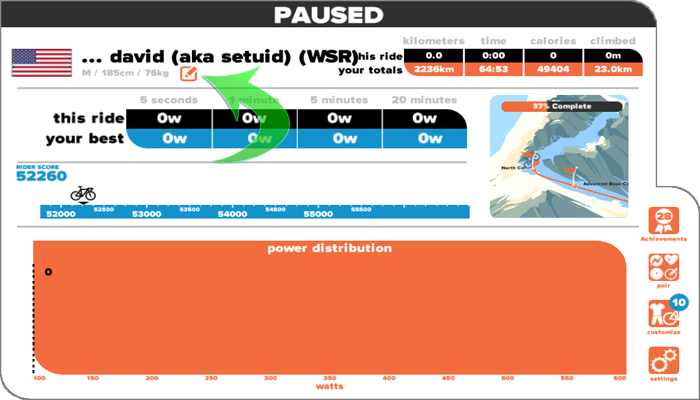
Your FTP is stored within your individual Settings, which you can see and access on the "User Profile" screen, which is accessed from within the "Pause" screen.
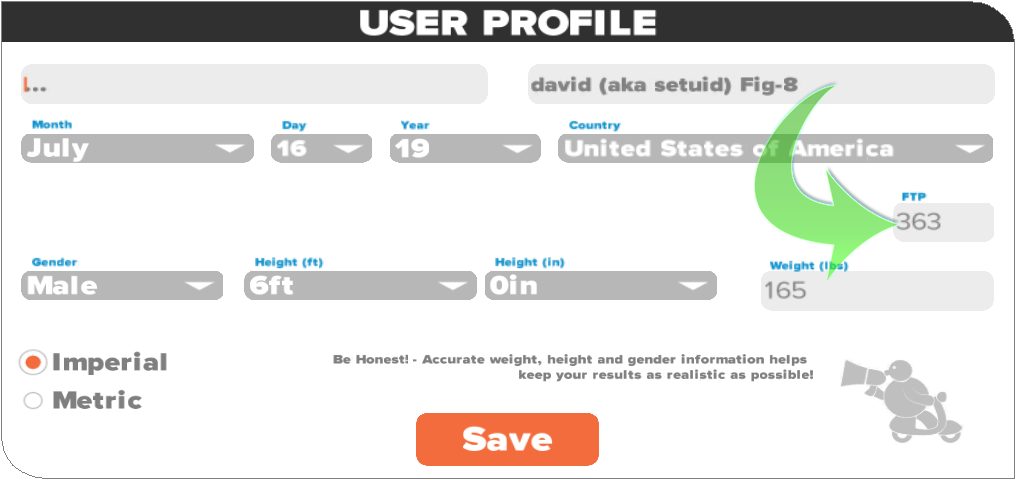
As you ride, Zwift will update your FTP as it increases but will not lower your FTP if your future rides result in a lower FTP value.
If you want to track and change your FTP to any values other than what Zwift inserts, you have to change it yourself using the above User Profile screen.
Another Zwift Elder, Jonathan Pait has done a great video breakdown of the 1-hour FTP workout in Zwift. I strongly suggest you watch it (it's only 20m long) to get a better idea of how the FTP test works and how it can benefit your training regimen.
- 84288 views
What is that odd grey flag in the Rider List?
What is that odd grey flag in the Rider List? setuid Sat, 11/25/2017 - 23:03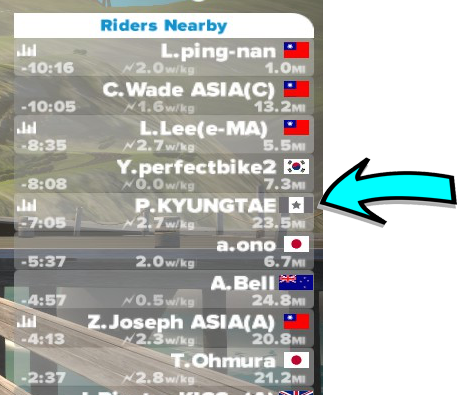
You've probably seen it in the Rider List before, and wondered: "What country is that? I don't recognize that flag..."
Well, you're right. It's not a flag of any recognized country at all, at least not in our real world. This flag is shown when someone has set up their profile but has not selected any country, or has chosen a country for which Zwift has no custom, in-game flag to display for their name.
Think of it like the "Acme, Inc." representation of a country that Zwift hasn't seen yet. Or maybe it's just the secret flag of Watopia! You get to decide.
Zwift has done a great job covering almost all of the countries and flags of its represented membership, but there may be some countries that have riders, without a flag to fly for them.
If you are from one of these countries, just send Zwift Support an email and ask them to create a flag for you, for your country.
If you see another nearby rider flying the flag-of-no-country, send them a #RideOn anyway. That's the universal flag that all Zwift'ers fly that says you speak their language.
- 39180 views
What types of setups does Zwift support?
What types of setups does Zwift support? setuid Sat, 11/25/2017 - 23:02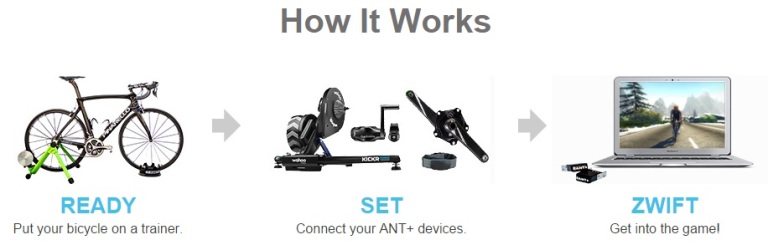
There are three (3) basic setups that Zwift supports, depending on your budget, equipment and expertise.
-
"Immersive" (Premium) setup: This setup is best used with a smart trainer that uses variable resistance. Your smart trainer will measure your power, speed and provide realistic resistance and can be controlled by Zwift itself.
-
"Flexible" setup: A manual or "dumb" trainer such as a fluid trainer or rollers, is paired up with a power meter on your bike. Zwift reads the power directly from your power meter but provides no resistance feedback to your trainer. This means your virtual rider or "avatar" in-game, will be climbing hills with a great amount of effort, since there is no direct feedback.
-
"Basic" setup: A manual trainer is paired with a speed sensor attached to your rear wheel or hub. Zwift uses the calculated size of your wheels and the reading from the speed sensor to estimate your power in watts. This is the setup you would use if you were just getting into Zwift or had a tight budget. There is no force feedback so your avatar's performance may not match your real world effort.
Feel free to choose the best one that fits your needs, and the space you intend to use it within!
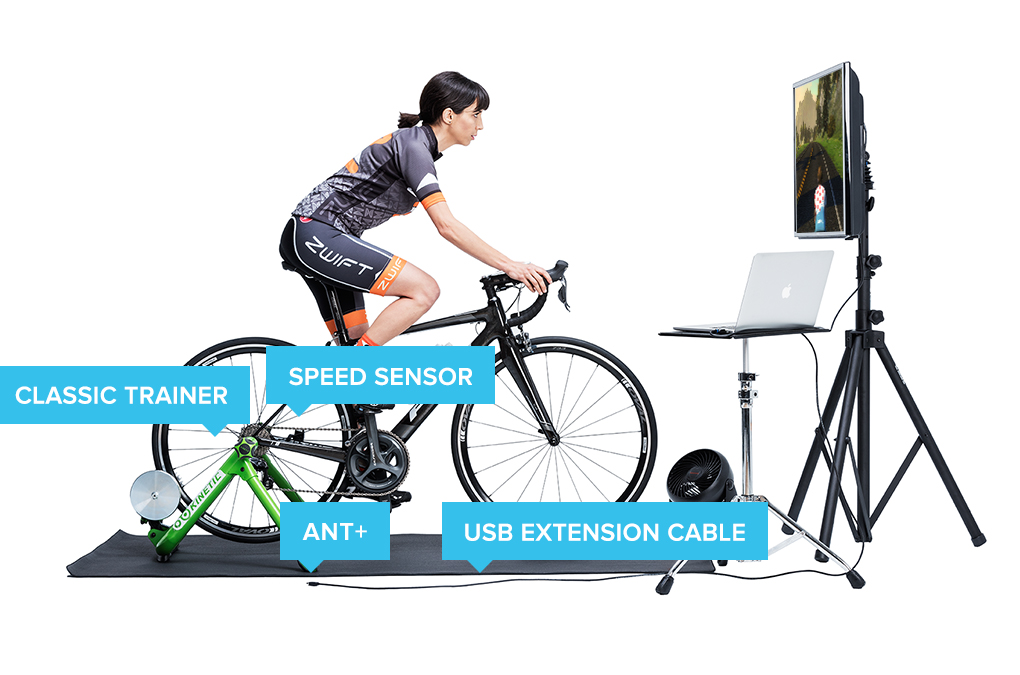
#RideOn!
- 1536 views
Why am I riding alone on the course, but I can see chat from other riders?
Why am I riding alone on the course, but I can see chat from other riders? setuid Sat, 11/25/2017 - 22:58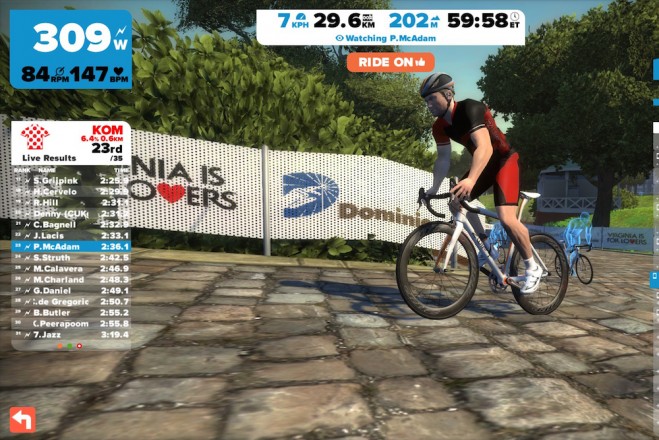 A few riders have reported that when they launch Zwift, they seem to be either alone on the course, or on the wrong course (Richmond on a Watopia day or vice versa) when they ride.
There are a few things to check to make sure your Zwift settings and version are correct and current:
- Check your Zwift version: Make sure you're running the latest stable version of the Zwift desktop application. You can check this by visiting the Zwift support site and look at the recent release notes for the version of the latest release of Zwift. As I type this KB article, that is 1.0.9609. I can see that by going to the "What's New" section of the support site and then searching for the most-recent release article.
Then, on your desktop or laptop, right-click the ZwiftLauncher in the System Tray (on Windows) or go to "Get Info" on the .app (on Mac) to find the version. If your version is not the latest version, proceed to Step 2 below.
- Clean Reinstall: To do a completely clean reinstall of Zwift, use these steps:
- First, use your operating system's method of uninstalling an application. In Windows, that's under the "Add Remove Programs" option in the Control Panel. On Mac, simply dragging the Zwift application from the "Applications" folder to the Trash and then emptying the trash (Cmd+Shift+Delete) is enough to uninstall it.
- Now you'll still have two directories left behind that need to be moved out of the way or removed entirely if you don't care to keep the data around. Move \Downloads\Zwift and \Documents\Zwift out of the way by renaming them to some other name.
- Download a fresh, clean copy of the ZwiftSetup from the main Zwift website. For Windows, use this link. For Mac, use this link. Even if you have an installer already downloaded from a few days ago or even last week or older, don't use it; download a fresh copy of the installer and install clean from that version.
- Now install Zwift as you would normally on your machine. Launching Zwift after the installer has finshed its setup and update should give you the latest verison + auto-update enabled and you'll be riding on the correct course at the correct time.
- PC Clock Time: If your PC clock is off by hours or days, you could be riding on the wrong course because your PC thinks you're on Wednesday instead of Thursday for example. Check your clock for any clock skew. If you want to fix this permanently, see: HOWTO: Correct and avoid clock skew on Windows and OS X platforms (written by David A. Desrosiers)
Hopefully that solves your problem with showing up on the wrong course or riding solo when you intended to ride with others.
However, if you did want to ride solo or alone, or choose a different course to ride, see the following KB articles:
- 52068 views
Why do my Zwift miles get ignored with Strava challenges?
Why do my Zwift miles get ignored with Strava challenges? setuid Sat, 11/25/2017 - 22:57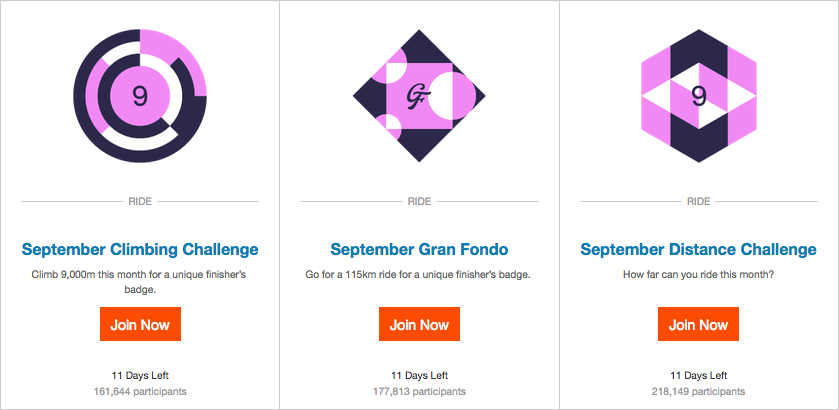
When you join a riding challenge on Strava, it assumes you're going to be riding those miles in the real world, and booking those captured miles against that challenge.
Before the Zwift team worked with the Strava team to provide direct upload integration, every Zwfit mile previously counted towards those challenges. After the direct integration, they no longer do. And that's intentional.
When you upload a ride from Zwift to Strava using the direct interface in Zwift itself (by connecting Zwift directly to Strava), Zwift will send your activity to Strava via their API, as a "Virtual Ride", which Strava treats very differently from a "Ride", in their system.
Virtual miles only count towards virtual challenges, while "real" miles count towards real challenges.
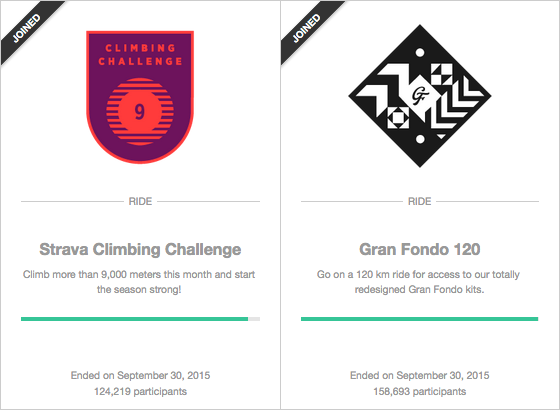
There's been much debate about this in the online cycling community, because the amount of effort, work, calories expended is the same, or more while riding indoors, but Strava does not agree.
However... there is a way to achive what you want!
Note: These methods below may work for you, but many other riders putting real-world miles towards the challenges do consider this cheating, and may flag or report your ride as prohibited. If they do, you'll lose those miles towards that challenge.
YMMV, quite literally in this case.
If you want to have your miles count towards your actual Strava challenges, there are a few methods, some of which are not really the fairest to others who are riding real miles outdoors while you ride indoors, but they are possible:
- Upload your Activity Manually
- Upload from your Bicycle Computer
- Modify your Activity File with FitFileTools
Upload your Activity Manually
Disconnect your Zwift account from Strava (reverse of the connecting steps), so all you have is Zwift storing its own activities in your Zwift activities folder, and on their website.
From here, ride as you normally would, and Zwift will store the data in the activity folder. You can then go into that folder, and upload that ride manually to Strava, using the "Upload Activity" option in the upper-right of the Strava interface, as shown here:
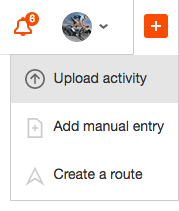
When you create this ride and fill out the ride data, simply select "Ride" as the Activity Type from the dropdown, and not "Virtual Ride", and Strava will mark it accordingly, and count your miles towards those real challenges.
Upload from your Bicycle Computer
Disconnect Zwift from Strava as above, and ride normally on Zwift, but this time, also capture your ride data from your handlebar-mounted bicycle computer as well as within Zwift. When you're done riding, Zwift will have its own copy of your ride data, and your bike computer will have its own representation of that data.
In the case of a Garmin or Sigma bike computer for example, you would export your ride from the bike computer in TCX or GPX file format, and upload that to Strava as a "file" (vs. creating a "Manual Activity" above).
Note: This will only work for distance-based challenges, not climbing challenges!
Your bicycle computer will not be able to reflect any climbing you've done in-game, because to your bike computer, you've been riding a dead-flat course for the entire duration.
It will also not be able to plot a map for that ride, since you've been standing still, and your mileage may differ, because your bicycle computer has no idea that you've been going up and down hills or riding a virtual course in-game, vs. on the real road.
Modify your Activity File with FitFileTools
As above, disconnect Zwift from Strava, and allow Zwift to capture your full ride. When complete, pull the ride from your activities folder, or download it directly from Zwift. You will get a .fit file that includes your ride data.
Take that .fit file over to FitFileTools, and use the "Field Stripper" option or the "Device Changer" option to manipulate your .fit file as needed to simulate a "real" ride, then upload that modified .fit file manually to Strava.
These should get you what you want, but remember: many other riders will consider this cheating and may flag your activities as invalid, removing your miles from the challenge counts.
There are other tickets to both Zwift and Strava requesting support for "virtual challenges", so those riding indoors can have their own exclusive challenges, and can bank miles against them. It will eventually happen... we just have to be patient.
Until then, these should work for you. Good luck!
- 66543 views
Why doesn't my 'E' key work to begin a workout in Zwift?
Why doesn't my 'E' key work to begin a workout in Zwift? setuid Sat, 11/21/2015 - 17:11
You may find that sometimes you try to start a workout by using the standard 'E' key on your keyboard, but it doesn't seem to work.
What?! Why? It's always worked before!
But wait, don't leave just yet! #RageStay
Barring all of the first-level troubleshooting steps:
- Did your keyboard's cable become detached from the PC's USB port?
- Did your batteries run low on your wireless keyboard?
- Did you perspire on the keyboard so much it has just stopped working?
- Are you running something like AutoHotKey that steals the 'e' key away for another purpose or shortcut?
If you've verified all of those things, there's just one more:
Once you've joined an official Zwift event in-game, the 'E' workout menu shortcut key is disabled, so you will be unable to join a workout while actively participating in that event. You'll need to quit the event first using the "Quit Event" button in the lower-left corner, before beginning your workout.
If you think about it, you wouldn't want to be actively in a workout while you're in a ride event, because your efforts at each segment of your event would not be achieved, as you struggle to maintain position in the pack of your ride or race.
- 2866 views
Zwift on iOS (ZiOS)
Zwift on iOS (ZiOS) setuid Sat, 11/21/2015 - 17:02- 5433 views
How do I connect my ANT+ to Zwift on iPhone/iPad
How do I connect my ANT+ to Zwift on iPhone/iPad setuid Wed, 11/22/2017 - 11:40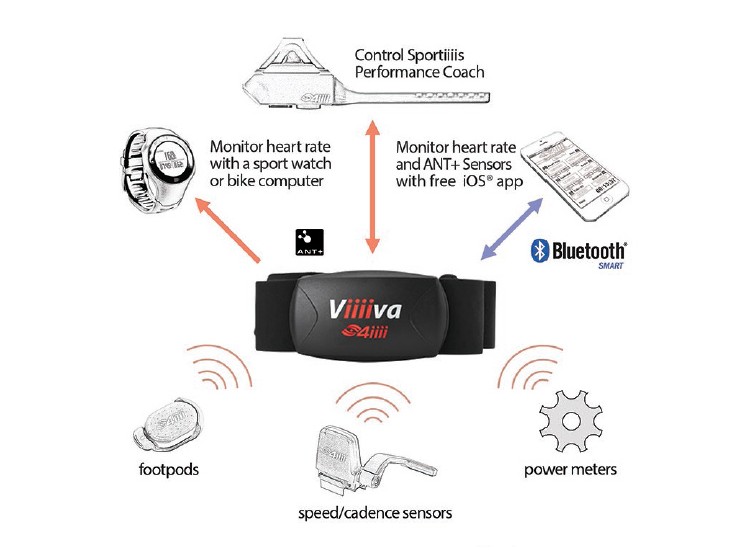
(draft, pending Zwift on iOS screenshots to illustrate detailed pairing options)
As of September 2016, the Zwift virtual cycling application was announced to be available on iOS, for early-adopter beta testers. As of the publish date of this KB article, there are a limited number of slots to sign up, but get your name in early, so you can be a part of it!
That being said, Zwift running natively on the iPhone and iPad brings with it some minor challenges for those riders who were previously running Zwift on their desktop PC or Mac machines, namely the lack of support in iOS for the ANT+ protocol; the predominant protocol used by fitness applications and sensors to communicate your ride data back to your PC.
But have no fear! There are solutions to fix this!
- Supported Devices for Zwift
- Which ANT+ Bridge Do I Need?
- Pairing your ANT+ Devices
- Configuring Zwift on iOS
Supported iOS Devices for Zwift
There's one caveat: You have to have a supported iOS device to run Zwift on iOS. It won't run on an iPhone 3 or an iPhone 5 for example. Here's a breakdown of the minimum devices needed to support Zwift (requires a 64-bit A7 or newer processor). Supported IOS device list:
- iPhone 7/7 Plus
- iPhone 6/6 Plus/6s/6s Plus
- iPhone SE
- iPhone 5S
- iPad Air (v1 and v2)
- iPad Pro (9.7" and 12.9" models)
- iPad mini (v2, 3 and 4, including Retina models)
- iPod Touch (6th Gen)
If your iOS device is not shown here, it is not supported at this time.
Which ANT+ Bridge Do I Need?
Many cycling power meters, including the one I use (a Specialized Quarq), supports broadcasting its power data over ANT+ only, no support for Bluetooth Low Energy (also known as BLE or BTLE). So if I were to use Zwift on iOS, I need a way for the application on the iPad, to be able to receive the data from my ANT+ power meter.
Enter the "ANT+ Bridge" revolution!
There are a few devices out there (more are coming!) that will receive your ride data via the ANT+ protocol from your Smart Trainer or Power Meter/sensors, peel back the ANT+ layers and rewrap that data in the BLE protocol to send to the listening Zwift application running on your iPad or iPhone.
To get that running, head over to your favorite fitness retailer (or the defacto, Amazon) and search for the Viiiiva V100 (that's 4 'eyes') heart rate monitor.

Here's a direct link (don't worry, no affiliate links)
https://www.amazon.com/4iiii-Innovations-V100-viiiiva-Monitor/dp/B00BHZQ6OG
Pairing your ANT+ Devices
This HRM will allow you to pair your ANT+ with the HRM via the mobile app, then it will convert that data to BLE format and send it upstream to Zwift, which is paired to your V100 HRM.
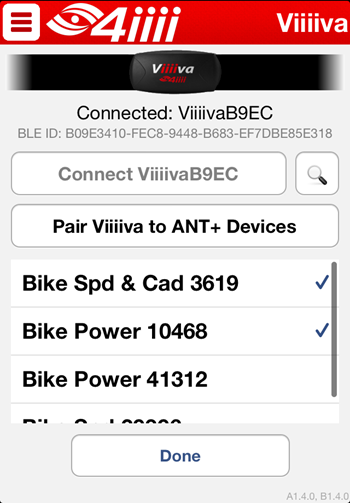
Easey-peasey, right?
You don't even have to use the V100 as an HRM if you wish to use another HRM. Just tap the contacts to "activate" (turn on) the V100, then toss it in your jersey pocket or cycling bag, and continue on your ride as you normally would with your standard HRM (which can be BLE paired to your cycling computer on your bike, or ANT+ paired to the V100 HRM itself).
The only limitation here, is that you can't pair both the V100 HRM and an ANT+ HRM to Zwift, that won't work (unless you're a Klingon, with an 8-chambered heart).
Once your V100 is paired up with Zwift running on the iPad, and your V100 is paired up with your bike or trainer's ANT+ sensors, you're good to go! Zwift will receive the data from the V100 as if all of your equipment was independently speaking BLE.
There is another product called "CABLE" (Connect ANT+ to BLE) from NPE Engineering (makers of the "WASP" ANT+ to WiFi bridge) that will allow you to connect ANT+ devices to BLE.
http://store.npe-inc.com/cable-connect-ant-to-ble/

I have no personal experience with this product, so can't comment on its capability, but I'll get one and backfill this KB article with those details.
Exciting times for Zwift! More to come...
- 498827 views
How do the iPhone and iPad differ when using Zwift?
How do the iPhone and iPad differ when using Zwift? setuid Sat, 11/21/2015 - 17:38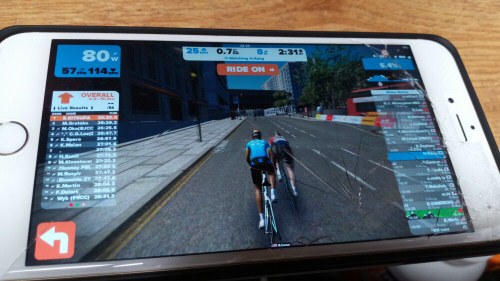
On December 10th of 2016, Zwift released a native version of Zwift for the Apple iOS platform. This adds a new platform to the Zwift ecosystem in addition to the previous PC and Mac platforms. This comes after a healthy beta period filled with many long-time Zwift users.
You can download Zwift for iOS (ZiOS) from iTunes directly, to begin using it on your Apple device. Zwift supports the following iOS devices below. Please note that you need to have a device capable of running iOS 9.0 or later, to start using Zwift.
- iPhone 5s (uses the Apple A7 SoC)
- iPhone 6, iPhone 6 Plus (using the Apple A8 SoC)
- iPhone 6s, iPhone 6s Plus
- iPhone SE (uses the Apple A9 SoC)
- iPhone 7, iPhone 7 Plus (uses the Apple A10 SoC)
- iPad Air, iPad Air Wi-Fi (plus cellular)
- iPad mini 2, iPad mini 2 Wi-Fi (plus cellular)
- iPad Air 2, iPad Air 2 Wi-Fi (plus cellular)
- iPad mini 3, iPad mini 3 Wi-Fi (plus cellular)
- iPad mini 4, iPad mini 4 Wi-Fi (plus cellular)
- 12.9-inch iPad Pro, 12.9-inch iPad Pro Wi-Fi (plus cellular)
- 9.7-inch iPad Pro, 9.7-inch iPad Pro Wi-Fi (plus cellular)
- ...and iPod touch (6th generation)
These Apple devices each include various chipsets, from the Apple A7 through Apple A9 and newer. Each chipset has different capabilties and performance levels. In addition, each device supports different pixel densities and resolutions. You can find a list of those capabilities and resolutions online if you're interested in all the details.
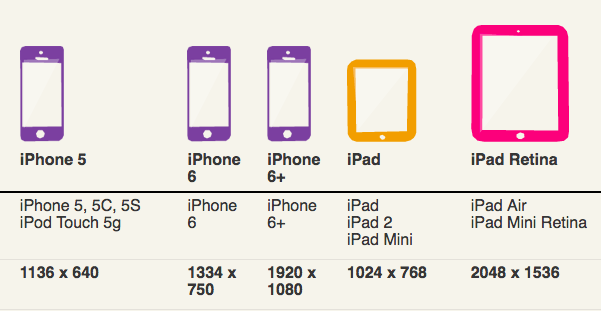
Zwift running on the iPad will support a 4:3 (standard) resolution, while Zwift on the iPhone will support 16:9 (widescreen) resolution.
If you want the best, richest experience, make sure you're running the latest hardware and latest iOS version on that hardware. The newer devices will support 60fps (Frames per Second), while the older devices will only run Zwift in 30fps.
You can also connect your iOS device via its Lightning connector directly to an HDTV and get a bigger display to improve your Zwift experience. You can do that by connecting your device to your TV using a Lightning to HDMI or Lightning to VGA adapter. You can find these on Amazon as well as directly from your nearest Apple Store.
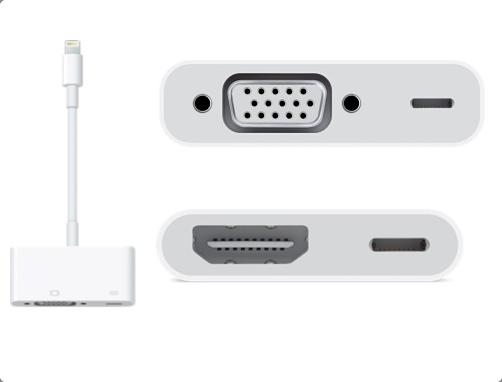
You can also "stream" (broadcast wirelessly) your Zwift experience from your mobile iOS device directly to your TV through Apple AirPlay. You would connect your iOS device to your AirPlay device, and then broadcast the game to your TV from there. Follow the Apple Documentation on how to set this up for your iOS device.
Good luck and #RideOn!
- 60472 views
My power went out. Can I still use Zwift?
My power went out. Can I still use Zwift? setuid Sat, 11/25/2017 - 23:09
Have you lost power? Is your house or pain cave in the dark? Don't despair! You can still ride on Zwift!
All you need are rollers or a manual ("dumb") trainer or a TacX Neo smart trainer. The rollers and manual trainer do not require any additional power other than your legs, and the TacX Neo can be operated without power, it just won't be able to provide the "road feel" or FE-C Zwift-controlled resistance for you.
And you'll need Zwift running on an iOS device that has a data connection, such as an iPhone or iPad connected via a hotspot through your phone.
Why the hotspot? Well, if you've lost power, you've probably lost your DSL/cable/landline Internet access as well.
Just fire up Zwift on iOS (ZiOS), pair it with your sensors and power meter if necessary, and start riding! You won't miss a workout, while your neighbors are struggling to find candles in the dark.
Many thanks go to Robert J. Morzek for idea to write this article
- 4379 views